
Your treadmill’s display shows “0%” no matter how many times you press the incline button. That frustrating flat-deck experience zaps calorie burn and muscle engagement—exactly when you need hill training most. Instead of settling for ineffective walks or expensive replacements, you can create a rock-solid 3-10% incline in under 60 minutes using basic materials. This guide reveals exactly how to safely lift the front end of any non-incline treadmill while avoiding warranty traps, frame damage, and dangerous instability. You’ll learn DIY wood block construction, critical safety checks, and pro-tested protocols that mimic motorized incline performance without touching electronics.
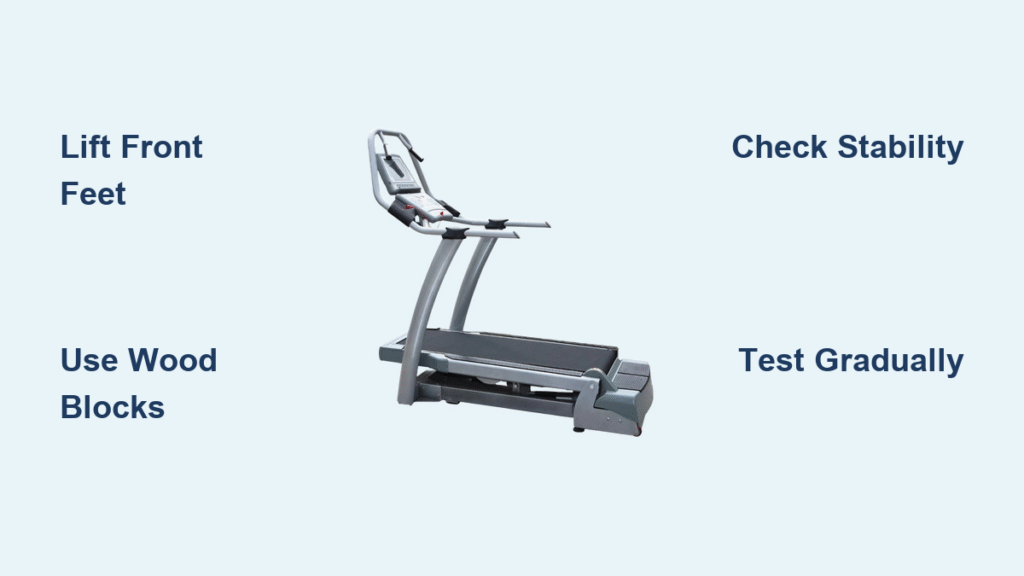
Create a Fixed Incline by Lifting Only the Front End
Raising just the treadmill’s front feet—while keeping rear feet grounded—forces the deck into a stable uphill angle. This physics trick works because treadmills are engineered with rear-mounted motors; lifting the front shifts your weight toward the drive system, preventing belt slippage. Most home models gain 3-4% grade per inch of lift, transforming flat walks into legitimate hill simulations. Never lift the rear end—this destabilizes the center of gravity, causing dangerous backward slides during use.
Why Front-Only Lifts Work on Any Treadmill
- Manual models: Factory lacks incline hardware, so blocks replace missing mechanisms safely.
- Dead-motor treadmills: Bypasses broken electronics while preserving belt-speed functions.
- Budget flat-deck units: Exploits inherent frame geometry—no modifications needed.
Critical Balance Rules You Must Follow
Position risers directly under both front feet only. Measure your treadmill’s front base width first—typically 24-30 inches—then cut blocks ½ inch wider for stability. If your floor slopes, place thin rubber shims under the lower side of blocks to prevent lateral drift. Exceeding 4.5 inches of total lift risks rear-foot separation, which twists the frame and voids safety certifications.
Select the Safest Riser Material for Your Treadmill
Purpose-Built Risers vs DIY Wood: Real-World Comparison
| Option | Cost | Max Height | Stability Rating | Best For |
|---|---|---|---|---|
| Treadmill-specific blocks | $25-$40 | 3″ | ★★★★★ | Warranty-conscious users |
| DIY kiln-dried 2×4 stacks | $8-$12 | 4.5″ | ★★★★☆ | Budget DIYers |
| Recycled rubber mats | $15-$20 | 1″ | ★★★☆☆ | Temporary solutions |
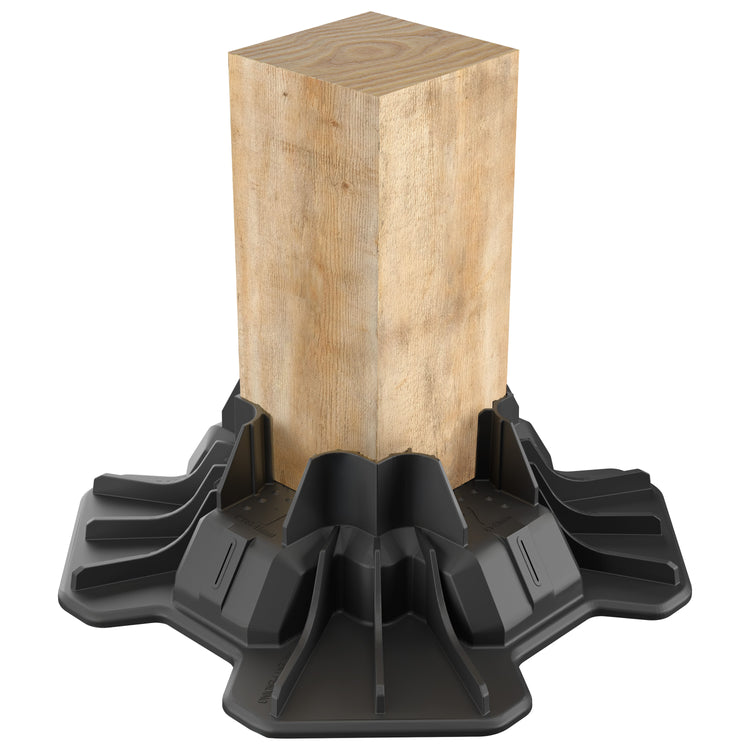
Build Unshakeable DIY Wood Blocks
Use only kiln-dried 2x4s or ¾-inch plywood—green lumber warps under load. Cut 12-inch segments at your hardware store (free cuts available). Assemble stacks with these non-negotiable steps:
1. Drill ⅛-inch pilot holes to prevent splitting.
2. Drive six 2½-inch deck screws in crisscross pattern per stack.
3. Sand all edges smooth; apply polyurethane for moisture resistance.
4. Verify width spans both front feet plus ½-inch overhang on each side.
Materials That Cause Catastrophic Failure
Never use bricks—their hard edges crack plastic treadmill feet. Avoid foam rollers—they compress mid-workout, creating sudden wobble. Skip particleboard/MDF; these fracture under 200+ pounds of dynamic load. If your blocks slide on smooth floors, place the entire setup on a ¼-inch rubber equipment mat.
Build Rock-Solid DIY Incline Blocks
Step-by-Step Construction in 20 Minutes
- Measure your treadmill’s front base width (add ½ inch total).
- Cut 2x4s into 12-inch segments—most stores do this free.
- Stack segments; pre-drill holes before screwing.
- Screw six fasteners per stack in X-pattern for shear resistance.
- Sand edges smooth; optional: stain + two polyurethane coats.
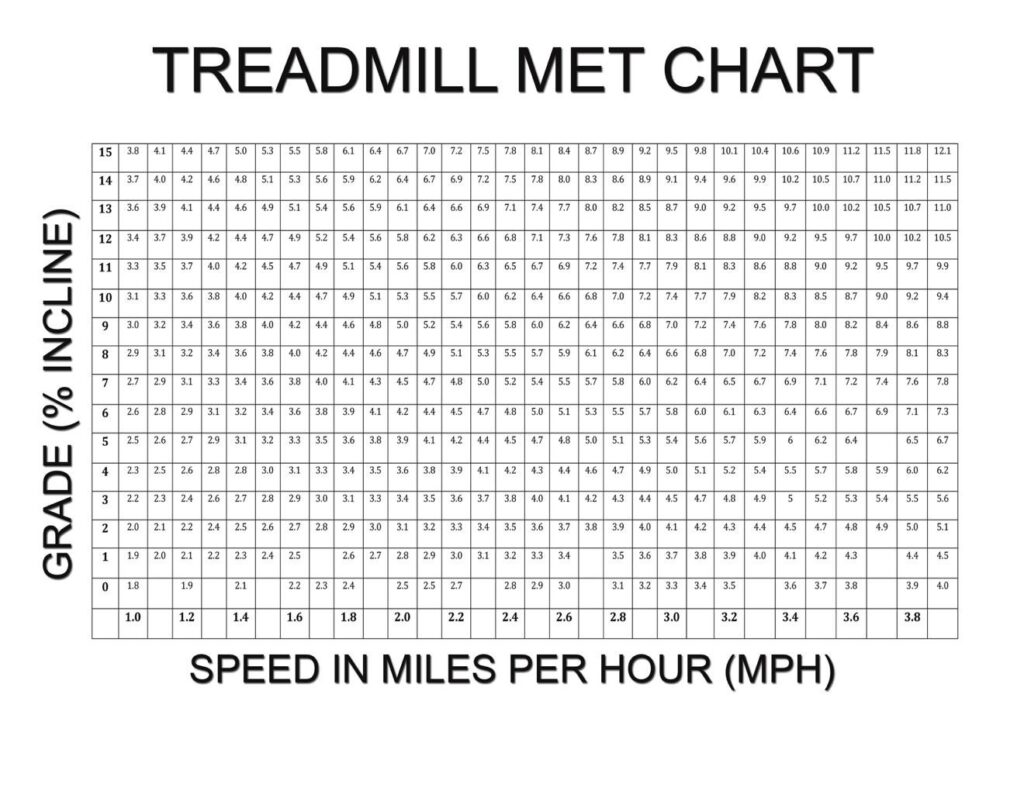
Precise Incline Height Calculator
- 1 layer (1.5″) = 3-4% grade (ideal for warm-ups)
- 2 layers (3″) = 6-7% grade (optimal fat-burning zone)
- 3 layers (4.5″) = 9-10% grade (max safe limit for glute activation)
Pro Tip: Exceeding 4.5″ risks rear-foot lift—measure clearance before final assembly.
Critical Safety Checks Before Your First Session
5-Point Stability Test
| Check | Tool | Pass Standard |
|—|—|—|—|
| Side-to-side level | 24″ carpenter’s level | Bubble centered ±¼ inch |
| Front/rear rock | Hand pressure on rails | <1mm wobble |
| Belt tracking | 1mph walk test | Stays centered ±⅛ inch |
| Motor temp | Post-10-min touch test | Warm but <140°F |
| Noise profile | 3mph listening test | Steady hum, no clicks |
Stop immediately if you detect burning smells, visible belt drift, or frame flexing. Reduce block height by one layer and retest.
Weight Capacity Verification Formula
Add your weight + treadmill weight + riser weight. Example: 200lb user + 140lb treadmill + 8lb blocks = 348lb total. Confirm this is below your treadmill’s max user rating (check manual—typically 300-400lb). Exceeding limits cracks frames within weeks.
Avoid Voiding Your Warranty: Load Limits and Risks
Most manufacturers void warranties for “non-approved modifications,” but removable blocks are safe if:
– Original feet stay intact and unaltered
– Blocks sit directly under feet (no drilling)
– You remove blocks during service calls
Pro Tip: Photograph original setup before installing blocks—this proves no permanent changes were made.
Test Your Incline Safely: Step-by-Step Protocol
Follow this progression to prevent injury:
1. Warm-up: 2 minutes at 1mph, 0% incline (no blocks).
2. 1-layer test: Walk 3 minutes at 2.5mph; check stability.
3. 2-layer test: Repeat at same speed; monitor heart rate (expect +5-8bpm).
4. 3-layer test: Only if prior steps pass; limit to 2 minutes initially.
Never jump to max height—gradual testing catches instability before falls occur.
Long-Term Maintenance to Prevent Treadmill Damage
- Every 50 miles: Inspect blocks for cracks or loose screws; tighten immediately.
- Monthly: Rotate blocks 180° to distribute compression wear.
- Quarterly: Re-torque frame bolts—added vibration from incline loosens them.
- Lubrication: Apply silicone belt lube 25% more often; incline increases friction by 40%.
Fix Common Incline Block Problems in Minutes
| Symptom | Immediate Fix |
|---|---|
| Belt drifting left/right | Slide thin rubber shim under low block side |
| Motor surging or stuttering | Reduce height by one layer; loosen belt ¼ turn |
| Frame creaking underfoot | Insert ¼” rubber pad between foot and block |
| Blocks sliding during use | Place entire treadmill on rubber equipment mat |
When to Upgrade: Hand-Crank Kits vs New Treadmill
If fixed incline feels limiting:
– Hand-crank conversion kits ($45-$60) work for Merit/Sunny models—adds adjustable incline via manual pin system.
– Full motorized retrofits rarely make sense—new treadmills with 0-15% motors start at $700.
Skip expensive “incline motor repairs”—$200+ labor often exceeds machine value.
Your Pre-Use Incline Block Checklist
- [ ] Measured front base width; blocks cut to match +½ inch
- [ ] Used kiln-dried wood ≥¾ inch thick (no particleboard!)
- [ ] Verified total weight ≤ treadmill’s max rating
- [ ] Passed 5-point stability test with level
- [ ] Monitored belt tracking during first 5-minute test
- [ ] Confirmed warranty allows removable blocks
- [ ] Set phone reminder for 50-mile maintenance check
Lift the front, lock it down, and conquer hills—no motor required. Within 60 minutes, your “broken” treadmill becomes a calorie-torching incline machine that builds strength, burns 50% more fat, and saves you hundreds versus replacement. Remember: front-only lift, wood blocks wider than the base, and gradual testing prevent 99% of failures. Now step up and start climbing.


