
Your rowing workout feels too easy, and the damper lever just isn’t cutting it. Whether you’re chasing that burn in your legs or need more challenge for your intervals, increasing resistance properly can transform your entire session. The key lies in understanding your machine’s unique resistance system and knowing the exact techniques that actually make a difference.
Most people crank the damper to 10 and wonder why their back hurts more than their legs. Smart resistance adjustments consider your machine type, fitness goals, and proper form. This guide breaks down exactly how to increase resistance on every major rower type without destroying your technique or your machine.
Air Rower Resistance Boosting
Air resistance machines dominate most gyms, but they’re the most misunderstood. The damper lever isn’t a volume knob for resistance—it’s more like switching between a sleek racing shell and a heavy barge.
Master Damper Settings Beyond 7
High damper settings (7-10) flood the flywheel with maximum air, creating heavy strokes that feel like rowing through mud. However, maxing out isn’t always the answer. Start at damper 5 and perform 10 strokes at your normal pace. If you can maintain form without rushing the recovery, move to damper 7. Test another 10 strokes. The sweet spot appears when each drive feels challenging but controlled—usually between damper 6-8 for most users.
Pro tip: Monitor your split time. A 10-second improvement in 500m time at damper 6 beats sloppy strokes at damper 10. Remember, higher damper settings don’t automatically burn more calories—your effort level matters equally.
Clean Flywheel Housing Method
Dust buildup silently steals resistance. Remove the flywheel cover (check your manual) and vacuum accumulated dust every 3-6 months. A clean machine at damper 6 often provides more actual resistance than a dusty one at damper 8.
Quick test: If your damper lever moves easily and the flywheel spins freely with minimal noise, your housing needs cleaning. Regular maintenance ensures consistent resistance levels across workouts.
Water Rower Power Techniques
Water rowers present a unique challenge—no damper, no buttons. Your resistance comes from pure physics and water volume.
Water Level Adjustment Formula
Add water in 1-liter increments using the included siphon. Each liter increases baseline resistance approximately 5-8%. The standard progression:
- Base level: Fill to the marked line (usually 17 liters)
- Strength focus: Add 2-3 liters for 10-15% more resistance
- Maximum challenge: Fill to just below the neck (22-24 liters)
Warning: Overfilling beyond the neck causes splashing and potential machine damage. Water rowers require pre-workout adjustments only—resistance can’t be changed once you start rowing.
Stroke Power Optimization
Since you can’t adjust water mid-workout, focus on power application. Drive harder through the legs and accelerate the handle through the finish. A 20% increase in stroke power translates to 30-40% more resistance against the water’s inertia.
Magnetic Rowing Machine Intensity
Magnetic rowers offer the most precise resistance control, but many users underutilize their full range.
Electronic Resistance Progression
Most magnetic machines offer 16-32 levels, but jumping straight to maximum causes form breakdown. Use this proven progression:
- Week 1-2: Start at level 6-8, focus on perfect form
- Week 3-4: Increase to level 10-12, maintain stroke rate
- Week 5+: Progress to level 14-16, monitor split times
- Advanced: Use levels 20+ only for short intervals
Key insight: Level 12 with proper technique produces more power output than level 16 with poor form. The advantage of magnetic rowers is real-time adjustment during your workout.
Manual Dial Optimization
For manual magnetic rowers, turn the dial in quarter-turn increments. Mark your current setting with tape to track progression. A full rotation typically equals 4-5 resistance levels. Consistent, small adjustments yield better results than dramatic changes.
Hydraulic Cylinder Maximization
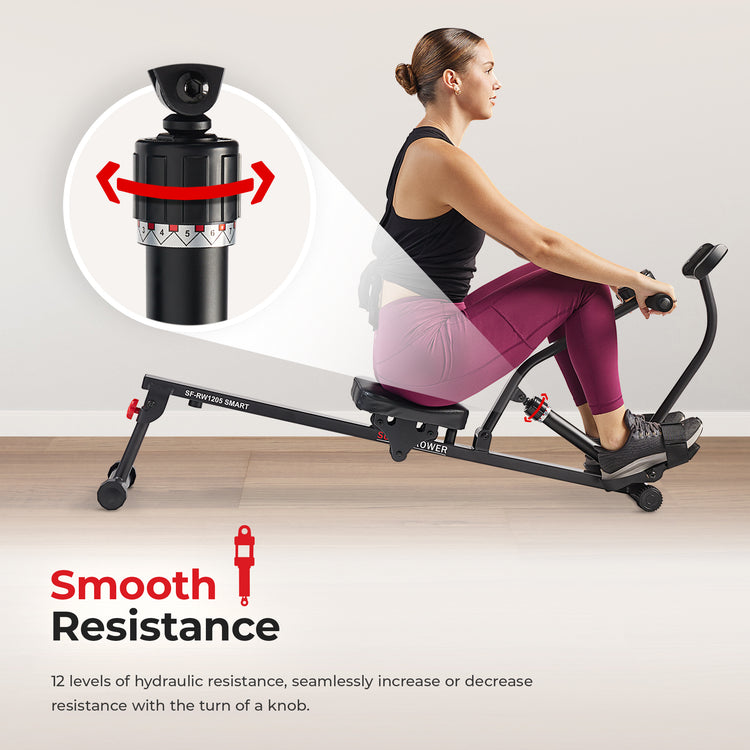
Basic hydraulic machines still have untapped potential when approached correctly.
Dual Cylinder Synchronization
Most hydraulic rowers feature independent cylinders. Adjust both cylinders to the same setting—mismatched resistance causes uneven muscle development and potential injury.
Quick adjustment method:
1. Turn both knobs fully clockwise to the lowest setting
2. Count clicks as you turn counterclockwise
3. Match click counts on both sides
Fluid Level Check
Hydraulic cylinders lose effectiveness over time. If maximum setting feels weak, check for fluid leaks around the cylinder seals. Replacement cylinders cost $30-50 and restore full resistance range. For proper how to increase resistance on rowing machine results with hydraulic models, regular maintenance is essential.
Resistance Setting by Workout Type
Endurance Session Setup
- Air rowers: Damper 4-5, focus on consistent 24-28 SPM
- Magnetic: Level 8-10, maintain steady-state heart rate
- Water: Standard water level, target 2:10-2:20 split times
Power Interval Protocol
- Air rowers: Damper 7-8, 10-stroke power pieces
- Magnetic: Level 14-16, 30-second max effort intervals
- Water: Maximum water volume, 20-stroke sprint sequences
Technique Focus Resistance
Use 20-30% less resistance than normal to perfect your form. Lower resistance reveals timing flaws that high resistance masks.
Common Resistance Mistakes
Damper Misuse Consequences
Setting damper to 10 doesn’t guarantee better workouts. High damper settings:
– Shift load from legs to back
– Reduce cardiovascular benefit
– Increase injury risk from poor form
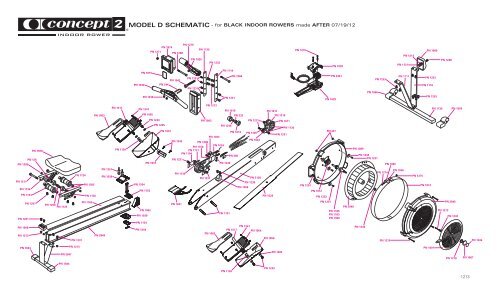
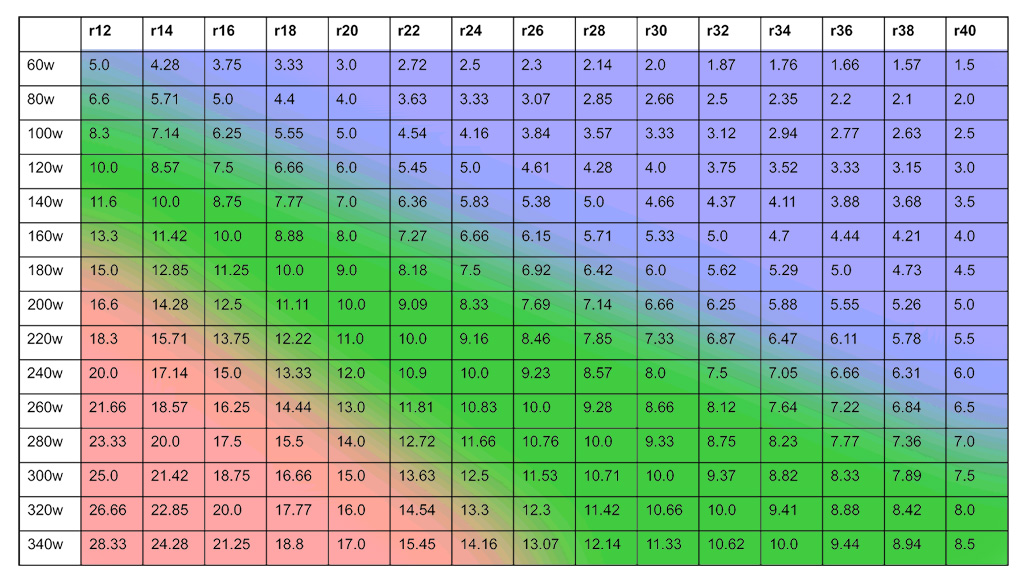
Better approach: Use drag factor (Concept2 monitors) instead of damper numbers. Target 110-130 for most workouts.
Resistance vs Effort Confusion
Your effort level matters more than machine settings. A skilled rower at damper 5 can produce more power than a beginner at damper 10. Focus on split times and power output, not just the resistance number.
Maintenance for Consistent Resistance
Air Rower Care Schedule
- Weekly: Wipe down rail and handle
- Monthly: Check chain tension and lubrication
- Quarterly: Deep clean flywheel housing
- Annually: Replace chain if stretched beyond adjustment range
Water Rower Maintenance
Change water every 6 months using purification tablets. Cloudy water affects resistance feel and can damage internal components. Add 1 tablet monthly between full changes.
Magnetic System Checks
Inspect magnet alignment if resistance feels uneven. The magnet should move smoothly without catching. Most issues resolve with simple track cleaning using a damp cloth.
Testing Your Adjustments
500m Benchmark Test
After any resistance change, perform a controlled 500m piece. Record:
– Average split time
– Stroke rate
– Perceived exertion (1-10 scale)
Improvements in split time at the same perceived effort indicate successful resistance increases. This practical test shows exactly how to increase resistance on rowing machine effectively for your fitness level.
Power Curve Analysis
Advanced users: Check your power curve on the monitor. A smooth, consistent curve indicates proper resistance selection. Jagged curves suggest the resistance exceeds your current strength level.
Master these resistance techniques and your rowing workouts will never feel stale again. Remember, the goal isn’t maximum resistance—it’s optimal resistance that challenges your muscles while preserving your technique. Start with small adjustments, measure your results, and build progressively stronger sessions week by week. With the right approach to how to increase resistance on rowing machine, you’ll transform your workouts from mundane to magnificent.


