
Rain hammering your windows, gym closed until Monday, and that urgent need to burn calories won’t wait. Instead of scrolling through expensive online listings, grab your toolbox—tonight you can build a functional exercise bike from garage scraps or basic hardware store finds. Whether you’re converting your road bike into a trainer setup or constructing a stationary unit from scratch, this guide delivers proven methods that actually work. You’ll discover how to make exercise bike setups that rival commercial models at 10% of the cost, with safety checks and smart integration tips included.
Forget complicated engineering—these approaches use basic tools and clear steps anyone can follow. By the end of this guide, you’ll know exactly which path fits your budget, space, and fitness goals.
Convert Your Road Bike Into Indoor Trainer in 20 Minutes
Skip the $300 trainer purchase—your existing bicycle becomes an instant workout machine with two critical decisions: wheel-on versus direct-drive setup.
Wheel-On Trainer: Fast Setup, Higher Tire Wear
Wheel-on trainers clamp to your rear axle while a roller presses against your tire. Installation takes under five minutes but creates noise and wears tires faster. For best results, inflate your rear tire to 100-110 PSI before mounting—this prevents slippage during intense intervals. Critical warning: Avoid knobby mountain bike tires; they vibrate violently and wear out 3x faster on trainers. Swap to smooth road tires ($25) for quieter operation and longer life.
Direct-Drive Conversion: Quiet Power for Serious Training
Remove your rear wheel and mount your cassette directly to the trainer hub. This eliminates tire contact noise and provides accurate power readings for apps like Zwift. You’ll need a compatible cassette body (check your drivetrain type) and a torque wrench to secure it properly. While the initial setup takes 15 minutes, you gain silent operation and ERG mode compatibility—where resistance automatically adjusts during virtual climbs.
Jack-Stand Method: $30 Garage Solution
Materials required:
– Two automotive jack stands ($30 at Harbor Freight)
– Steel bike pegs ($5 each)
– Rubber gym mat
Assembly steps:
1. Remove rear axle nuts from your bike
2. Thread steel pegs through the axle ends
3. Position jack stands 12 inches apart on the mat
4. Rest pegs in the stand saddles
5. Adjust height until rear wheel clears ground by 1 inch
Pro tip: If your bike rocks during sprints, place a folded towel under the front wheel or use a 2×4 block as a wheel chock.
Build Stand-Alone Exercise Bike from Scratch
No bicycle? No problem. Construct a purpose-built stationary bike that handles heavy daily use without wobbling.
Steel Frame Construction: Rock-Solid Foundation
Using 1.5-inch steel tubing:
1. Weld a rectangular base (36″x24″) with cross-bracing
2. Add vertical seat post sleeve at 74-degree angle
3. Mount bottom bracket shell with sealed bearings
4. Install 30-pound flywheel with belt drive system
Critical stability check: Before riding, apply full body weight to all directions. Any flex means add diagonal bracing. For bolt-together builds (no welding), use angle iron and grade-8 bolts tightened to 35 ft-lbs.
Magnetic Resistance: Adjustable Workout Intensity
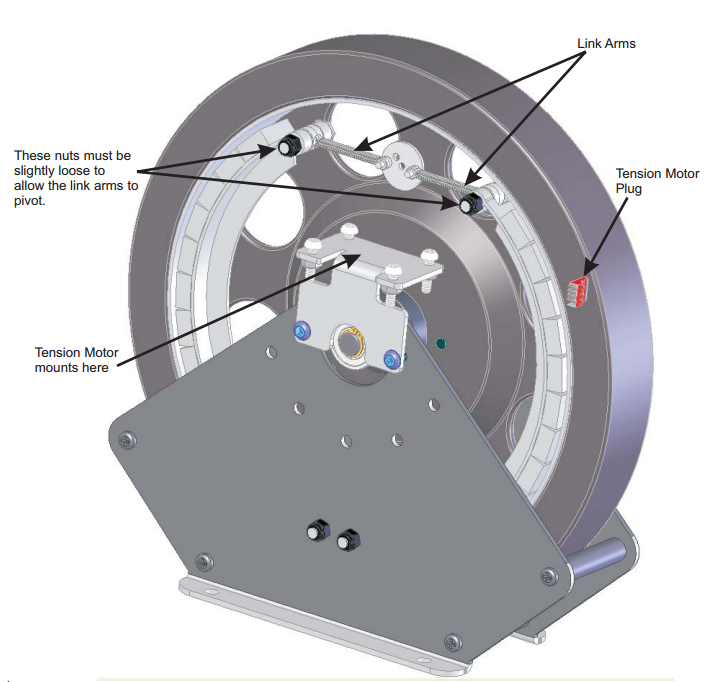
Mount rare-earth magnets near the flywheel using a threaded rod system. Turning the knob moves magnets closer to the flywheel, increasing resistance. Start with 1/2 inch gap for easy spinning, then reduce to 1/4 inch for hill climbs. Warning: Keep magnets away from pacemakers and credit cards—they generate powerful magnetic fields.
Smart Integration Without Breaking Budget
Transform your DIY setup into a connected training system that tracks performance and joins virtual races.
$50 Sensor Setup: Zwift-Ready in Minutes
Clip a speed/cadence sensor ($35) to your chainstay and pair it with your phone. This estimates power output for apps like Zwift and TrainerRoad. Troubleshooting tip: If cadence readings drop out, check the magnet gap—maintain exactly 2mm between sensor and magnet for reliable data.
Free App Alternatives That Actually Work
Skip expensive subscriptions with these proven options:
– Kinomap: Free real-world video routes (limited to 3 per week)
– Peloton Digital: 30-day free trial works with any bike
– Zwift: 25km free trial lets you test virtual worlds
Setup hack: Mount an old laptop on a PVC stand ($20 materials) instead of buying a $120 trainer desk. Position it 3 feet away for optimal viewing during rides.
Stop Your Exercise Bike From Rocking During Sprints
Nothing kills motivation like a wobbling setup mid-workout. Fix instability with these proven methods:
- Place the entire unit on a 3×6 foot rubber gym mat ($40)
- For jack-stand builds, insert cardboard shims under legs on uneven floors
- Tighten all bolts to manufacturer specs (vibration loosens hardware)
- Add front wheel resistance with bungee cords anchored to wall
Critical test: Perform a 30-second max sprint—if the unit moves more than 1 inch, reinforce the base before continuing.
Weekly 10-Minute Exercise Bike Tune-Up Routine
Prevent breakdowns and extend equipment life with this maintenance checklist:
Immediate Post-Ride Actions
- Wipe sweat from frame with damp cloth (corrosion starts in 20 minutes)
- Check tire pressure if using wheel-on setup (loses 5-10 PSI weekly)
- Inspect resistance unit for dust buildup
Monthly Deep Maintenance
- Clean and lube chain with bicycle-specific degreaser
- Tighten all bolts to proper torque specifications
- Verify magnet alignment on resistance systems
Warning: Ignoring chain maintenance indoors causes 40% faster wear due to sweat corrosion—clean weekly during heavy use.
Cost Breakdown: Realistic Budget Options
Ultra-Budget Build ($70 Total)
- Automotive jack stands: $30
- Steel bike pegs: $10
- Rubber gym mat: $20
- Cadence tracking: $0 (use phone accelerometer)
- Cooling: $10 (thrift store box fan)
Mid-Range Smart Setup ($670)
- Used road bike: $400
- Wahoo KICKR Core trainer: $350
- Heart rate strap: $45
- Accessories: $155 (mat, fan, shoes, iPad mount)
Money-saving tip: Buy trainers during post-holiday sales—November through January sees 20-30% discounts as retailers clear inventory.
Quick-Start Tonight Action Plan
Don’t wait for perfect conditions—start building immediately with this time-tested sequence:
30-Minute Setup:
1. Choose conversion path based on whether you own a bike
2. Gather garage materials (jack stands, lumber, pegs)
3. Order missing critical parts online for next-day delivery
2-Hour Weekend Build:
1. Assemble base structure on rubber mat
2. Test stability with gentle pedaling (NO full effort yet)
3. Install primary resistance system and verify smooth operation
First Workout Protocol:
– Start with 15-minute easy spin to check for issues
– Gradually increase resistance over 3 sessions
– Complete full 30-minute workout by day 7
Fix These 3 Common Problems Immediately
Rear wheel slipping during high resistance:
Inflate to 110 PSI minimum and tighten roller knob 2 full turns clockwise. If problem persists, replace with trainer-specific tire.
No cadence reading in training apps:
Replace sensor battery and verify 2mm magnet gap. Re-pair device in app settings—Bluetooth connections often drop after software updates.
Excessive noise during pedaling:
Switch to smooth trainer tires immediately. If using direct-drive, service hub bearings—loose bearings create grinding sounds that worsen over time.
Your homemade exercise bike delivers gym-quality cardio without the premium price tag. Whether you choose the $70 jack-stand method tonight or build a smart trainer setup over the next month, consistent 30-minute sessions will transform your fitness. Start with the ultra-budget build to confirm you’ll actually use it before investing more—most people discover they need far less equipment than they initially thought. Grab your tools and build your workout solution before sunset; your first ride awaits before bedtime.


