
Resistance bands have become essential tools for fitness training, physical therapy, and home workouts, yet many people overlook a critical aspect of their effectiveness: proper measurement. Unlike traditional dumbbells with fixed weight labels, resistance bands provide variable resistance that changes based on how far you stretch them, making accurate measurement essential for selecting the right bands, tracking your progress, and ensuring consistent training loads. Whether you’re a physical therapist designing rehabilitation programs, an athlete building explosive power, or a home fitness enthusiast wanting to replace worn-out bands, understanding how to measure resistance bands correctly transforms guesswork into science. This guide walks you through every measurement technique, from basic physical dimensions to precise force testing, helping you get the most out of your resistance training equipment.
Learning how to measure resistance bands involves three core areas: determining the resistance (force) at various stretch lengths, measuring physical dimensions like length and width, and tracking how these characteristics change over time. Each measurement type serves a different purpose, and mastering all of them gives you complete knowledge about your equipment’s capabilities and condition. The best part is that you can start with simple techniques requiring minimal equipment and progress to more precise methods as your needs demand. By the end of this guide, you’ll have the skills to measure any resistance band like a professional.
Essential Tools for Measuring Resistance Bands
Before diving into measurement techniques, gathering the right tools ensures accurate, repeatable results. The equipment you need depends on the precision required for your applications, but having a basic toolkit prepares you for most measurement scenarios.
A digital hanging scale or force gauge provides the most accurate resistance measurements, offering precision within a fraction of a pound. Digital models display readings clearly and often include features like peak hold and unit conversion that simplify the measurement process. Choose a scale with a capacity matching your bands’ resistance range—most resistance bands fall between 5 and 150 pounds, so a scale with a 200-pound capacity covers most applications. Spring scales offer a budget-friendly alternative, though they require careful reading of analog dials and typically provide less precision than digital options.
Flexible tape measures allow accurate length measurements in both resting and stretched states. Cloth or fiberglass tape measures conform to the band’s shape and work well for measuring along stretched paths. A caliper (digital or analog) measures width and thickness with precision that rulers cannot match, providing the detailed dimensional data needed to understand why certain bands perform differently. Precision scales that measure in grams or ounces help calculate material density, which correlates with durability and resistance characteristics.
Understanding Resistance Specifications
The resistance of any resistance band depends on three interconnected factors: material composition, physical dimensions, and stretch length. Natural latex and synthetic rubber compounds each have different elasticity characteristics—latex typically offers excellent stretch and feel but can trigger allergies, while synthetic alternatives provide hypoallergenic options with slightly different performance profiles. Thicker and wider bands contain more material, creating higher resistance because more rubber must be stretched. The durometer, or hardness, of the rubber compound influences how stiff the band feels throughout its range of motion.
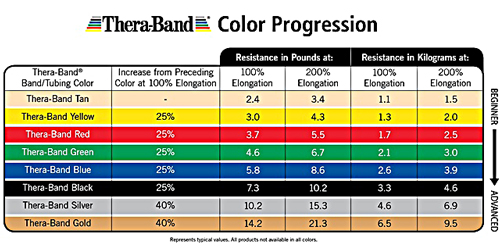
Manufacturers rate resistance at standardized extension lengths, most commonly when the band is stretched to 100% of its resting length (doubled) or to a specific measurement like 36 or 48 inches total length. Understanding these rating standards helps you interpret manufacturer specifications accurately and compare bands from different companies. Most bands follow a color-coding system, though these standards vary significantly between manufacturers—yellow often indicates extra light, green represents light, red signifies medium, blue indicates heavy, and black represents extra heavy. Always verify actual resistance specifications rather than relying solely on color, as a “heavy” blue band from one company may match a “medium” red band from another.
Measure Resistance with a Scale
The most accurate method for measuring resistance involves using a hanging scale to directly measure the force required to stretch the band. This technique provides objective, reproducible results that account for any variations between the band’s actual performance and manufacturer specifications. Here’s how to perform precise resistance measurements:
- Secure one end of the band firmly at a fixed point—a door anchor, hook, or sturdy object works well
- Attach your scale to the other end of the band, ensuring the attachment method matches how you’ll use the band during exercises
- Slowly pull the scale until the band reaches your desired extension length, read the force value, and record it
- For consistent results, measure at multiple extension points: 50%, 100%, 150%, and 200% of the band’s resting length
New bands require “pre-stretching” before taking definitive measurements. Stretch the band 10-20 times to its maximum intended extension to allow material settling, as the first few stretches often show slightly different resistance due to initial elastic behavior. Take each measurement three times and calculate the average to minimize random variation. Document the ambient temperature, as rubber properties change with temperature—higher temperatures make bands slightly more elastic (lower resistance), while lower temperatures increase stiffness. For the most consistent results, perform measurements in a controlled environment around 68-72°F.
Measure Physical Dimensions Correctly

Physical dimensions—length, width, and thickness—directly determine a band’s resistance capacity and durability. Accurate dimensional measurements help you select replacement bands, compare products from different manufacturers, and understand why bands with similar resistance ratings may feel different during exercises.
Measure resting length by allowing the band to hang naturally without tension and measuring from end to end with a flexible tape measure. For bands with handles, determine whether your measurement includes or excludes the handle length, as manufacturer conventions vary. Standard length categories include short bands (12-18 inches) for upper body exercises with door anchors, medium bands (24-36 inches) for versatile full-body work, and long bands (41-60+ inches) for lower body exercises and extensive range-of-motion movements. Longer bands provide greater maximum resistance because they can stretch to greater absolute lengths, and they offer more anchor point flexibility.
Width measurement requires a ruler or caliper across the band’s flat surface at multiple points along its length, as some bands vary due to manufacturing processes. Take thickness measurements at several locations, pressing caliper jaws together gently to compress material without significant deformation. For bands with reinforced ends or varying material distribution, document measurements at each distinct section. These dimensional specifications, combined with resistance data, help predict performance characteristics and durability expectations.
Test Resistance at Different Extension Lengths

Resistance changes throughout a band’s stretch range, so testing at multiple extension points reveals the complete performance picture. This testing approach identifies whether a band provides appropriate resistance for specific exercises and helps you understand how anchor point changes affect workout difficulty.
Establish a standardized testing protocol with fixed extension points expressed as percentages of resting length. Measure resistance at 50% extension (band is 1.5 times original length), 100% extension (doubled length), 150% extension (2.5 times original length), and 200% extension (tripled length). Record each measurement three times and note any significant variation between readings, as inconsistent results may indicate material degradation or measurement error. Plot these measurements to visualize the band’s resistance curve, showing how resistance builds linearly or progressively throughout the stretch range.
For exercises requiring specific resistance at particular joint angles, customize your extension testing to match those positions. For example, if you’re measuring for banded push-ups, test resistance at the chest position and at full arm extension to understand resistance throughout the movement. Anchor height significantly affects resistance curves during exercises like band pull-aparts or squats—test with the band anchored at different heights to see how anchor position changes difficulty at various movement points.
Track Degradation Over Time
Resistance bands degrade with use, and tracking this degradation ensures you replace bands before they fail during workouts or provide insufficient resistance for effective training. Regular measurements combined with visual inspections give you complete knowledge about your equipment’s condition.
Establish a baseline by measuring new bands and recording those values as reference points. During subsequent measurements, compare current readings against baseline values to identify resistance loss. A decrease of more than 10-15% from original specifications typically indicates the band should be replaced, as degradation accelerates once this threshold is passed. Track these changes in your resistance profile documentation, noting the date and magnitude of each measurement session.
Visual inspection complements measurement tracking by identifying physical damage before it causes equipment failure. Examine bands regularly for cracking, fading, thinning in high-stress areas near handles or anchor points, permanent deformation (failure to return fully to resting length), and damage from sharp objects or overstretching. Pay particular attention to areas that experience the most stress during exercises—these locations show degradation first and often determine overall service life.
Compare Bands Like a Professional
Professional-grade comparison techniques help you evaluate different bands objectively, whether you’re selecting new equipment, comparing brands, or verifying that replacement bands match your existing favorites. Standardized measurement protocols eliminate variables and reveal true performance differences between products.
When comparing bands from different manufacturers, apply identical protocols to each band—including the same attachment method, extension lengths, measurement equipment, and environmental conditions. This consistency ensures that differences in results reflect actual product performance rather than measurement artifacts. Create comparison charts documenting measured resistance at standardized extension lengths alongside physical dimensions, material descriptions, and price information. These documents facilitate informed purchasing decisions and help determine whether premium-priced products offer proportional advantages.
Resistance band sets require specific comparison attention to verify consistent progression between bands. Measure each band in a set and calculate the resistance increase between consecutive bands—typical progression should show 20-30% increases that allow gradual overload during training. Inconsistent progression may indicate quality control issues or suggest the set is designed for non-standard strength profiles. Test sets both when new and after several months to assess whether resistance progression remains consistent as bands age, as some sets show differential aging where lower-resistance bands degrade faster.
Quick Reference: Measurement Checklist
Resistance Measurement: Use a force gauge for precise readings, test at multiple extension points (50%, 100%, 150%, 200% of resting length), pre-stretch new bands before testing, and measure in controlled temperatures around 68-72°F. Record three readings at each extension point and calculate averages.
Dimensional Measurement: Measure resting length from end to end, measure width and thickness at multiple points, calculate elongation capacity by testing maximum safe extension, and document any variations across the band’s length.
Documentation: Create resistance profiles for each band, track measurements over time against baseline values, note environmental conditions during testing, and schedule regular reassessment based on usage intensity.
Visual Inspection: Check regularly for cracking, fading, thinning, permanent deformation, and damage from sharp objects or overstretching. Replace bands showing more than 10-15% resistance loss or visible damage.
By following these measurement techniques consistently, you gain complete knowledge about your resistance bands’ characteristics, ensuring you select the right equipment, maintain consistent training loads, and replace bands at optimal times. This systematic approach transforms resistance band selection and maintenance from guesswork into evidence-based practice, enhancing both your training effectiveness and safety.


