
Shoulder pain affects millions of people, from desk workers hunched over computers to athletes performing repetitive overhead motions. While many treatments exist, foam rolling has emerged as an accessible, self-administered technique that can significantly reduce discomfort and improve mobility. Learning how to use a foam roller for shoulder pain empowers you to take control of your recovery, targeting tight muscles and releasing tension without requiring expensive professional sessions or equipment.
This comprehensive guide walks you through proven techniques, essential safety protocols, and step-by-step instructions to effectively address shoulder tension using a foam roller. Whether you’re dealing with rotator cuff tightness, trapezius knots, or general shoulder stiffness, these methods will help you achieve lasting relief and prevent future injuries.
Positioning Your Foam Roller for Maximum Shoulder Relief

The key to effective shoulder foam rolling lies in proper positioning—getting the roller in exactly the right spot while maintaining control of your body weight. Unlike rolling larger muscle groups like legs, shoulder work requires precise placement and subtle weight adjustments to avoid bone contact and maximize muscle release.
Start by sitting on the floor with your legs bent and feet flat. Place the foam roller horizontally behind you, then carefully lower your upper back onto it. Position the roller just below the base of your skull but above your shoulder blades—this targets the upper trapezius where tension often accumulates. Now comes the critical adjustment: shift your weight slightly to one side by sliding your hips a few inches left or right. This concentrates pressure on one shoulder complex at a time rather than splitting it evenly across your spine.
For targeted rotator cuff work, lie on your side with the foam roller positioned vertically under your armpit. Roll slowly forward and backward through a small range of motion (just 2-3 inches) while keeping your elbow bent at 90 degrees. This position isolates the external rotators that commonly contribute to shoulder impingement. Pro tip: Place your top hand on the ground in front of you for stability and controlled movement.
How to Adjust Pressure Without Causing Injury
Many people make the critical mistake of applying too much pressure when learning how to use a foam roller for shoulder pain. The shoulder complex contains numerous sensitive structures that can be easily irritated. Instead of bearing full body weight, modify pressure by adjusting your leverage points.
When rolling your upper back, keep one foot lifted off the floor to reduce pressure by 30-40%. For more precise control, cross your arms over your chest rather than placing them behind your head—this decreases the weight transferred to the roller. If you encounter a particularly tender spot, stop rolling and maintain static pressure for 30-45 seconds while taking deep diaphragmatic breaths. Inhale through your nose for 4 seconds, hold for 2, then exhale slowly through pursed lips for 6 seconds—this breathing pattern triggers the parasympathetic nervous system, helping muscles relax under pressure.
Identifying Proper Release Sensations
Understanding what you should feel during foam rolling separates effective technique from potentially harmful practice. When properly targeting shoulder muscles, you’ll experience a “good pain”—a deep, dull ache that gradually diminishes as the tissue releases. This sensation should never be sharp, shooting, or cause numbness/tingling.
As you roll, watch for visual cues: your shoulder should naturally drop toward the floor as tension releases, and your breathing should become deeper and more relaxed. If you notice your jaw clenching, shoulders hiking toward your ears, or breath holding—stop immediately. These signs indicate you’re triggering protective tension rather than facilitating release. Warning: Never roll directly over the shoulder joint itself or the front of the shoulder where the biceps tendon resides—this can exacerbate impingement issues.
Targeting Specific Shoulder Pain Culprits
Releasing the Upper Trapezius Trigger Points
The upper trapezius is ground zero for most shoulder pain stemming from desk work and poor posture. To effectively release this area, position yourself with the foam roller horizontally across your upper back, just below the base of your skull. Now, turn your head slowly toward the side you’re targeting—right ear toward right shoulder for the right trapezius.
From this position, use your bottom hand to gently pull your head further into the stretch while maintaining the roller’s position. Hold for 30 seconds, then slowly return to center before repeating on the other side. This technique accesses the muscle fibers that run diagonally from your neck to your shoulder—a common site for trigger points that refer pain throughout the shoulder complex.
Unlocking the Subscapularis Muscle
Most people don’t realize their shoulder pain originates from the subscapularis—a deep rotator cuff muscle on the front of your shoulder blade. This hidden culprit often causes anterior shoulder pain and restricted internal rotation. To access it, lie on your side with the foam roller positioned vertically under your armpit. Bend your bottom elbow to 90 degrees with your hand resting on your abdomen.
Slowly roll your body forward about 2 inches, then backward, maintaining the elbow position. You’ll feel pressure along the front edge of your shoulder blade—this is the subscapularis releasing. Spend 45 seconds on this area, then switch sides. Time-saving tip: Perform this technique while watching TV to make it part of your daily routine.
Avoiding Critical Shoulder Foam Rolling Mistakes
The Spine Rolling Trap
One of the most dangerous mistakes when learning how to use a foam roller for shoulder pain is rolling directly up and down the spine. The cervical and thoracic vertebrae aren’t designed to bear this pressure, and improper rolling can compress nerve roots or damage delicate spinal structures.
Instead of rolling vertically along your spine, maintain a horizontal roller position and move side-to-side across your upper back. Focus on the muscular tissue 2-3 inches lateral to your spine—not directly on the bony prominences. If you feel pressure on bones rather than muscles, reposition immediately.
Ignoring the Pectoralis Minor Connection
Shoulder pain often stems from tight pectoralis minor muscles pulling the shoulder forward into internal rotation. Most foam rolling routines completely miss this critical muscle. To release it, lie face down with the foam roller positioned horizontally under your collarbone. Prop yourself up on your forearms and slowly roll side-to-side while keeping your head lifted.
This position targets the pectoralis minor attachment near your shoulder—key for correcting rounded shoulder posture. Spend just 20-30 seconds here per side; this area is sensitive and overworking it can cause rib discomfort.
Optimizing Your Shoulder Foam Rolling Routine

Timing Matters: Pre-Workout vs. Post-Workout
When you perform shoulder foam rolling significantly impacts results. Before workouts, spend just 2-3 minutes on light rolling to increase blood flow and prepare tissues for movement—never deep release work pre-exercise, as this can temporarily reduce muscle power output.
Save intensive shoulder foam rolling for post-workout or as a standalone recovery session in the evening. At this time, spend 8-10 minutes systematically working all shoulder regions while tissues are warm but not fatigued. Follow with static stretching for maximum flexibility gains.
Creating Your 7-Minute Shoulder Rescue Protocol
For busy schedules, implement this efficient protocol targeting the four critical shoulder areas:
- Upper trapezius: 60 seconds (30 per side with head turn)
- Subscapularis: 45 seconds (22.5 per side)
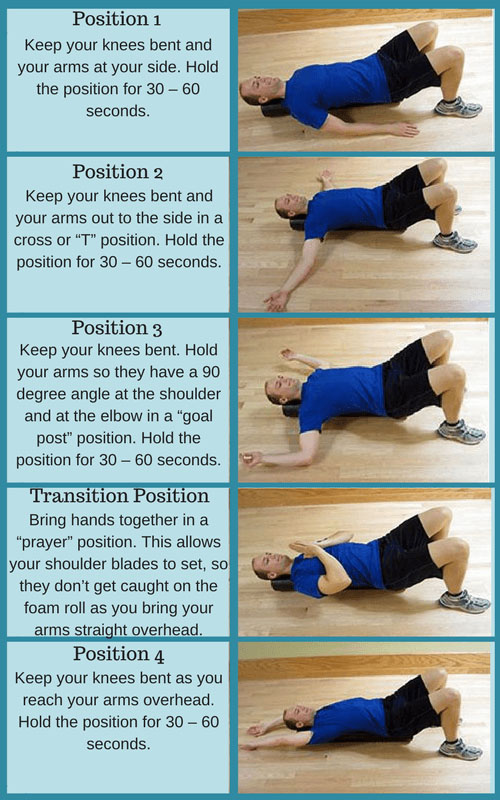
- Thoracic spine mobility: 90 seconds (horizontal roller position, arms extended overhead)
- Pectoralis minor: 30 seconds
- Rotator cuff: 60 seconds (30 per side in side-lying position)
- Stretch integration: 90 seconds of doorway chest stretch and cross-body shoulder stretch
Perform this routine 3-4 times weekly for chronic pain, or daily for acute tension. Consistency beats duration—regular short sessions produce better long-term results than infrequent marathon rolling.
When Professional Help Trumps Self-Treatment
While learning how to use a foam roller for shoulder pain addresses many common issues, certain red flags require professional evaluation:
- Pain that wakes you from sleep
- Inability to raise your arm above shoulder height
- Shoulder instability or “slipping” sensations
- Pain lasting longer than 2 weeks despite consistent self-care
- Any numbness or tingling down your arm
These symptoms may indicate structural damage requiring medical intervention. A physical therapist can provide advanced techniques like instrument-assisted soft tissue mobilization that complement your foam rolling routine.
Final Shoulder Pain Relief Protocol
Mastering foam rolling for shoulder pain requires precision, patience, and proper technique—not brute force. Focus on slow, controlled movements through small ranges while maintaining relaxed breathing. Start with just 3-4 minutes daily, gradually increasing as your tissues adapt.
Combine your foam rolling with postural awareness throughout the day—set phone reminders to check your shoulder position every hour. Over time, this integrated approach transforms shoulder pain from a persistent nuisance into occasional discomfort you can quickly address. Remember: consistency with proper form beats occasional aggressive rolling every time. Your path to pain-free shoulders begins with that first mindful roll today.


