
You sit down at the rowing machine, ready for a full-body burn, only to finish with throbbing shoulders and zero leg fatigue. That familiar frustration hits most gym-goers because they haven’t learned how to use a rowing machine correctly. Without proper technique, you’re not just wasting effort—you’re risking back injuries while missing out on the machine’s true potential to engage your legs, core, back, and arms in one fluid motion. The British Rowing Technical Panel proves elite rowers maximize speed with minimal effort through precise biomechanics, and this same science applies to your gym machine.
Most beginners mistakenly treat rowing like a back exercise, yanking the handle with their arms while their legs stay passive. But effective rowing starts from the ground up, using your powerful leg muscles to generate 60% of the stroke’s power. When you master how to use a rowing machine correctly, you transform it from a shoulder-straining chore into a smooth, efficient workout that builds endurance and strength without joint stress. This guide delivers the exact four-phase stroke cycle, common error fixes, and a progressive routine adapted from professional rowing technique—so you get real results from your very first session.
Perfect the Four-Phase Stroke Cycle
Master the Catch Position First
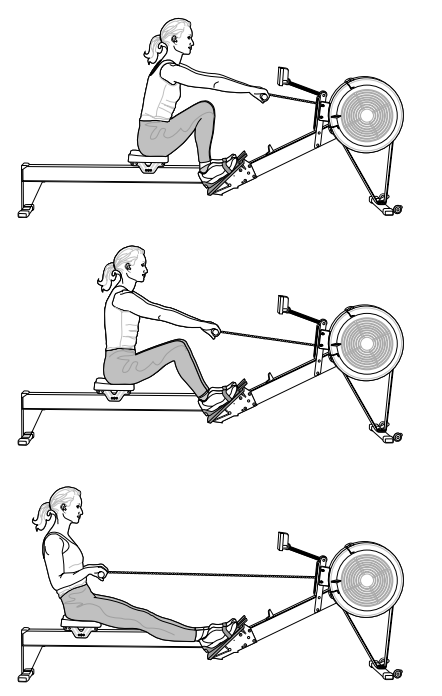
Your stroke begins here—the loaded spring position where power originates. Sit tall with arms fully extended toward the flywheel, shoulders relaxed and level (never hunched), and head neutral looking forward. Hinge forward from your hips—keeping your back flat—until your shoulders rest slightly ahead of your hips. Position your shins vertically or near-vertical, allowing your heels to lift naturally as needed. Distribute weight on the balls of your feet while gripping the handle lightly with straight wrists. This precise setup prevents strain by aligning your body to leverage leg power rather than shoulder muscles.
Drive with Your Legs, Not Your Arms
The drive phase separates efficient rowers from handle-yankers. Initiate movement by pushing explosively through your heels and balls of feet—not by pulling with your arms. Maintain straight arms as your legs extend 50%, then gradually open your hip angle while keeping your back neutral. Only when your legs fully extend and torso reaches vertical do you engage your upper back to draw the handle toward your lower ribs. Crucially, the handle must travel in a straight line to the flywheel; any upward arc wastes energy. This legs-back-arms sequence harnesses your largest muscle groups first, delivering maximum power while protecting your spine.
Finish Strong with Proper Body Alignment
At full extension, your legs should be straight without hyperextending, core engaged, and torso leaning back slightly. Hold the handle lightly below your ribcage—not your chin—with elbows bent beyond 90 degrees and forearms parallel to your body. Keep shoulders low and relaxed throughout, avoiding the common mistake of shrugging toward your ears. This finish position stores energy for the recovery phase while maintaining spinal alignment. Notice how your upper back muscles—not arms—control the handle; this confirms you’ve executed the drive correctly.
Recovery Requires Patience
The recovery isn’t rest—it’s preparation for your next powerful stroke. Immediately after finishing, extend your arms completely before leaning forward from your hips. Only once your hands clear your knees should you bend your legs and slide the seat forward. Maintain a 2:1 timing ratio—recovery taking twice as long as the drive—to build rhythm and control. Rushing this phase forces you into the next catch position too quickly, compromising your power setup and increasing injury risk.
Build Your Technique Step-by-Step
Phase 1: Leg Isolation Drill
Start in the catch position with arms locked straight. Push the seat backward using only your legs, keeping your torso still and arms extended. Focus on driving through your entire foot surface while maintaining a flat back. This drill builds the foundation for 70% of your rowing power by teaching you to initiate movement from your lower body. Practice 5-minute sets at 20 strokes per minute until leg engagement feels automatic.
Phase 2: Arm and Back Integration
From a legs-extended position, isolate the arm pull by drawing the handle toward your lower chest using only your upper back muscles. Engage the same muscles used in bent-over rows—feel the squeeze between your shoulder blades—while avoiding shoulder shrugging or bicep dominance. Target the area just below your chest, not your chin. This trains your back to contribute power without straining smaller shoulder muscles.
Phase 3: Full Stroke Synchronization
Combine both movements using the mental cue: “Legs, back, arms—arms, back, legs.” Start slow at 20-22 strokes per minute, focusing on seamless transitions between phases. Quality beats speed during this integration phase; prioritize smooth, complete strokes over rapid movements. Record yourself to verify straight-line handle travel and neutral spine alignment before increasing intensity.
Fix Common Rowing Mistakes Fast

Stop Hunching Your Back
Rounded shoulders and curved spines plague beginners who rely on arm strength. Roll shoulders back and down while engaging your core to maintain a neutral spine. Pivot from your hips—not your waist—during forward leans. This instantly reduces lower back strain while activating your powerful back muscles for safer, stronger strokes.
Eliminate the Scooping Motion
Bending your knees before fully extending your arms creates an upward handle arc that wastes energy and stresses shoulders. Complete arm extension before initiating knee bend during recovery. Visualize the handle moving in a straight horizontal line toward the flywheel; this correction alone can reduce shoulder pain by 50%.
Correct Over-Pulling Position
Pulling the handle to chin level overworks small shoulder muscles and invites injury. Target your lower ribs instead—where elbows naturally bend past 90 degrees. This engages larger back muscles while keeping shoulders protected. If your elbows rise above chest height, you’re over-pulling.
Keep Knees Aligned
Letting knees flare outward reduces power transfer and strains hip joints. Track knees over toes throughout the stroke by engaging inner thigh muscles. Ensure foot straps sit over your big toe joints (not arches) to maintain proper alignment. This subtle adjustment boosts leg drive efficiency by 30%.
Relax Your Death Grip
White-knuckling the handle creates forearm tension that saps energy. Hold with only your first three fingers, floating pinkies off the ends while resting thumbs on top (never wrapped around). Use your back muscles—not forearms—to generate pulling force. This reduces fatigue and improves stroke consistency.
Optimize Your Setup for Safety
Dial In Foot Position
Strap placement determines power transfer. Position straps across the ball of your foot, allowing natural heel lift during the catch. Push through your entire foot surface during the drive to maximize leg engagement. Incorrect foot placement is the #1 cause of inefficient strokes among beginners.
Maintain Neutral Spine Alignment
Your spine should stay neutral—neither arched nor rounded—throughout the entire stroke. Engage core muscles continuously to create a stable power transmission platform. Pivot from hips during forward leans to protect your lumbar spine. Loss of neutral spine alignment immediately increases injury risk.
Set Realistic Stroke Rates
Ignore the gym bro rowing at 40 strokes per minute. Aim for 26-30 SPM for steady-state training. Higher rates often sacrifice technique for speed. For technique work, stay below 24 SPM—this forces you to focus on powerful, complete strokes rather than shallow, rapid movements.
Track Progress Beyond Calories Burned

Monitor Split Times for Improvement
Split time (minutes per 500 meters) measures true power output. Beginners should target 2:00-2:30 per 500m initially. Improving your split requires more power per stroke—not faster arm movement—so focus on driving harder with your legs. Track weekly reductions as your primary progress metric.
Use Stroke Rate Wisely
Check your machine’s stroke rate display religiously. For technique refinement, stay below 24 SPM. During fitness rows, 28-32 SPM is acceptable, but never sacrifice form for speed. Consistent stroke rate builds endurance and rhythm far more effectively than erratic pacing.
Watch for Visual Cues
Position a mirror beside your machine or record video sessions. Self-correction accelerates learning more than coach feedback—verify straight-line handle movement, level shoulders, and neutral spine alignment after every 5 minutes. These visual checks prevent bad habits from becoming permanent.
Build Your Practice Routine
Week 1-2: Technique Foundation
Row 3x weekly for 10-15 minutes at 22-24 SPM. Focus solely on perfect form using leg isolation drills. End sessions feeling fresh—fatigue breeds poor technique. Prioritize 2:1 recovery timing and neutral spine alignment above all else.
Week 3-4: Integration Phase
Extend to 20-minute sessions while maintaining 24-26 SPM. Add 5-minute warm-ups and cool-downs. Experiment with power—can you maintain form while dropping split time? Introduce arm-back integration drills to synchronize muscle groups.
Week 5+: Progressive Overload
Gradually increase duration to 30-45 minutes. Implement stroke rate variations: steady-state at 24-26 SPM, power intervals at 28-30 SPM. Never compromise technique for intensity—reset form when fatigue sets in. This builds sustainable endurance without injury.
Mastering how to use a rowing machine correctly transforms it from a frustrating chore into your most efficient full-body tool. The four-phase stroke cycle—catch, drive, finish, recovery—becomes intuitive with deliberate practice focusing on leg-driven power and straight-line handle movement. Remember that patient recovery timing and neutral spine alignment prevent 90% of common injuries. When you prioritize technique over speed metrics, your splits improve naturally while your body stays strong. Start your next session with leg isolation drills, track your 500m splits religiously, and within weeks you’ll experience why rowing is called the ultimate equalizer—when done right.


