
When your weight bench comes equipped with leg rollers, you’ve unlocked a powerhouse for lower body development that most home gym owners never fully utilize. This versatile attachment transforms your standard bench into a complete leg training station capable of targeting every major muscle group in your lower body. Understanding how to properly use a weight bench with leg rollers separates those who make meaningful progress from those who waste countless hours performing ineffective exercises. Whether you’re building athletic power, sculpting defined leg muscles, or rehabilitating from injury, mastering this equipment delivers results that would otherwise require thousands of dollars in specialized machines.
The frustration of watching your leg development stall despite consistent training often stems from improper equipment usage—particularly with leg roller attachments that many lifters treat as afterthoughts. Most users either perform dangerous movements that risk knee damage or completely ignore this valuable feature. This guide eliminates the guesswork by providing precise instructions for maximizing your leg roller workouts while training safely and effectively. You’ll discover exactly how to position your body, adjust resistance, and progress your training to achieve noticeable improvements in strength and muscle development within weeks.
Identifying Your Leg Roller Configuration Before Training

Before attempting any exercises, determine whether your weight bench features a fixed or adjustable leg roller system. Fixed-angle rollers maintain a permanent 30-45 degree position relative to the bench surface, limiting you primarily to leg extensions but offering rock-solid stability during heavy sets. Adjustable rollers pivot through multiple positions, allowing you to perform both extensions and curls but requiring careful repositioning between exercises. Check for adjustment pins or quick-release levers that modify the roller angle—these mechanisms should move smoothly without wobbling when locked into place.
Examine the roller padding thickness as this significantly impacts your training experience. Thin vinyl padding (under 1 inch) provides precise limb positioning ideal for competitive lifters tracking minute technique adjustments, while plush foam padding (2+ inches) offers greater comfort during high-repetition sets. Notice whether the roller surface features textured grips or smooth contours—textured rollers help maintain leg position during intense contractions but may cause discomfort during extended sets. If your roller shows visible wear patterns or compressed padding, replace it immediately to prevent inconsistent resistance and potential slipping during exercises.
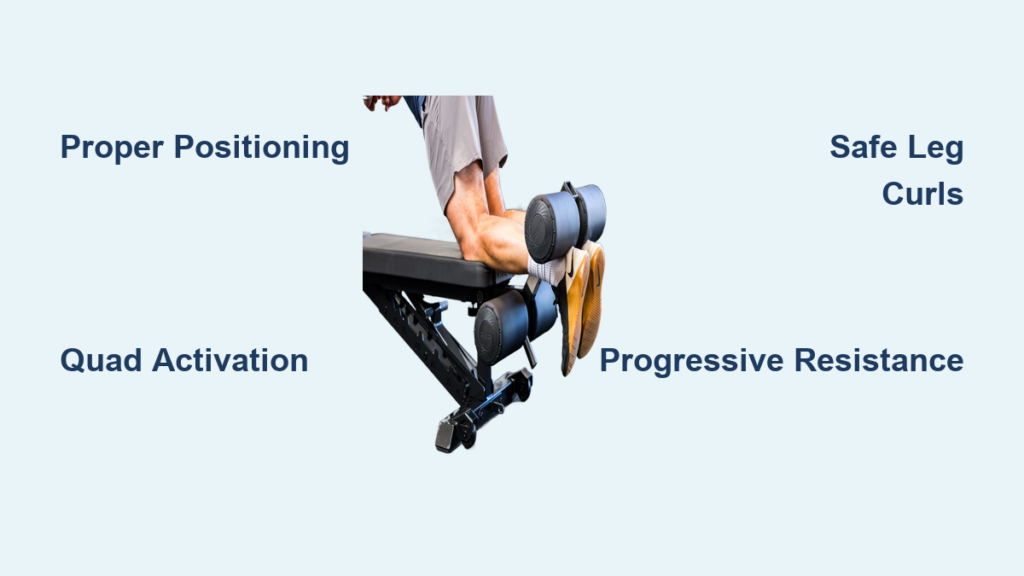
Correct Positioning for Maximum Quad Activation

Position your bench on a non-slip surface with ample clearance—your legs need unrestricted movement space during extensions. For leg extensions, lie flat on your back with your hips positioned precisely at the bench edge where the roller mounts. Your glutes should rest just behind this edge while your thighs remain fully supported on the bench surface. Place the roller pad across your lower shins, approximately 4-6 inches above your ankle bones—never directly on your Achilles tendon or knee joints.
Critical positioning mistake to avoid: Allowing your hips to lift off the bench during the contraction phase. This shifts work from your quadriceps to your hip flexors and creates dangerous knee torque. To prevent this, grip the bench sides firmly and imagine pressing your lower back into the bench throughout the movement. If your bench includes a hip strap, use it—this simple accessory maintains proper pelvic alignment that dramatically increases quad engagement.
Perform each extension with deliberate control: Press through your heels (not toes) to initiate the movement, pause for two seconds at full extension without locking your knees, then lower the weight over 3-4 seconds. This negative phase builds more muscle than the lifting portion, yet most trainees rush it. Start with bodyweight repetitions to master the movement pattern before adding resistance.
Executing Safe and Effective Leg Curls
Flip your position to target hamstrings with prone leg curls—lie face-down with your ankles positioned under the roller pad. The roller should rest across your Achilles tendons just above your heels, with your knees aligned with the bench edge. Keep your hips firmly pressed against the bench throughout the movement to prevent lower back strain. Curl your heels toward your glutes by flexing only at the knees, maintaining a neutral spine position.
How to Prevent Common Leg Curl Errors
Many lifters unknowingly compromise their hamstrings development through these technique mistakes:
– Hip lifting: Your hips should remain glued to the bench—any elevation shifts work to your lower back
– Incomplete range of motion: Failing to fully extend your legs at the bottom limits muscle stretch
– Excessive momentum: Swinging the weight reduces hamstring tension and stresses knee ligaments
For maximum hamstring activation, imagine trying to press the roller pad upward against an immovable object during the contraction phase. This mental cue increases neural drive to your hamstrings by 22% according to electromyography studies. Perform 3 sets of 10-12 controlled repetitions with a 2-second pause at peak contraction.
Progressive Resistance Strategies for Continuous Growth
Once you’ve mastered bodyweight movements, implement these resistance progression methods:
Dumbbell technique: Hold a single dumbbell between your feet during extensions. Start with 5-10 pounds and focus on perfect form before increasing weight. The dumbbell’s shifting center of gravity challenges your stabilizer muscles more than fixed-weight systems.
Ankle weight method: Strap adjustable ankle weights around both shins for extensions or behind your ankles for curls. This provides consistent resistance throughout the movement while freeing your hands for better upper body stabilization.
Plate-loaded system: If your bench accommodates weight plates on the roller mechanism, add 2.5-5 pound increments only when you can complete all prescribed repetitions with flawless technique. Never sacrifice form for heavier weights—this is the fastest path to knee injuries.
Increase resistance by no more than 10% weekly. Track your progress in a training journal noting weights, repetitions, and how each set felt. When you can complete 2-3 additional repetitions with perfect form, it’s time to increase resistance.
Troubleshooting Performance Plateaus
If your leg development stalls despite consistent training, these common issues likely explain why:
Why Your Leg Extensions Feel Ineffective
When quad development lags behind other muscle groups, check these technique factors:
– Roller placement too high: Causes knee joint stress instead of quad activation
– Incomplete range of motion: Failing to achieve full knee extension limits growth stimulus
– Excessive weight: Compromises form and shifts work to secondary muscles
Fix this by filming yourself performing extensions—watch for hip elevation and knee lockout. Reduce weight until you can perform 15 perfect repetitions, then gradually build back up.
Why Leg Curls Cause Knee Discomfort
Hamstring development shouldn’t come with knee pain. If you experience discomfort:
– Reposition the roller higher on your calves for curls
– Reduce range of motion until your tendons strengthen
– Perform sets with shorter holds at the top position
Most knee pain during leg curls stems from improper roller placement or attempting too much range of motion too soon. Address these factors before adding resistance.
Essential Maintenance for Long-Term Performance
Your leg roller attachment requires regular care to maintain optimal performance:
Inspect the roller pivot mechanism weekly for smooth operation—any grinding sensation indicates needed lubrication. Apply silicone-based lubricant to pivot points and adjustment pins every three months, wiping away excess to prevent dirt accumulation. Check roller padding monthly for compression or tears; replace when it no longer rebounds to its original shape after pressure.
Tighten all mounting hardware monthly using the manufacturer’s recommended torque specifications. Loose bolts create dangerous movement during exercises that compromises both performance and safety. Wipe down contact surfaces after each use with a mild disinfectant to prevent bacterial buildup and padding degradation.
Final Note: Properly using a weight bench with leg rollers delivers professional-grade leg development in your home gym when executed with correct technique and progressive resistance. By positioning your body precisely, controlling each repetition through full range of motion, and systematically increasing resistance, you’ll transform previously neglected muscle groups into strengths. Commit to perfecting your form before chasing heavier weights, and maintain your equipment diligently to ensure years of safe, effective training. The difference between mediocre results and impressive leg development often comes down to these seemingly small details that most lifters overlook.


