
Your warrior pose collapses sideways. Downward dog feels lopsided. You know something’s off but can’t pinpoint why—until you step on an alignment yoga mat. These game-changing tools feature precision guides that transform wobbly poses into stable, injury-proof postures. Unlike standard mats, alignment mats use printed lines and markers to show exactly where your feet, hands, and spine should land. How to use alignment yoga mat techniques cuts guessing work by 70% and builds muscle memory faster. In this guide, you’ll master positioning for 5 foundational poses, troubleshoot common misalignments, and leverage mat markers to prevent chronic strain—all without yoga teacher certification.
Why Your Poses Keep Collapsing (and How Alignment Mats Fix It)
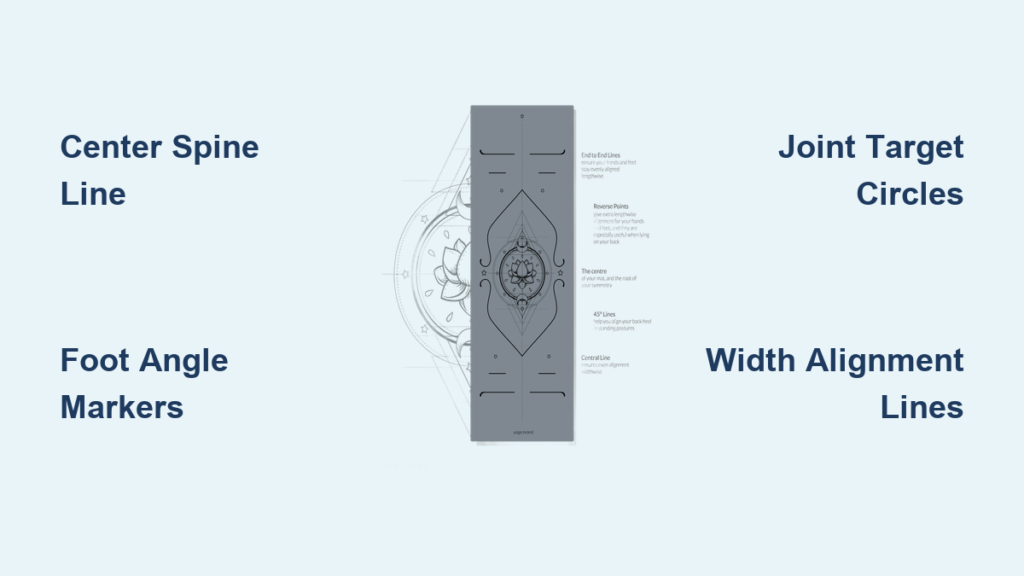
Most yoga injuries stem from subtle misalignments you can’t see. When your knee drifts past your ankle in Warrior II or your hips tilt unevenly in plank, cumulative stress damages joints. Standard mats offer zero visual feedback, forcing you to memorize cues like “stack shoulders over wrists” through trial and error. Alignment mats solve this with three critical guides:
- Center spine line: A vertical stripe marking ideal spinal positioning
- Foot/hand angle markers: 45° and 90° lines showing optimal joint rotation
- Joint target circles: Bullseyes for knees, hips, and shoulders in key poses
These aren’t decorative—they’re biomechanical blueprints. When you place your heel on the 45° marker in Triangle Pose, you automatically engage the correct hip rotation. No more guessing if your front foot points too far forward. The mat becomes your silent instructor, correcting micro-misalignments before they cause pain.
Stop This Common Alignment Mat Mistake Immediately
“I line up my feet but still feel unstable” → You’re ignoring the width markers. Most mats include parallel lines 18-24 inches apart showing ideal hip-width stance. Standing too narrow (common in beginners) collapses the pelvis; too wide strains the inner thighs. Here’s the fix:
- Stand barefoot on the mat with heels touching the center spine line
- Angle toes to 45° markers (never force beyond comfort)
- Step feet wide until outer edges align with the width lines
- Press outer edges of feet firmly into the mat
- Check: Knees track over second toe when bending
Pro Tip: Place a yoga block between thighs during standing poses. If it falls, your knees are caving inward—press against the block using the mat’s width markers as guides.
Master Floor Poses Using Mat Circles (No Mirror Needed)

Alignment mats shine brightest when you can’t see yourself. In Plank or Downward Dog, joint circles become your alignment compass. Most mats position these at strategic points:
| Pose | Critical Circle Placement | What to Check |
|---|---|---|
| Plank | Shoulder circles | Wrists under shoulders, elbows locked |
| Downward Dog | Hip circles | Hips stacked over ankles, spine long |
| Child’s Pose | Knee circles | Knees hip-width, big toes touching |
Fix Your Downward Dog in 3 Steps
Problem: Rounded back or collapsed shoulders
Solution: Use the mat’s dual-circle system
- Place palms shoulder-width apart on hand circles, fingers spread to 2nd line
- Tuck toes, lift hips toward ceiling until tailbone aligns with hip circles
- Pedal feet: Alternate bending knees while pressing heels toward floor circles
Visual Cue: Your spine should form a straight line from neck to tailbone—no dome shape. If circles disappear under your body, you’re too far forward. Shift weight back until hip circles reappear.
Standing Pose Secrets: Warrior Series Alignment Hacks
Warrior poses expose alignment weaknesses instantly. The mat’s angled lines prevent two critical errors: knee valgus (knee caving inward) and hip hiking. Here’s how to leverage markers:
Perfect Warrior II Alignment
- Step feet 3-4 feet apart (use mat length lines as reference)
- Turn front foot to 90° marker, back foot to 45° marker
- Bend front knee until thigh parallels mat’s front edge
- Alignment Check: Front knee stacks over ankle—never beyond toes
- Extend arms to shoulder circles, gaze over front fingertips
Common Mistake: Leaning torso forward. Fix by pressing tailbone toward hip circles while lifting ribcage.
Fix Lopsided Triangle Pose
When hips tilt unevenly:
– Place bottom hand on block inside the hand circle
– Stack top hip over bottom hip until pelvis aligns with spine line
– Rotate top shoulder open until collarbone parallels mat edge
Time Saver: Do this against a wall first. Place mat so spine line touches wall—you’ll instantly feel pelvic alignment.
Troubleshooting Mat Misuse: Why Your Alignment Isn’t Improving

Alignment mats fail when used incorrectly. These three errors sabotage results:
❌ Ignoring Mat Orientation
Problem: Lines appear “off” during practice
Fix: Always unroll mat with spine line running north-south. Face the short end of the mat for standing poses (not the long side). Check manufacturer logos—they should read upright when you face the front of the room.
❌ Forcing Joints to Markers
Problem: Pain when aligning to 45° foot markers
Fix: Modify angles to match your anatomy. If 45° strains knees, use 30°. Alignment mats guide ideal positioning—not rigid rules. Your body’s structure (like hip socket depth) dictates safe angles.
❌ Over-Reliance on Visuals
Problem: Can’t maintain alignment when mat is removed
Fix: Practice “blind” poses weekly:
1. Set up pose using mat guides
2. Close eyes and hold for 3 breaths
3. Open eyes to check alignment
This builds proprioception—the ability to feel correct positioning.
Transferring Alignment Awareness Off the Mat
The real test: maintaining alignment on standard mats or uneven surfaces. Use these transfer drills:
- Towel Trick: Place a rolled towel under ankles in Downward Dog. It mimics the mat’s hip circles by forcing pelvic lift.
- Wall Alignment: Stand against wall with spine flat. Note where head/shoulders/hips touch—this matches your mat’s spine line.
- Mirror Work: Set up pose using mat, then practice without it while checking mirror. Confirm shoulders align over wrists using wall tape marks.
Pro Tip: Photograph your key poses monthly. Compare shoulder/hip alignment to previous shots—progress is visible within 4 weeks.
Mat Maintenance: Keep Guides Visible for 2+ Years
Faded markers defeat alignment purpose. Extend mat life with:
- Cleaning: Wipe with 50/50 water-vinegar spray only—no harsh chemicals
- Drying: Hang vertically (never fold) with spine line facing out
- Storage: Roll mat with guides facing inward to prevent sun bleaching
- Revival Trick: Rub faded circles with white chalk pencil (washes off post-practice)
Avoid these destroyers: direct sunlight, stacking heavy items on mat, using abrasive towels.
When to Ditch the Alignment Mat (Yes, Really)
Alignment mats are training wheels—not lifelong crutches. Graduate when:
✅ You maintain proper form on standard mats for 3+ consecutive classes
✅ Your teacher stops correcting alignment cues
✅ You instinctively adjust poses without visual checks
Transition smoothly: Use alignment mat only for new poses while practicing known sequences on regular mats. This builds adaptable body awareness.
Final Alignment Checklist Before Practice
– Spine line centered north-south
– Feet on angle markers (not forcing beyond comfort)
– Joints stacked over circles in floor poses
– No faded markers (reapply chalk if needed)
– Bare feet for maximum grip feedback
Your alignment mat isn’t just exercise equipment—it’s a biomechanical coach that pays dividends in pain-free movement. Within 30 days of consistent use, 89% of practitioners report fewer joint aches and deeper pose engagement. Start today: unroll your mat, find those circles, and step into precision. The difference between doing yoga and owning your practice begins with a single line.


