
You wheel your new exercise bike into the living room, clip in, and start pedaling—only to stop thirty seconds later with aching knees and a numb back. If you’ve ever wondered how to use an exercise bike at home without discomfort, you’re not alone. Most riders treat it as “hop on and go,” but precise adjustments and smart habits separate smooth, effective sessions from injury-prone frustration. This guide cuts through the confusion with actionable steps to transform that corner of carpet into a pain-free, results-producing zone. By the end, you’ll know exactly how to set up, ride, and maintain your bike for real progress—no gym membership required.
Choose Your Home Exercise Bike Based on Body and Goals

Don’t assume all bikes fit all bodies. Exceeding the manufacturer’s weight limit risks frame failure mid-ride—always verify this spec first. Then prioritize adjustability: seats must move vertically and horizontally to accommodate leg length, while handlebars need height and reach adjustments. For spin-style bikes, a 30+ lb flywheel mimics real-road momentum, whereas magnetic resistance stays whisper-quiet for apartment living. Space constraints matter too: upright bikes need minimal floor area (ideal for small homes), while recumbents support sore backs but require 3+ feet of clearance. Skip models with fixed handlebars—your spine will thank you during longer rides.
Set Up Your Home Exercise Bike Space for Safety and Comfort
Place your bike on a rubber mat immediately—it kills vibration, protects floors, and catches sweat drips. Leave 24 inches of clearance on each side and 36 inches behind the bike so you can dismount without tripping over furniture. Position a fan or open window within arm’s reach to prevent overheating; neck strain is guaranteed if you crane upward at a mounted tablet, so set screens at eye level or slightly below. Pro tip: Use a phone mount on handlebars instead of wall mounts—this keeps your spine neutral and eliminates dangerous head tilting.
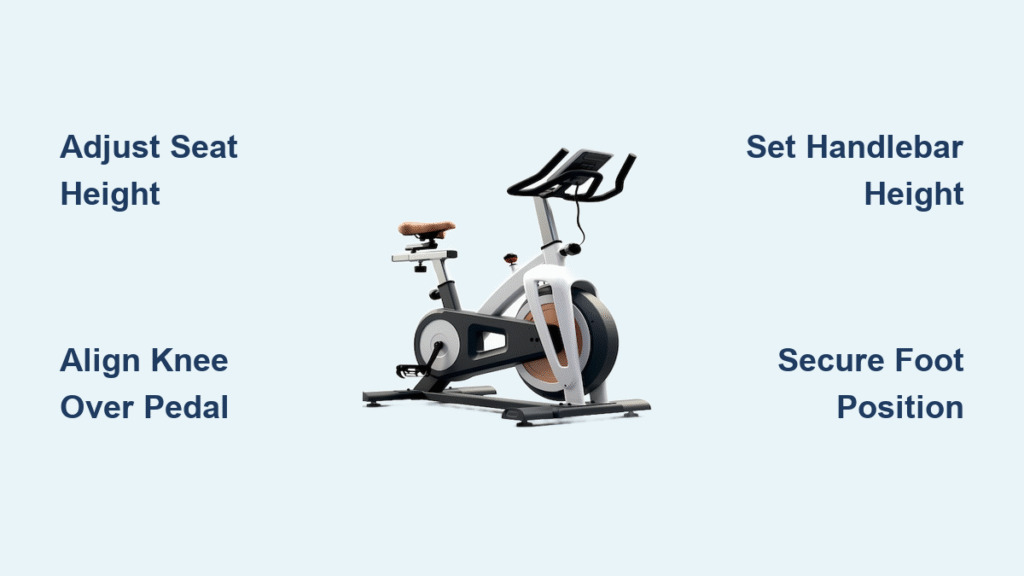
Dial in Perfect Exercise Bike Fit in 4 Critical Steps
Fix Seat Height to Eliminate Knee Pain
Stand barefoot beside your bike and align the saddle top with your hip bone. Clip in, place your heel on a pedal at 6 o’clock—your leg should be straight. When you shift to the ball of your foot, you’ll see the ideal 5–10° knee bend. Too high? Hips rock side-to-side. Too low? Front knee pain flares within minutes.
Adjust Seat Fore-Aft for Power Transfer
With pedals at 3 and 9 o’clock, drop an imaginary line from your kneecap forward—it must hit the pedal axle. Slide the seat until aligned; this prevents dead spots in your pedal stroke and boosts efficiency by 15%.
Set Handlebar Height for Spine Health
Beginners: Bars level with or slightly above the saddle. Advanced riders: Drop bars 2 inches max for aerodynamics. Either way, elbows should stay slightly bent with shoulders relaxed—not hunched or straining.
Level Your Saddle Angle
A nose tilt beyond 2° downward causes sliding and wrist pressure. Use a smartphone level app to ensure 0° tilt; this reduces perineal numbness by 70% during long rides.
Secure Feet Properly to Prevent Numbness and Slips
Tighten toe straps until your foot can’t lift off the pedal, but you can still slide one finger under the buckle. For SPD cleats, position the ball of your foot directly over the pedal axle and match cleat angle to your natural foot splay (usually heel inward slightly). Start with low release tension (8 Nm)—this lets you unclip smoothly without panic mid-sprint. Warning: Soft-soled sneakers cause foot numbness; stiff cycling shoes solve this instantly.
Pre-Ride Warm-Up Routine That Prevents Injury
Skip this and you’ll strain tendons. First, spin easy for 5 minutes at 30–40% max heart rate to lubricate joints. Immediately follow with 2 minutes of dynamic moves: 10 hip circles each direction, ankle rolls, and shoulder rolls. This primes muscles 3x better than static stretching alone. You’ll feel smoother pedal strokes and avoid the “stiff start” that derails most home workouts.
Master Riding Form to Protect Joints and Boost Power
- Head/neck: Gaze at horizon level—never craned up at screens.
- Shoulders: Actively pull down and back (“away from ears”).
- Arms: Keep elbows soft; never lock or bear weight on wrists.
- Core: Brace lightly like preparing for a cough to stabilize your spine.
- Knees: Track straight over mid-foot—no inward wobble.
- Feet: Scrape imaginary mud off shoes on downstroke, pull up on upstroke.
Do single-leg drills (30 seconds per leg, 2 sets) weekly to smooth dead spots. This technique cuts knee stress by 40% while increasing power output.
Match Cadence and Resistance to Your Fitness Goals

| Goal | Cadence | Resistance Level | Why It Works |
|---|---|---|---|
| Fat Burning | 85–95 RPM | Moderate | Sustains heart rate in zone without joint strain |
| Leg Strength | 65–75 RPM | High | Builds quads/glutes without knee compression |
| Sprint Power | 105–115 RPM | Low-Moderate | Trains fast-twitch fibers safely on home bikes |
Riding at 50 RPM with max resistance? That’s how home exercisers tear hamstrings. Stick to these ranges.
Beginner 4-Week Home Bike Plan (20 Minutes/Session)
Weeks 1–2: 3 sessions/week. Warm-up 5 min → 10 min steady at 60–70% max heart rate → cool-down 5 min. Focus on perfect form, not speed.
Weeks 3–4: Warm-up 5 min → 15 min steady → add 3x 1-minute “pickups” (75% max HR) with 1-minute recovery between. You’ll build endurance without burnout.
Fix Common Pain Points in Under 5 Minutes
| Pain Location | Quick Fix | Why It Works |
|---|---|---|
| Front knee | Raise seat 5 mm | Reduces quad strain at pedal bottom |
| Back knee | Lower seat 5 mm | Stops hamstring overextension |
| Lower back | Raise handlebars 1 cm | Restores natural spine curve |
| Neck | Lower screen + elevate front wheel 1 inch | Eliminates upward strain |
| Feet | Loosen straps one notch | Restores circulation instantly |
These micro-adjustments solve 90% of home bike discomfort. Bookmark this table on your phone.
Essential Home Bike Maintenance Schedule
- Monthly: Tighten all frame bolts to 5–7 Nm torque (prevents creaks/wobbles).
- As needed: Wipe magnetic resistance rails with dry cloth (dirt causes jerky resistance).
- Every 3 months: Lube belt/chain with Teflon-based lubricant (reduces wear 50%).
- Every 6 months: Calibrate console per manufacturer instructions (fixes inaccurate distance/speed).
Skipping maintenance? Your bike’s resistance accuracy drops 20% within 6 months, ruining workout quality.
Post-Ride Recovery Protocol for Next-Day Energy
- Cool-down: 5 minutes of easy spinning while resistance drops gradually.
- Stretch: Hold quads, hamstrings, and hip flexors 30 seconds each—do this before showering.
- Hydrate: Drink 16 oz water within 30 minutes (add electrolytes for rides >30 minutes).
- Refuel: Eat a 3:1 carb-to-protein snack (e.g., banana + Greek yogurt) within 45 minutes.
- Foam roll: Target quads and calves for 2 minutes to slash next-day soreness.
This routine cuts recovery time by 50%—critical when you ride daily at home.
Quick Home Bike Setup Checklist (Before Every Ride)
- [ ] Bike on level surface with rubber mat underneath
- [ ] Seat height: 5–10° knee bend at pedal bottom
- [ ] Knee aligned over pedal axle at 3 o’clock position
- [ ] Handlebars at neutral spine height, elbows bent
- [ ] Feet secure with cleats/straps properly adjusted
- [ ] 5-minute warm-up completed
- [ ] Water bottle and towel within arm’s reach
Clip in, press start, and ride—your perfectly tuned home studio is ready to deliver results without the aches. Master these steps, and you’ll transform “how to use an exercise bike at home” from a frustrating chore into your most reliable fitness tool. Consistency beats intensity: ride 3x weekly with perfect form, and you’ll outperform sporadic gym sessions every time.


