
Your chest workout hits a plateau, and you’re struggling to feel that deep muscle burn during fly movements. The solution might be right in front of you—the butterfly attachment on your weight bench. This versatile piece of equipment, often overlooked in home gyms, targets your pectoral muscles with precision that free weights can’t match. Whether you’re a beginner wondering how to set it up or an experienced lifter seeking perfect form, mastering the butterfly attachment unlocks new levels of chest development. In this guide, you’ll learn the exact setup process, proper technique for maximum muscle engagement, and common mistakes that sabotage your results—so you can transform your chest workouts starting today.
Proper Butterfly Attachment Setup and Adjustment

Before lifting any weight, correct setup determines whether you’ll build muscle or risk injury. Most weight bench systems feature a butterfly attachment that either bolts directly to the bench frame or connects via a cable system. Locate the mounting points on your specific bench model—typically two connection points at shoulder height on either side of the bench backrest. Secure the attachment firmly using the provided hardware, ensuring no wobble when you apply pressure. If your system uses cables, thread them through the designated pulleys and attach to the handles with carabiners or secured hooks.
How to Adjust Seat Height for Your Body Type
Your seat height makes or breaks proper range of motion. Sit on the bench with your back flat against the pad and measure from your armpit to the seat. The pivot point of the butterfly arms should align with your shoulder joint. If the arms sit too high, you’ll strain your shoulders; too low reduces chest engagement. Most quality attachments feature 3-5 height adjustments—loosen the adjustment knob, set the height, then tighten securely. Test the position by moving through the motion without weight: your elbows should maintain a 15-30 degree bend throughout, with handles meeting just below eye level at peak contraction.
Selecting the Right Weight for Effective Training
Choosing improper resistance ruins the exercise’s effectiveness. Start with the lightest possible weight—often just the attachment’s natural resistance—to master the movement pattern. Proper butterfly technique requires slow, controlled motions: 2 seconds to squeeze the handles together, 1 second hold at peak contraction, and 3 seconds to return to start position. If you can complete 15 smooth repetitions without feeling your shoulder joints strain, add weight in 5-10 pound increments. The ideal resistance allows 8-12 perfect repetitions before muscle failure, with the last two reps requiring maximum effort while maintaining form.
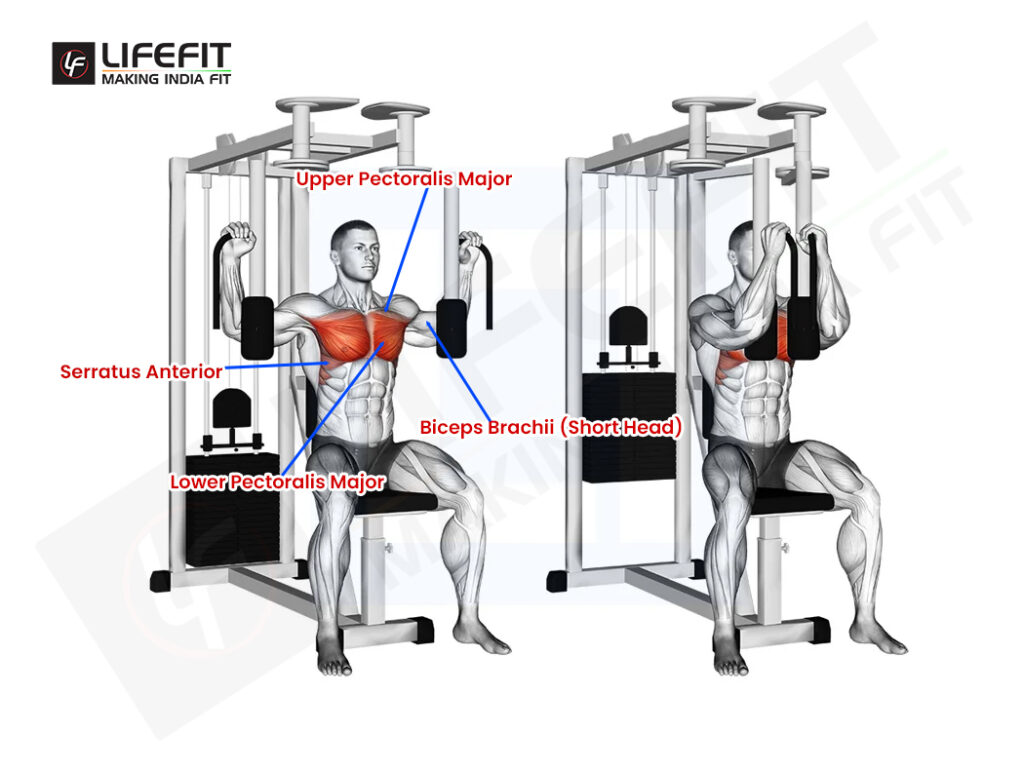
Correct Butterfly Exercise Technique and Form
Step-by-Step Movement Execution for Chest Activation
- Sit with your entire back flat against the pad, feet firmly planted shoulder-width apart
- Grip handles with palms facing forward, thumbs wrapped securely around the grips
- Begin with arms extended to shoulder height, elbows slightly bent (never locked)
- Inhale deeply as you slowly open your arms against resistance
- Exhale forcefully while squeezing handles together, imagining you’re hugging a tree
- Pause for one full second when handles nearly touch in front of your chest
- Control the return movement for three seconds, stopping just before full stretch
The critical detail most lifters miss: your shoulder blades must stay pinned to the backrest throughout. If you find yourself leaning forward or arching your back, the weight is too heavy. Proper form creates intense tension across your entire pectoral muscle group from sternum to shoulders, with no strain in your rotator cuff.
Common Technique Mistakes That Reduce Effectiveness
Overextending at the bottom position – Letting your arms pull behind your torso shifts work to your rear delts and strains shoulder capsules. Stop the eccentric phase when your upper arms reach parallel to the floor.
Using momentum to swing weights – Bouncing at the bottom or jerking handles together recruits shoulders instead of chest. If you need momentum, reduce the weight by 25%.
Shrugging shoulders toward ears – This disengages the chest and overworks traps. Before starting each rep, consciously pull shoulders down and back as if tucking them into your back pockets.
Incomplete range of motion – Many lifters don’t fully extend or contract. You should feel a deep stretch across your chest at full extension and maximum squeeze at peak contraction.
Advanced Butterfly Training Strategies
How to Modify for Different Chest Development Goals
Upper chest focus: Adjust the seat so handles meet slightly above nipple line. Tilt handles downward 15 degrees at peak contraction, emphasizing the clavicular head of your pectoralis major.
Inner chest separation: Use a slower eccentric phase (4-5 seconds) with a 2-second peak contraction hold. Visualize squeezing a beach ball between your hands to activate the sternal head of your pecs.
Lower chest development: Position yourself so handles converge below your lower pec line. Lean slightly forward while maintaining back contact with the pad to target the costal portion of your pectorals.
Incorporating Isometric Holds for Strength Gains
Isometric training dramatically increases muscle fiber recruitment. At three critical points in your range of motion—full extension, mid-range, and peak contraction—pause for 5-10 seconds while maintaining maximum tension. These static holds build strength at specific angles that translate to improved performance in compound lifts like bench press. Start with one isometric position per set, holding for 3 seconds, then gradually increase duration as your strength improves.
Safety Considerations and Injury Prevention

Critical Safety Checks Before Every Workout
Inspect pivot points – Wipe down and examine all moving joints for smooth operation. Any grinding sensation indicates worn bearings needing replacement.
Verify cable integrity – Run your fingers along cables feeling for frays or kinks. Replace immediately if you find damage—cable failure at peak tension can cause serious injury.
Confirm seat stability – Rock yourself side-to-side while seated. If the entire bench moves, anchor it to a stable base or wall mount according to manufacturer specifications.
Recognizing Warning Signs of Improper Use
Sharp pain in your shoulder joint—not muscle burn—means stop immediately. This indicates potential impingement where tendons get pinched between bones. Similarly, tingling or numbness in your hands suggests nerve compression from poor posture. Never work through these warning signs; adjust your position or reduce weight instead. Properly executed butterfly movements should create intense but comfortable muscle fatigue without joint discomfort.
Maintenance and Longevity Tips
Weekly Care Routine for Optimal Performance
Dedicate five minutes after each workout to maintenance. Wipe down pads with disinfectant to prevent sweat damage to upholstery. Apply silicone-based lubricant to all pivot points monthly—never use WD-40 as it attracts dust. Check all bolts and fasteners weekly for tightness, as vibration during use loosens connections over time. Store the attachment in the lowest resistance position when not in use to maintain cable tension.
When to Replace Worn Components
Cables typically last 1-3 years depending on usage frequency. Replace when you notice: visible fraying, inconsistent resistance through the movement range, or sudden “catching” during motion. Padding should be replaced when it develops permanent indentations from your body shape—you need consistent support across your entire back. If the resistance mechanism becomes jerky despite lubrication, consult your manufacturer about replacing the internal components.
Butterfly Attachment Versatility Beyond Chest Workouts
Effective Back and Shoulder Exercises
Flip your technique to transform this chest builder into a back developer. Sit facing away from the machine, grasp handles with overhand grip, and pull handles apart while squeezing shoulder blades. This reverse fly motion targets rear delts and rhomboids. For shoulder isolation, set the attachment to medium height, use light weight, and perform front raises by lifting handles straight forward to shoulder height while maintaining slight elbow bend.
Final Note: Mastering the butterfly attachment requires attention to detail but delivers unmatched chest development when performed correctly. Focus first on perfect form with minimal resistance before increasing weight, and always prioritize controlled movements over heavy lifting. Implement these techniques consistently for 6-8 weeks, and you’ll notice improved chest definition and strength that translates to all upper body exercises. For continued progress, vary your hand positions and incorporate isometric holds every third workout to break through plateaus. Remember that the butterfly attachment works best as part of a balanced routine—pair it with compound lifts like bench press for complete chest development.


