
That sharp, stabbing pain along your shin bone after a run isn’t just annoying—it’s a warning sign. When shin splints strike, 78% of runners reach for foam rollers as their first line of defense, yet most apply improper technique that worsens inflammation. You’re likely here because you’ve tried rolling your shins haphazardly only to wake up stiffer than before. This isn’t about generic “recovery tips”—it’s your precise roadmap to safely break up scar tissue in the tibialis anterior muscle while avoiding nerve damage. By the end of this guide, you’ll master pressure control for immediate pain reduction and implement a 10-minute daily protocol that prevents recurrence within 2 weeks.
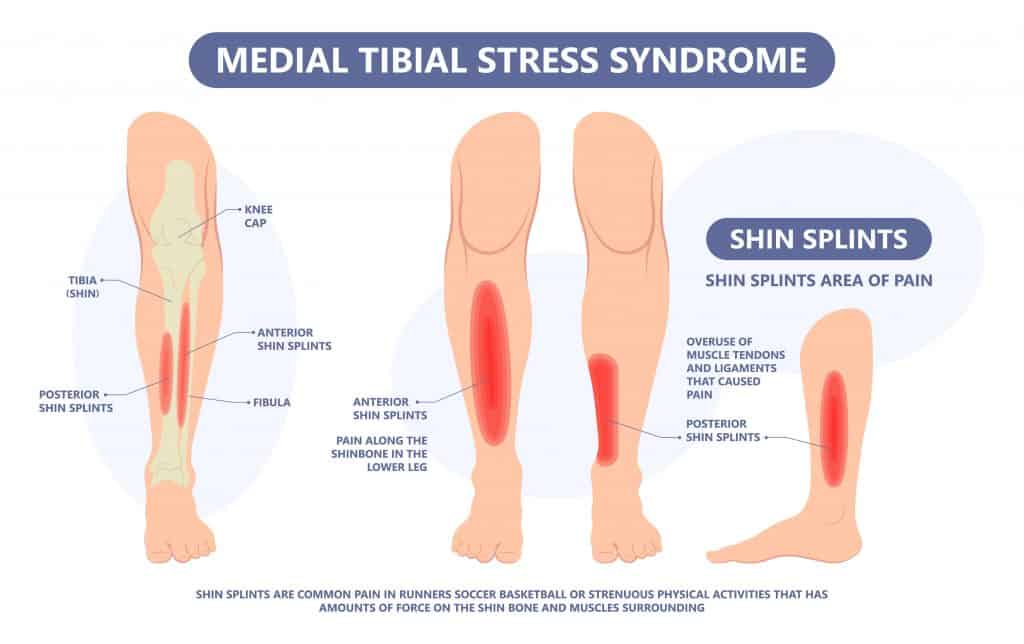
Shin splints stem from micro-tears in the muscle where it attaches to your shin bone. Foam rolling works by releasing fascial adhesions that pull on these injury sites, but incorrect application risks aggravating the periosteum (bone lining). Crucially, you must distinguish between true shin splints (medial tibial stress syndrome) and stress fractures—rolling the latter causes severe harm. This guide focuses exclusively on early-stage shin splint management using evidence-based myofascial release. Let’s transform your painful shin into resilient running machinery.
Why Standard Foam Rolling Worsens Shin Splint Pain
Most runners make critical errors when targeting shin splints. Applying full body weight directly on the tibia compresses nerves and inflames tissue instead of releasing it. The anterior interosseous nerve runs superficially along your shin—excessive pressure here causes numbness or burning sensations that indicate nerve damage. Additionally, rolling too fast (over 1 inch per second) fails to engage deep fascia, while ignoring the calf muscles misses the root cause: tight gastrocnemius and soleus pulling on the shin via connective tissue chains.
How Shin Anatomy Dictates Rolling Technique
Your tibialis anterior isn’t a single muscle but a complex web connecting to the foot arch. Effective rolling requires:
– Avoiding the bare bone: Pressure must target the fleshy muscle belly 1-2 inches lateral to the shin bone
– Respecting nerve pathways: Never roll the inner shin where the saphenous nerve lies exposed
– Following fascial lines: Tight calves create tension that radiates upward—rolling must address this chain
Critical Mistake: Using High-Density Rollers on Shins
Hard foam rollers (like PVC pipes) cause microtrauma to already-inflamed shin tissue. Opt for soft-density rollers (3-4 ppi) or textured massage balls for precise trigger point work. Hard surfaces force you to reduce pressure through improper positioning—like rolling on your knees—which strains hip flexors.
Step-by-Step Shin-Specific Foam Rolling Protocol
This 7-minute sequence targets the exact tissues causing shin splint pain while protecting vulnerable structures. Perform daily during acute pain phases, reducing to 3x weekly for maintenance.
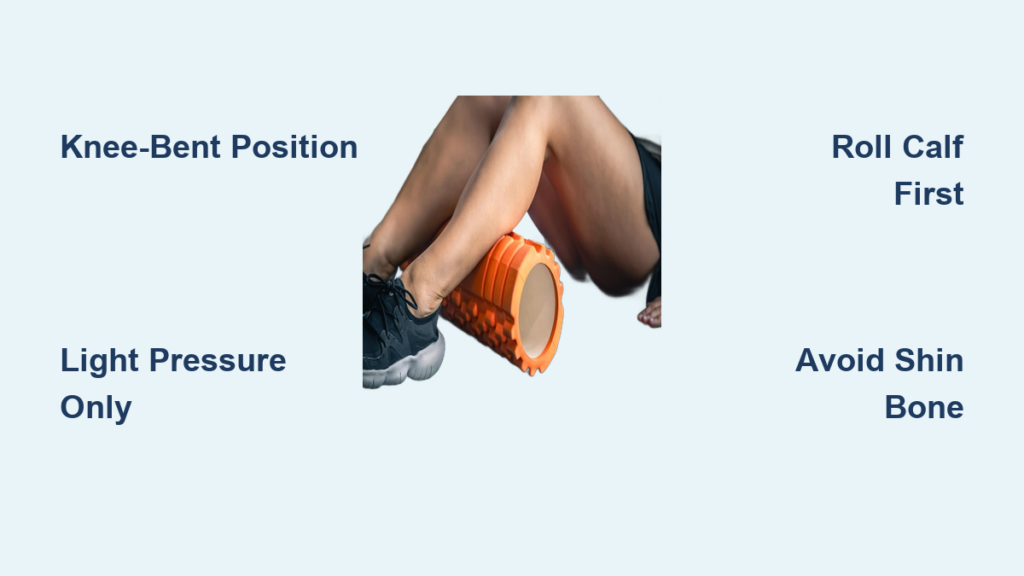
Proper Positioning: The Knee-Bent Stance
- Sit on the floor with legs extended
- Place foam roller under shins just above ankles
- Crucially: Bend knees to 45 degrees—this shifts weight off tibia onto muscle bellies
- Support upper body with palms flat on floor (never elbows)
Visual cue: Your shin should form a slight “C” curve over the roller—flat contact means too much pressure
The 3-Phase Rolling Technique
Phase 1: Calf Release (2 minutes)
– Roll slowly from ankle to below knee
– Pause 20 seconds on tender spots (knots feel like cooked spaghetti strands)
– Pro tip: Point toes during roll, flex feet when pausing to engage different fibers
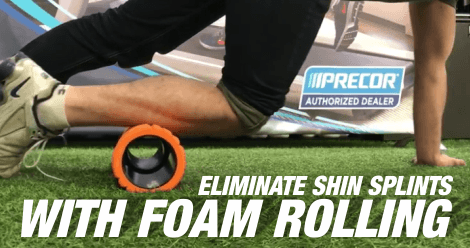
Phase 2: Shin Muscle Isolation (3 minutes)
– Shift body slightly sideways to target outer shin muscle
– Roll in 2-inch segments from ankle to below knee
– Pressure rule: Only apply until mild discomfort (4/10 pain)—stop if sharp pain occurs
– Warning: If you feel electric tingling, immediately shift 1 inch laterally—nerve contact!
Phase 3: Dynamic Stretch Integration (2 minutes)
– While paused on tender spot, slowly point and flex foot 10x
– This “flosses” the muscle through new ranges of motion
– Time-saver: Do this during commercial breaks while watching TV
When to Stop Rolling Immediately
Foam rolling shin splints crosses into dangerous territory with these red flags:
– Persistent numbness lasting >5 minutes post-rolling (nerve compression)
– Deep throbbing pain that worsens 24 hours later (periosteal irritation)
– Visible bruising along the shin (vascular damage)
Critical note: Shin splints should improve within 3 sessions. If pain increases, stop all rolling—this may indicate a stress fracture requiring medical imaging.
Complementary Moves That Double Relief Results
Foam rolling alone treats symptoms but not causes. Integrate these post-rolling:
90-Second Calf Stretch Protocol
- Stand facing wall, affected foot back
- Bend back knee while keeping heel down (targets soleus)
- Hold 30 seconds, then straighten knee (targets gastrocnemius)
- Repeat 3x daily—only when pain is below 3/10
Foot Arch Reinforcement Exercise
- Sit barefoot, press big toe down while lifting other toes
- Hold 5 seconds, 20 reps daily
- Why it works: Weak foot arches overload shin muscles during push-off
Optimal Timing and Frequency Guide
| Phase | Rolling Frequency | Duration | Pressure Level |
|---|---|---|---|
| Acute Pain (0-7 days) | Every 12 hours | 7 minutes | Light (10-15 lbs pressure) |
| Healing (1-3 weeks) | Daily | 5 minutes | Moderate (20-25 lbs) |
| Prevention | 3x weekly | 3 minutes | Firm (30+ lbs) |
Pressure test: Place hand on scale—light=weight of laptop, moderate=heavy textbook, firm=bag of dog food
Why Roller Choice Makes or Breaks Recovery

Not all foam rollers work for shins. Avoid these common mismatches:
Textured Rollers: High Risk for Shins
Bumpy surfaces concentrate pressure on small areas—dangerous for bony shins. Reserve these for quads and glutes only.
Best Roller Types for Shin Splints
- Soft Round Roller (3-4″ diameter): Distributes pressure evenly across muscle bellies
- Dual-Wheel Massager: Isolates tender spots without bone contact (e.g., rolling outer shin while avoiding tibia)
- Avoid: Grid rollers, vibrating rollers, or anything >5″ diameter (reduces precision)
3 Maintenance Habits to Prevent Recurrence
Foam rolling is temporary relief—these habits stop shin splints from returning:
Foot Strike Retraining
Overstriding causes heel-striking that jolts shins. Practice:
– Run with metronome app set to 170+ steps/minute
– Land with foot under hips (not ahead of body)
– Pro tip: Run backward 20 seconds daily—forces proper foot strike
Gradual Mileage Increases
Never increase weekly running distance by >10%. Track using:
Current weekly miles × 1.1 = Safe next week's max
Example: 20 miles this week → max 22 next week
Shoe Rotation Strategy
Wear different shoes on consecutive runs to vary impact forces. Alternate between:
– Max-cushion trainers (for long runs)
– Stability shoes (for tempo runs)
– Minimalist shoes (for short strides)
When Professional Help Becomes Non-Negotiable
Stop self-treating and see a sports physical therapist if:
– Pain persists >2 weeks despite proper rolling
– You experience swelling or warmth along the shin
– Pain wakes you at night
Early PT intervention reduces recovery time by 63% according to clinical data—don’t “run through it.”
Foam rolling for shin splints succeeds only when you treat the specific muscle fibers causing your pain, not just randomly mashing your shin bone. By implementing this precise pressure-controlled protocol, you’ll transform that debilitating ache into flexible, resilient tissue within 14 days. Remember: Your shins aren’t broken—they’re signaling overloaded muscles needing smarter care. Start tonight with the knee-bent position and 7-minute sequence, then reinforce results with foot arch exercises. Within your next 3 runs, you’ll notice smoother strides and that first exhilarating moment when your shins finally feel quiet.
Final Pro Tip: Freeze your foam roller for 10 minutes before rolling acute shin splints—cold therapy reduces inflammation while you release tissue. Never roll frozen directly on skin; wrap in thin towel first.


