
Hip resistance bands have become one of the most versatile and effective tools for strengthening your lower body, particularly the glutes, hips, and thighs. Whether you’re a beginner starting your fitness journey or an experienced athlete looking to add resistance to your warm-up routine, learning how to use hip resistance bands properly can transform your workouts. These compact, affordable bands target muscles that many other exercises miss, helping you build strength, improve stability, and achieve better muscle activation. In this comprehensive guide, you’ll discover everything you need to know about selecting, positioning, and performing hip band exercises that deliver real results.
Before we dive into specific exercises and techniques, it’s important to understand why hip resistance bands deserve a permanent spot in your fitness toolkit. Unlike free weights that rely on gravity, resistance bands create constant tension throughout the entire range of motion. This means your muscles stay engaged from the first to the last rep, maximizing muscle growth and strength gains. Additionally, hip bands are incredibly portable—you can toss them in a gym bag, suitcase, or desk drawer and get a complete workout anywhere. Understanding the proper techniques ensures you avoid injury while getting the most benefit from every session. By the end of this guide, you’ll have a complete roadmap for incorporating hip resistance bands into your routine effectively.
Choose the Right Hip Resistance Band
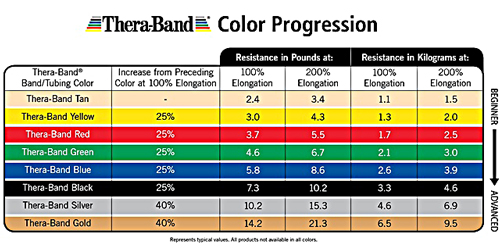
Selecting the appropriate resistance level is the foundation of learning how to use hip resistance bands successfully. Resistance bands typically come in several strength levels, ranging from extra light to extra heavy, and choosing the wrong one can either leave your workout ineffective or lead to strain and injury. Light resistance bands (usually yellow or green in popular brands) work well for beginners, those recovering from injury, or anyone primarily focused on activation and warm-up exercises. These lighter bands allow you to concentrate on proper form and mind-muscle connection without the resistance overwhelming your technique.
Medium resistance bands (often blue or black) represent the sweet spot for most intermediate exercisers who have built a baseline of strength and stability. When learning how to use hip resistance bands for strength building rather than just activation, this level provides enough challenge to stimulate muscle growth while still allowing you to complete your prescribed reps and sets. Heavy and extra-heavy bands (frequently red or purple) are designed for advanced athletes or those specifically targeting maximal glute development. These bands require significant strength to stretch and should only be used once you’ve mastered proper form with lighter resistances.
The band’s material and construction also matter significantly for your training. Cloth-covered bands tend to be more comfortable against your skin during hip exercises, where bands typically sit against your thighs or hips. Latex bands offer more consistent resistance but can cause skin irritation for some users and may trigger latex allergies. Look for bands with reinforced stitching or molded handles, as these details prevent snapping and extend the band’s lifespan considerably. A quality hip resistance band should stretch smoothly without becoming thin and weak at maximum extension—this consistency ensures you’re getting uniform resistance throughout every movement.
Perfect Your Band Placement
The placement of your hip resistance band dramatically affects which muscles you’re targeting and how effective your exercise becomes. For most hip band exercises, the band should sit above your knees, around the mid-thigh area, though some variations require placement at the ankles or just below the hip bones. When the band sits too high on your thighs near your hips, you’ll engage more of your hip flexors and outer glutes. Positioning the band lower toward your knees increases the demand on your inner thighs and glute medius muscles. Experimenting with slight adjustments in placement—even an inch or two—can shift the muscle emphasis significantly.
Understanding band orientation matters just as much as height when figuring out how to use hip resistance bands correctly. Some exercises require the band to be positioned horizontally around your legs, while others work better with the band anchored to a sturdy object and held in your hands. When anchoring the band, always ensure it’s wrapped around a stable point that can withstand significant force—immovable furniture, heavy-duty anchor points, or doorframe anchors designed specifically for resistance bands. Never attach bands to anything that could break, snap, or give way under tension, as band snaps can cause serious injury.
The band’s position relative to your body during each exercise should remain consistent throughout the movement. Many beginners make the mistake of letting the band slide or rotate during exercises, which reduces tension on the target muscles and can cause the band to slip off entirely. For standing exercises, plant your feet firmly and maintain a stable base. For lying or seated movements, engage your core to keep your hips stable and prevent the band from migrating. Taking an extra moment to adjust your placement before beginning each set ensures you’re actually working the muscles you intend to target.
Essential Hip Band Exercises
Mastering the fundamental hip resistance band movements gives you a complete foundation for building stronger hips and glutes. Each exercise targets specific muscle groups, and understanding how to execute them properly ensures you’re getting maximum benefit from your training. Start with these essential exercises, perfect your form, and then progress to more advanced variations as your strength develops.
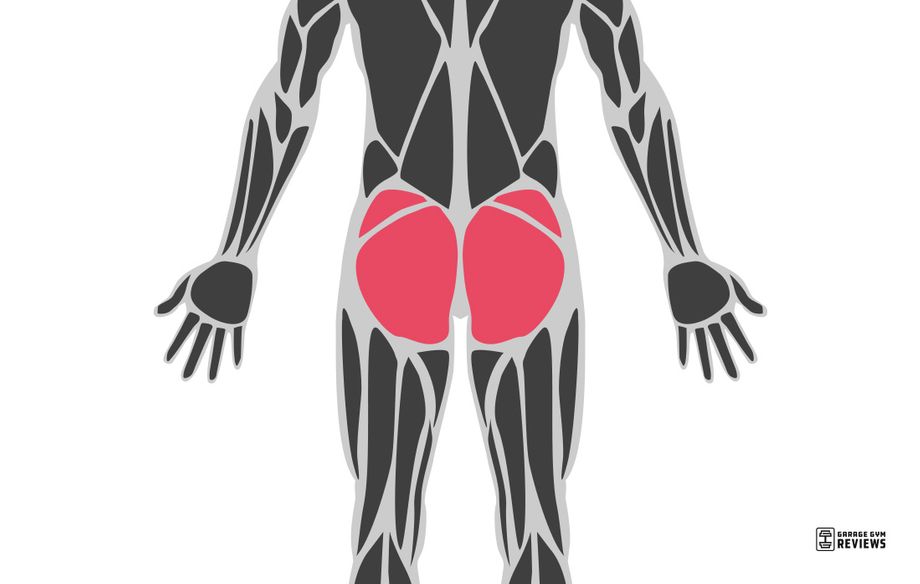
Standing Hip Abductions teach you how to use hip resistance bands for targeting the outer thighs and glutes. Stand with your feet shoulder-width apart and the band positioned above your knees. Shift your weight to one leg while keeping your core engaged and your standing knee slightly bent. Slowly lift your opposite leg out to the side, leading with your heel and keeping your toes pointing forward. Your working leg should travel in a controlled arc rather than swinging freely. Hold briefly at the top of the movement, squeezing your glute, then lower with control. Complete all reps on one side before switching. This exercise builds the lateral hip strength that improves athletic performance and prevents knee injuries.
Clamshells rank among the most effective exercises for learning how to use hip resistance bands to strengthen the glute medius and rotators. Lie on your side with your legs stacked and knees bent at a forty-five-degree angle. Position the band around your thighs, just above your knees. Keeping your feet touching, open your top knee upward against the band’s resistance while your hips stay stacked and your lower back remains stable. The movement should come from your hip rotation, not by twisting your torso. Squeeze your glutes at the top, then lower with control. This exercise is particularly valuable for runners and anyone who spends long hours sitting, as it counteracts the hip weakness that develops from prolonged sitting.
Glute Bridges with Band add resistance to one of the best exercises for overall glute development. Lie on your back with your knees bent and feet flat on the ground, hip-width apart. Position the band above your knees and press your knees outward against the resistance throughout the entire movement. Engage your core and squeeze your glutes as you lift your hips toward the ceiling until your body forms a straight line from shoulders to knees. Hold at the top for two seconds, making sure your ribs don’t flare upward, then lower with control. The band forces your glutes to work harder to keep your knees pushed out, increasing the exercise’s effectiveness significantly.
Common Mistakes to Avoid
Understanding how to use hip resistance bands means knowing what NOT to do, as poor form can undermine your efforts or lead to injury. One of the most frequent mistakes is allowing the band to snap back uncontrollably, especially during exercises that involve stepping or kicking. This usually happens when you release tension too quickly or choose a resistance level that’s too strong for your current strength. Always control the eccentric (lowering) phase of each movement, and if you can’t lower with control, the band is too heavy. The concentric (lifting) phase should be challenging but manageable, while the lowering phase should feel smooth and deliberate.
Another common error involves poor knee alignment during lower body exercises. When performing banded squats, hip abductions, or monster walks, your knees should track over your toes and push outward against the band continuously. Many people let their knees cave inward, which reduces glute activation and puts unhealthy stress on the knee joints. To correct this, focus on pushing your knees sideways throughout each movement rather than just moving your legs. You should feel your outer hips and glutes working hard to maintain proper knee alignment. If you can’t keep your knees out, switch to a lighter band until you’ve built sufficient strength.
Rushing through exercises eliminates much of their benefit by reducing time under tension and compromising form. Each rep should be performed with intention—slow down the lowering phase, pause briefly at the peak of contraction, and lift with control. This tempo maximizes muscle fiber recruitment and promotes greater strength and hypertrophy gains. Quick, sloppy reps might feel easier, but they produce inferior results. Aim for a three-second lowering phase and a one-second lifting phase to start, then adjust based on your specific goals. Quality consistently trumps quantity when it comes to resistance band training.
Progress Your Hip Band Training
Once you’ve mastered the fundamentals of how to use hip resistance bands, strategic progression ensures you continue making gains rather than plateauing. Progressive overload—the gradual increase of demand on your muscles—can be achieved through several methods when working with bands. The most straightforward approach is simply switching to a heavier resistance band as your strength improves. A good rule of thumb is to increase resistance when you can complete your target sets and reps with perfect form and without excessive fatigue compromising your technique.
Increasing time under tension offers another effective progression strategy for those learning how to use hip resistance bands for muscle development. Rather than adding weight, slow down your reps, add more sets, or reduce rest periods between sets. You might progress from three sets of ten reps to four sets of twelve reps, or from a two-second lowering phase to a four-second lowering phase. These modifications increase the total work your muscles perform without requiring a heavier band. Time under tension is particularly valuable for building muscular endurance alongside strength.
Frequency manipulation also contributes to progressive training. Beginners might start with two hip band sessions per week, allowing adequate recovery between sessions. As your tolerance develops, you might train three or four times weekly, either by increasing session frequency or by adding more exercises to each workout. Some athletes benefit from daily brief sessions focusing specifically on activation, while others prefer longer workouts focused on strength building. Listen to your body and adjust frequency based on your recovery capacity and scheduling constraints.
Cool Down and Recovery
Completing your workout with a proper cool down is essential for maximizing the benefits of learning how to use hip resistance bands and supporting long-term progress. After your final set, spend five to ten minutes performing gentle static stretches that target the muscles you’ve trained. Hold each stretch for twenty to thirty seconds, breathing deeply and avoiding any bouncing or forcing movements. Key stretches include the figure-four stretch for your hip rotators and glutes, a seated forward fold for your hamstrings and lower back, and a standing quad stretch that also engages your hip flexors.
Recovery between sessions deserves equal attention when you’re committed to mastering how to use hip resistance bands effectively. Muscles grow and strengthen during rest, not during the workout itself. Ensure you’re getting adequate sleep, as this is when most muscle repair and growth occurs. Nutrition matters significantly—protein intake supports muscle recovery, while adequate hydration maintains joint health and tissue function. Active recovery on off days, such as walking, gentle yoga, or foam rolling, can enhance recovery without interfering with your training adaptations.
Listening to your body provides the ultimate guidance for recovery management. Some mild muscle soreness after challenging sessions is normal and typically resolves within twenty-four to seventy-two hours. Persistent soreness, sharp pain, or joint discomfort signals that you may be overtraining, using improper form, or need additional recovery time before your next session. Pushing through genuine pain leads to injury and setbacks. Respect your body’s signals, adjust your training intensity or frequency as needed, and remember that consistency over months and years produces far better results than intensity that leads to injury and forced breaks.
Build Stronger Hips with Consistent Practice
Learning how to use hip resistance bands opens the door to stronger hips, better athletic performance, and improved functional fitness that enhances every aspect of your life. The key to success lies in starting with appropriate resistance levels, mastering proper band placement and exercise technique, and progressing thoughtfully as your strength develops. Consistency matters far more than occasional intense sessions—regular practice, even in brief sessions, builds the cumulative gains that transform your physique and performance over time.
Resistance band training offers remarkable versatility and accessibility that makes it ideal for virtually anyone seeking to improve hip strength and stability. The minimal equipment requirements mean you can train anywhere, while the low cost makes these tools accessible regardless of your budget. Whether you’re a serious athlete seeking competitive edge, a desk worker combating the negative effects of prolonged sitting, or someone recovering from injury and rebuilding strength, hip resistance bands provide effective training options that scale to your current abilities and goals.
Begin with the fundamentals outlined in this guide, focus on perfect technique over impressive numbers, and trust the process as your strength develops gradually over weeks and months. The muscles you’re building through hip band exercises support better posture, reduced injury risk, improved athletic performance, and enhanced daily function. Your future self will thank you for the investment you’re making today in building stronger, healthier hips through consistent, intelligent resistance band training.


