
Shoulder tension from desk work, stress, or exercise affects nearly 70% of adults, creating that familiar ache between your neck and shoulder blade that just won’t quit. Learning how to use massage ball on shoulder effectively delivers professional-grade relief without expensive appointments, putting targeted myofascial release right at your fingertips. This practical guide reveals exactly how to position, press, and progress with your massage ball for maximum shoulder pain relief—whether you’re a beginner or looking to refine your technique.
Unlike foam rollers that smooth large muscle groups, massage balls penetrate deep into the small, hard-to-reach muscles surrounding your shoulder blade and rotator cuff. When you master how to use massage ball on shoulder properly, you’ll break up stubborn adhesions, increase blood flow, and restore mobility in minutes. Skip the guesswork and discover the precise positions, pressure levels, and timing that transform your shoulder tension from chronic pain to pain-free movement.
Why Massage Balls Beat Foam Rollers for Shoulder Relief
Shoulder tension demands precision tools that reach the complex muscle web around your scapula—not broad pressure from foam rollers. The 2.5-inch diameter of standard lacrosse balls targets specific trigger points in your infraspinatus and teres minor muscles that foam rollers simply can’t access. These small muscles surrounding your shoulder blade control rotation and stability, making them prime targets for massage ball therapy.
You’ll feel immediate differences when switching from foam rollers to massage balls for shoulder work. The concentrated pressure dissolves stubborn knots in your rotator cuff muscles while avoiding excessive force on sensitive shoulder joints. Properly executed how to use massage ball on shoulder techniques provide deeper tissue penetration without the bruising risk of aggressive foam rolling.
Targeting Your Rotator Cuff Muscles Effectively
Your rotator cuff contains four critical muscles that stabilize shoulder movement. The infraspinatus (back of shoulder blade) responds best to wall positioning with moderate pressure for 45-90 seconds. Apply firm but controlled pressure while making small circular motions to release adhesions. For the supraspinatus (top of shoulder), use lighter pressure as this area connects directly to your shoulder joint—excessive force here risks impingement.
The teres minor and major muscles along your scapular border require careful positioning. Place the ball against your shoulder blade’s outer edge while standing against a wall, then shift your weight slightly to find tender spots. Hold pressure for 30-60 seconds until you feel the tension release—this sensation feels like the knot gradually melting under sustained pressure.
Choosing Your Perfect Shoulder Massage Ball

Not all massage balls deliver equal results for shoulder treatment. Lacrosse balls remain the gold standard for how to use massage ball on shoulder techniques due to their ideal 2.5-inch diameter and firm yet forgiving rubber composition. Beginners should select blue or green density balls (softer options), progressing to black or red density balls only after consistent practice.
Texture Matters for Shoulder-Specific Relief
Smooth balls provide consistent pressure that glides along muscle fibers without catching on sensitive shoulder tissue. Textured balls with ridges or spikes offer enhanced stimulation but may irritate tender shoulder areas for beginners. Peanut-shaped massage balls excel for treating both sides of your spine simultaneously—position them vertically along your trapezius muscle while standing against a wall for balanced release.
Pro Tip: Carry a soft density ball in your work bag for quick shoulder tension relief during desk breaks. The portability of massage balls makes implementing how to use massage ball on shoulder techniques part of your daily routine effortless.
Master the Wall Position: Your Go-To Shoulder Release Technique
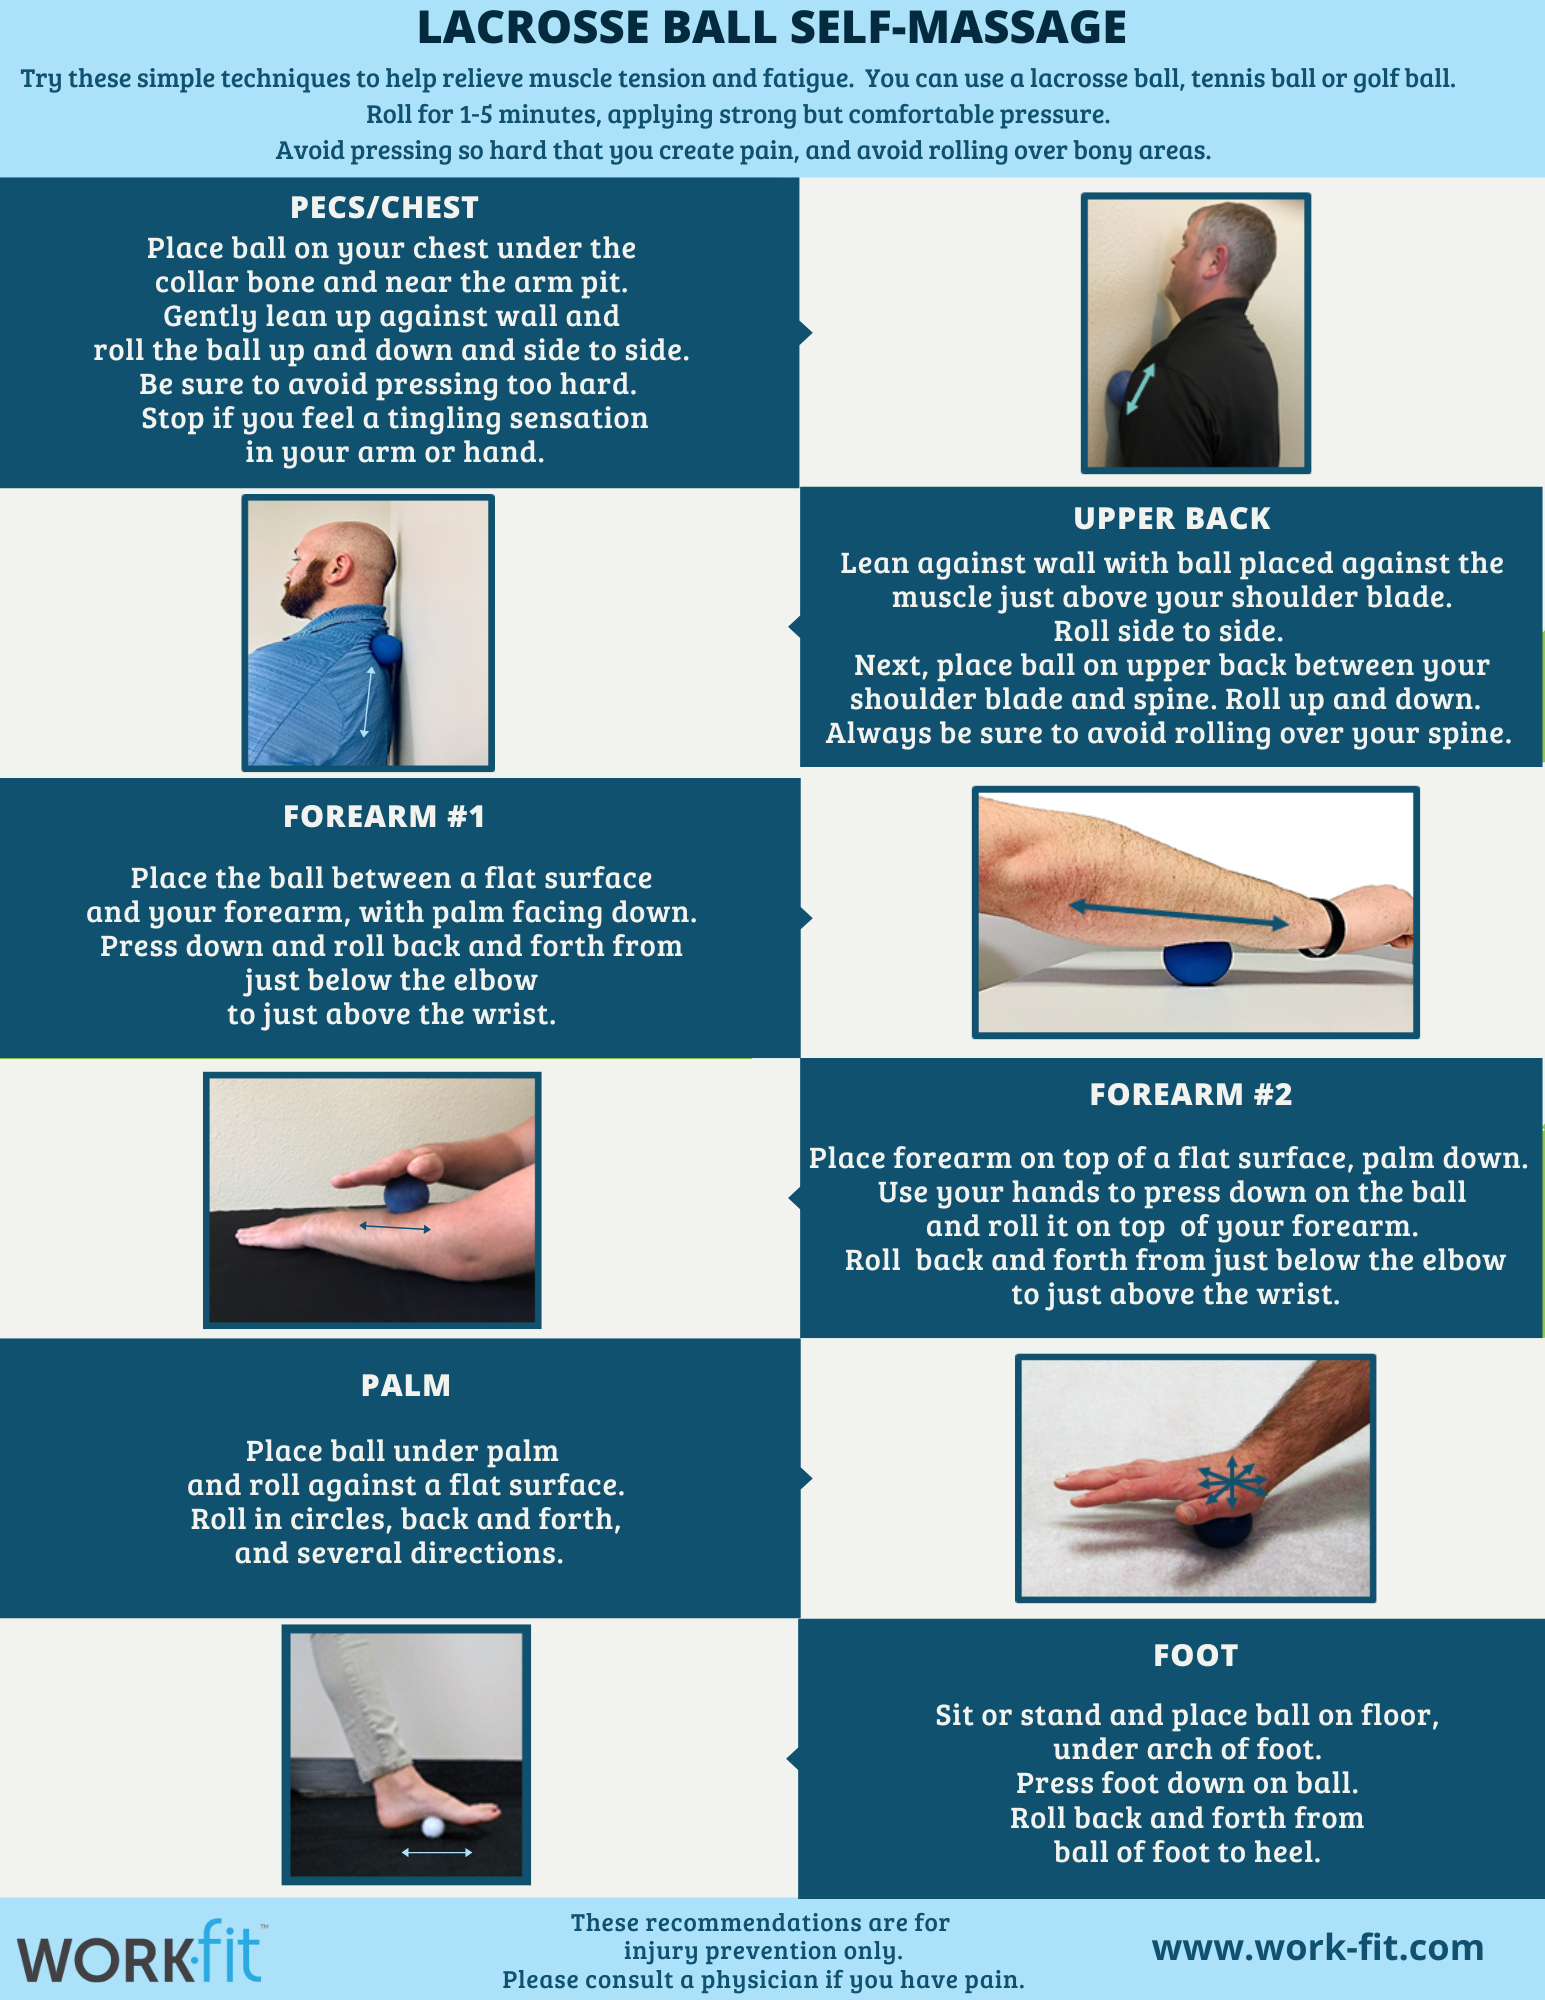
The standing wall position delivers the most accessible and effective shoulder treatment for beginners learning how to use massage ball on shoulder. Stand with your back against a smooth wall and place the ball between your shoulder blade and the wall. Slowly lean into the ball, adjusting your position until you locate tender spots—small shifts of just an inch reveal entirely new trigger points.
Step-by-Step Wall Technique
- Stand with feet shoulder-width apart against the wall
- Place ball between shoulder blade and wall at mid-scapular height
- Lean back gently until you feel moderate pressure (discomfort but no sharp pain)
- Breathe deeply while maintaining pressure for 30-90 seconds
- Shift body weight slightly up, down, or diagonally to explore surrounding areas
- Step away slowly to release pressure when finished
Warning: Never apply direct pressure to bony prominences like your spine or acromion process. Focus on the fleshy muscle tissue between your shoulder blade and spine.
Floor Position Alternatives When No Wall Is Available
When walls aren’t accessible, floor positions provide effective alternatives for how to use massage ball on shoulder techniques. Lie on your back with the ball positioned beneath your shoulder blade, keeping your arm relaxed at your side. Use your opposite hand to gently roll the ball along muscle fibers while controlling pressure with subtle weight shifts.
Three Effective Floor Positions
Supine Position (Face Up): Ideal for targeting middle trapezius fibers. Place ball beneath shoulder blade, keep head supported, and roll slowly while maintaining steady pressure. Perfect for office workers with tight upper backs.
Side-Lying Position: Best for anterior shoulder tension. Lie on your unaffected side with ball positioned beneath upper shoulder. Support head with pillow and shift weight gradually to increase pressure. Excellent for relieving chest-to-shoulder tension.
Prone Position (Face Down): Most effective for posterior deltoids. Lie face down with ball beneath shoulder, turn head to opposite side, and roll gently along scapular border. Use this position after upper body workouts to prevent soreness.
Targeting Trapezius Tension: Neck-to-Shoulder Relief

The upper trapezius muscle—the area where neck meets shoulder—harbors tension for most desk workers. To target this common pain point using how to use massage ball on shoulder techniques, position the ball at the highest point of your shoulder near the neck while standing against a wall. Apply moderate pressure for 45-90 seconds while taking deep breaths.
Trigger Point Release Protocol
- Locate the most tender spot along your trapezius muscle
- Apply direct pressure with your massage ball
- Breathe deeply while maintaining pressure for 30-90 seconds
- You’ll feel the pain intensity gradually decrease as the trigger point releases
- Slowly release pressure once tension diminishes by 50% or more
Pro Tip: Combine trapezius release with gentle neck tilts—slowly bring ear toward shoulder while maintaining ball pressure—for enhanced tension release.
Avoid These 5 Common Massage Ball Mistakes on Shoulders
Many people unknowingly sabotage their how to use massage ball on shoulder efforts with these preventable errors. Excessive initial pressure triggers muscle guarding that worsens tension—start light and gradually increase pressure over multiple sessions. Holding pressure too long on a single point (beyond 90 seconds) causes bruising rather than release.
Treating acute injuries aggressively compounds damage—wait 48-72 hours after sudden shoulder pain before gentle self-massage. Ignoring pain signals leads to injury; sharp or shooting pain means immediate pressure reduction. Neglecting surrounding muscles creates imbalance—always treat your entire shoulder complex, not just the most painful spot.
Safety First: When to Stop Immediately
Discontinue treatment and consult a professional if you experience:
– Numbness or tingling radiating down your arm
– Increased weakness in shoulder or arm
– Pain worsening 24-48 hours after treatment
– Visible bruising beyond mild soreness
– Dizziness or nausea during self-massage
Post-Treatment Stretches to Lock in Shoulder Mobility
Your how to use massage ball on shoulder routine isn’t complete without integrating stretches that capitalize on newly released tension. Perform these stretches immediately after massage ball therapy while muscles remain pliable:
Doorway Chest Stretch
Stand in doorway with forearms on frame (elbows at 90 degrees), step one foot forward, and lean until you feel stretch across chest. Hold 30 seconds, repeat 3 times. This counteracts forward shoulder posture from desk work.
Wall Angels
Stand against wall with lower back flat, arms in “surrender” position. Slowly slide arms up wall while maintaining contact, then lower. Repeat 10-15 times to improve scapular control and shoulder mobility.
Pro Tip: Drink 8-16 ounces of water after treatment to flush metabolic waste released from muscles during therapy.
Create Your Shoulder Relief Routine
Integrate how to use massage ball on shoulder techniques into your daily life with these practical schedules:
Morning Routine (5 minutes): Quick wall position treatment on most tense areas followed by shoulder rolls. Reduces overnight stiffness before your workday.
Work Break (3 minutes): Stand against wall with massage ball during short breaks. Combat desk-related tension before it becomes chronic.
Post-Workout (10 minutes): Target rotator cuff muscles after upper body exercise. Prevents soreness and improves recovery.
Consistency delivers results—regular 5-minute sessions outperform occasional 20-minute marathons. Within 1-2 weeks of daily practice, you’ll notice reduced pain frequency and improved shoulder mobility. By 1-3 months, chronic tension transforms into lasting relief through the cumulative effects of proper how to use massage ball on shoulder techniques.
When self-treatment doesn’t provide adequate relief after consistent practice, consult a physical therapist or massage professional. Persistent pain, weakness, or numbness requires professional evaluation to rule out underlying conditions. For most shoulder tension, however, mastering these targeted massage ball techniques delivers professional-quality relief in the comfort of your home—anytime tension strikes.


