
If you’re looking to maximize your lower body workout in minimal space, combining a mini stepper with resistance bands offers an efficient solution. Many fitness enthusiasts discover that using these two pieces of equipment together creates a more comprehensive lower body workout that targets multiple muscle groups simultaneously. This approach delivers better results than using either equipment alone, making it perfect for home gyms with limited space. You’ll learn exactly how to integrate resistance bands with your mini stepper sessions to boost calorie burn, increase muscle engagement, and improve overall workout effectiveness.
Proper Setup for Mini Stepper and Resistance Band Combination

Positioning Resistance Bands on Your Mini Stepper
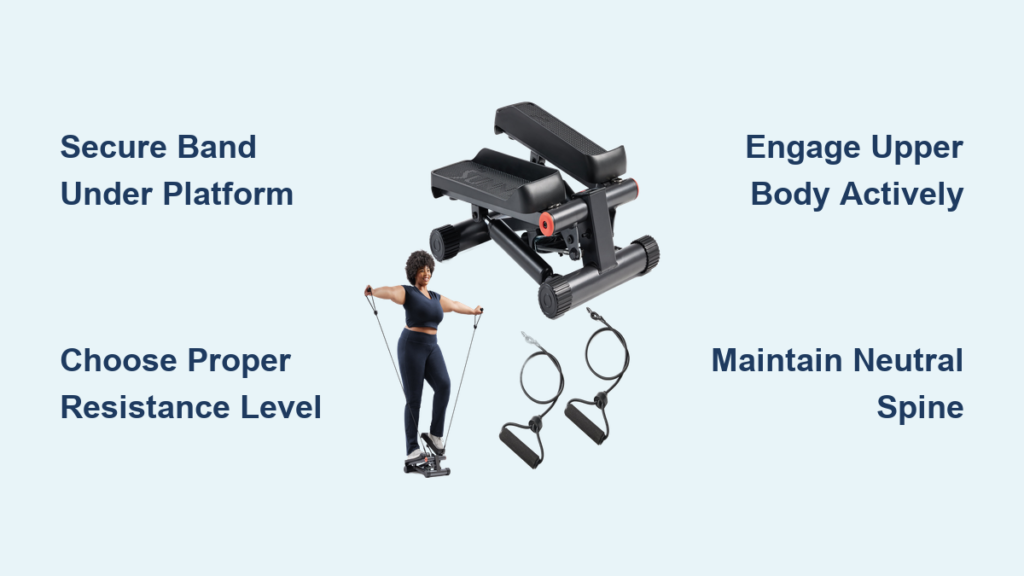
Secure your resistance band beneath the stepper platform before you begin your workout. Place the band directly under the center of the stepper where your feet will contact the pedals, ensuring it’s positioned to create tension when you step down. The band should run perpendicular to your stepping motion with equal length extending from both sides. Check that the band doesn’t interfere with the pedal movement mechanism and isn’t pinched anywhere that could cause it to snap during use.
Selecting the Right Resistance Level
Choose a resistance band that challenges you without compromising your form. For beginners, start with a lighter resistance band that allows you to maintain proper stepping technique for at least 3 minutes before fatigue sets in. As you progress, gradually increase to medium or heavy resistance bands that require noticeable effort during each downward step. The ideal resistance level should make the last 30 seconds of your stepping session challenging but still maintainable with good form.
Effective Workout Techniques with This Equipment Combination
Basic Stepping Pattern with Added Resistance
Begin with your feet shoulder-width apart on the pedals and grasp the resistance band handles at chest height. Initiate your stepping motion by pressing down firmly with one foot while maintaining tension in the band. As you step down, actively pull the band handles outward to engage your upper body. Complete 60-90 seconds of continuous stepping before taking a brief 15-second rest. This basic pattern creates simultaneous engagement of your glutes, quadriceps, hamstrings, and upper body muscles.
How to Maintain Proper Form During Combined Workouts
Keep your spine neutral and avoid leaning forward or backward as you step. Many users make the mistake of holding onto stationary objects for balance, which reduces the effectiveness of the resistance band component. Instead, engage your core muscles to maintain stability while allowing your arms to move naturally with the band resistance. Your knees should track in line with your toes, never collapsing inward, especially when the added resistance makes the movement more challenging.
Creating Progressive Workout Routines

Beginner-Friendly 10-Minute Routine
Start with a 2-minute warm-up using just the mini stepper without resistance bands. Then add a light resistance band and complete three rounds of:
– 90 seconds of basic stepping
– 30 seconds of rest
– 60 seconds of side-to-side stepping (moving laterally while maintaining band tension)
– 30 seconds of rest
This routine provides a manageable introduction to the combined workout while minimizing joint strain. The side-to-side variation specifically targets your abductor and adductor muscles that standard forward stepping might miss.
Intermediate 20-Minute Fat-Burning Protocol
After mastering the beginner routine for 2-3 weeks, progress to this more challenging protocol:
– 3 minutes steady stepping with medium resistance
– 2 minutes rest
– 4 minutes interval training (30 seconds high intensity/30 seconds recovery)
– 2 minutes rest
– 5 minutes of backward stepping with resistance
– 2 minutes rest
– 4 minutes of pyramid intervals (increasing then decreasing intensity)
This intermediate routine significantly increases calorie expenditure by incorporating interval training principles with the added resistance. Backward stepping particularly emphasizes your hamstrings and glutes while reducing quad dominance.
Common Mistakes to Avoid
Incorrect Band Placement That Reduces Effectiveness
Placing the resistance band too far forward or backward beneath the stepper creates uneven tension that can throw off your balance. The band must run directly under the center point where your feet contact the pedals to ensure consistent resistance throughout your stepping motion. Many users also make the error of looping the band around the stepper’s support frame rather than positioning it beneath the stepping platform, which dramatically reduces the resistance effect during the downward stepping motion.
Overlooking Upper Body Engagement Opportunities
Simply stepping while holding resistance bands without actively engaging your upper body wastes half the workout potential. To maximize results, coordinate your arm movements with your stepping rhythm—pull the bands apart as you step down, creating a full-body movement pattern. Neglecting this synchronization means you’re missing out on valuable upper body toning and increased calorie burn that comes from engaging more muscle groups simultaneously.
Safety Considerations for Combined Equipment Use
Proper Footwear Requirements
Wear athletic shoes with non-slip soles that provide adequate arch support for this workout combination. Avoid using the mini stepper with resistance bands while barefoot or in socks, as the added resistance increases slip risk. Your shoes should have enough flexibility in the forefoot to allow natural foot movement but sufficient stability to prevent ankle rolling when the resistance band creates unexpected tension during stepping.
Recognizing Warning Signs of Overexertion
Pay attention to unusual joint sensations, particularly in your knees and ankles, which may indicate improper form or excessive resistance. If you experience sharp pain (not to be confused with normal muscle fatigue), stop immediately and reassess your setup. Many users push too hard too soon with the resistance bands, leading to compromised form that can cause injury over time. A good rule of thumb is that you should be able to maintain proper form for the entire duration of your stepping session without significant form breakdown.
Maximizing Results with Strategic Recovery
Post-Workout Stretching Specific to This Routine
After your mini stepper and resistance band session, dedicate 5-7 minutes to targeted stretching. Focus particularly on your hip flexors, quadriceps, and shoulders, which receive intense engagement during this combined workout. Hold each stretch for 20-30 seconds, breathing deeply to enhance muscle recovery. This specific stretching routine helps prevent the muscle tightness that often accompanies this type of lower body focused workout.
Optimal Frequency for Best Results
For most fitness levels, performing this combined workout 3-4 times weekly provides optimal results without overtraining. Allow at least one full rest day between intense sessions to give your muscles adequate recovery time. Beginners should start with just 2 sessions weekly, gradually increasing frequency as their body adapts to the combined resistance demands. Consistency with proper recovery yields better long-term results than sporadic intense sessions that lead to burnout or injury.
Final Recommendations for Equipment Combination Success
Integrating resistance bands with your mini stepper transforms a simple cardio exercise into a comprehensive full-body workout that delivers significantly better results than using either piece of equipment alone. Remember to start with lighter resistance and shorter sessions, gradually increasing both as your strength and endurance improve. The key to success lies in maintaining proper form throughout your workout while progressively challenging your muscles with increased resistance and duration.
For continued progress, document your workouts by noting the resistance band level, session duration, and how each session felt. This tracking helps you recognize improvements and adjust your routine appropriately. Most importantly, listen to your body—this equipment combination can be incredibly effective, but only when performed with proper technique and appropriate resistance levels for your current fitness level.


