
Nothing derails your fitness progress faster than realizing your gym’s closed when you’re ready to sculpt stronger arms. Resistance bands solve this problem by transforming any space into your personal arm-training studio. These portable powerhouses deliver constant tension throughout every movement, activating more muscle fibers than traditional weights while being gentle on joints. Whether you’re a beginner seeking toned arms or an athlete wanting to maintain strength on the road, mastering how to use resistance bands for arms unlocks consistent progress without bulky equipment. In this guide, you’ll discover precise techniques that build impressive arms anywhere—no gym required.
Why Resistance Bands Beat Dumbbells for Arm Development
Resistance bands create tension through elongation rather than gravity, forcing your arm muscles to work harder through the entire range of motion. Unlike dumbbells that provide maximum resistance only at certain points, bands maintain consistent challenge from start to finish. This constant tension builds functional strength that translates directly to everyday movements while reducing joint strain.
The real magic happens through subtle adjustments—changing your grip width during curls shifts emphasis between different bicep heads, while altering anchor points targets specific tricep sections. This precision allows you to address muscle imbalances and develop complete arm definition that free weights often miss. Plus, bands’ portability means you never miss an arm workout, whether traveling or short on time.
Selecting Your Perfect Resistance Band Set
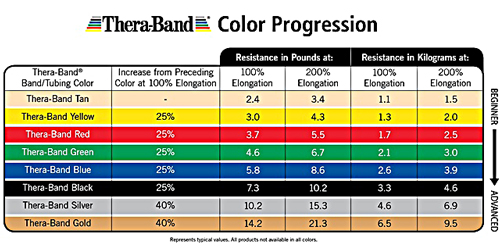
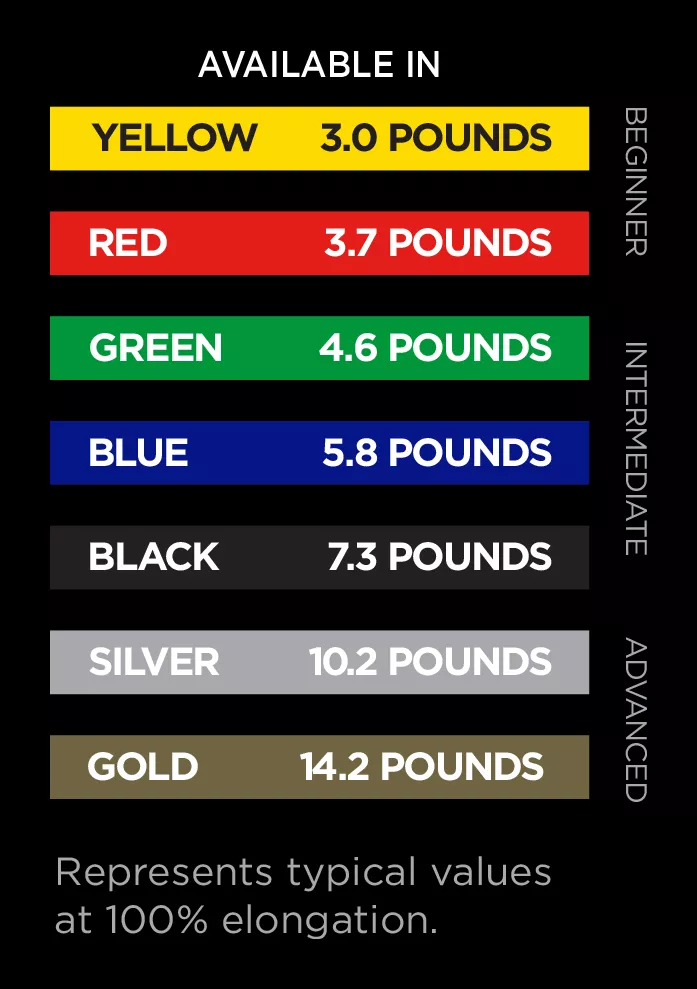
Choosing the right resistance levels prevents frustration and maximizes results. Most band sets use color-coding to indicate tension levels, with lighter bands (yellow, red) ideal for beginners and forearm work, medium bands (green, blue) perfect for standard bicep curls and tricep extensions, and heavier bands (black, silver) challenging advanced users.
Look for bands with comfortable handles that won’t dig into your palms during high-rep sets. Flat bands generally provide more consistent resistance than tube-style bands for arm exercises. Quality latex bands offer durability but check for allergies—synthetic options work well for sensitive skin. Start with a set containing at least three resistance levels to accommodate different exercises and progression.
Setting Up Your Arm Training Space
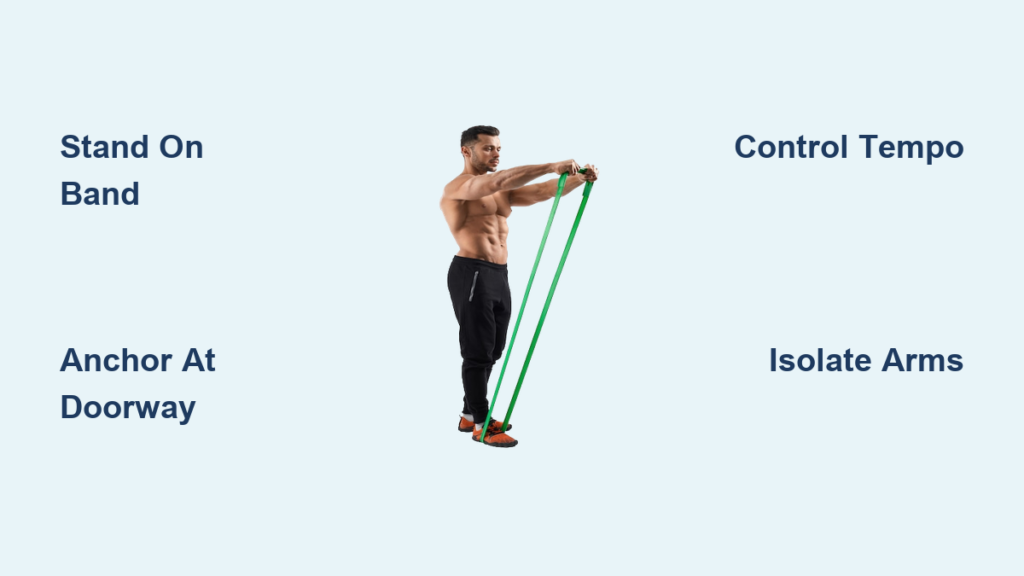
You need surprisingly little space for effective resistance band arm workouts—just enough room to fully extend your arms in all directions. A standard doorway with a secure anchor system provides versatile positioning for dozens of exercises. Test your anchor point by applying moderate tension before starting your workout to ensure safety.
Temperature affects band performance—cold bands feel stiffer while warm bands stretch more easily. If training in a cool space, perform a few light warm-up stretches with your bands first. Always inspect bands for nicks or thinning before use, especially at contact points with handles or anchors.
Mastering Essential Bicep Exercises
Standing Bicep Curl Technique
Stand firmly on the center of your band with feet shoulder-width apart, holding handles with palms facing forward. Keep elbows pinned to your sides as you curl handles toward shoulders, then slowly lower with control. The key to maximum bicep engagement is strict form—no body swinging or elbow movement. Choose a band that challenges you by the final repetitions while maintaining perfect technique.
Concentration Curl Variation
Sit with legs extended, placing one foot under the band. Hold the handle and curl while pressing your upper arm against your inner thigh. This single-arm variation eliminates momentum and delivers intense bicep isolation. Alternate arms or complete all reps on one side before switching to address strength imbalances.
Hammer Curl for Arm Thickness
Rotate palms to face each other and perform standard curls. This neutral grip targets the brachialis muscle beneath your biceps, creating impressive arm thickness and boosting grip strength. Include these in your routine for complete arm development that dumbbells alone can’t achieve.
Effective Tricep Training with Bands
Overhead Tricep Extension
Stand on the band with both feet, holding one handle behind your head with elbow pointed upward. Extend your arm straight overhead, then lower with control. This movement targets the long head of your triceps, creating that sought-after horseshoe shape. Keep your upper arm stationary—only your forearm should move.
Tricep Kickback for Definition
Anchor the band at waist height and hold handles while hinging forward at the hips. With elbows bent at 90 degrees, extend arms straight back against resistance. This isolation movement develops the lateral head responsible for arm width. Maintain a slight bend in knees and engage your core to prevent back strain.
Band-Assisted Diamond Press-Up
Loop a band behind your back while performing diamond hand-position push-ups. The added resistance dramatically increases tricep engagement throughout the movement. Place hands close together in a diamond shape under your chest for maximum tricep activation.
Forearm and Grip Strength Builders
Wrist Curl Technique
Rest your forearm on your thigh with palm facing up, holding a band handle. Curl your wrist upward against resistance, then slowly lower. Perform high repetitions (20-30) for muscular endurance that supports all other arm exercises. Balance with wrist extensions (palm down) to prevent muscle imbalances.
Farmer’s Walk Variation
Grip both handles in one hand while keeping the band anchored under your opposite foot. Walk forward while maintaining tension, building crushing grip strength that enhances performance in all pulling exercises. Alternate hands to ensure balanced development.
Creating Your Arm-Specific Workout Plan
Structure your routine for maximum efficiency: begin with bicep exercises followed immediately by tricep work to allow brief recovery between muscle groups. Perform three sets of 12-15 repetitions for each exercise with 60-90 seconds rest between sets. Complete this routine 2-3 times weekly with at least 48 hours between sessions.
Start with standing bicep curls, then overhead tricep extensions. Follow with concentration curls and tricep kickbacks. Finish with 20 repetitions of wrist curls and extensions per wrist. As you progress, increase resistance, add repetitions, or slow your movement tempo to continue challenging your muscles.
Avoiding Critical Training Mistakes
Using momentum instead of muscle control sabotages your results. If you can’t complete reps with strict form, switch to a lighter band—proper technique always trumps resistance level. Many practitioners also cut their range of motion short, stopping just before full extension. Complete each repetition fully for balanced development and improved flexibility.
Neglecting single-arm work creates strength imbalances that eventually limit progress. Always train each arm independently and focus on matching performance between sides. Your dominant arm will naturally try to compensate—concentrate on equal effort from both arms.
Progressing Beyond Plateaus
Systematic progression prevents stagnation in your arm development. When exercises feel too easy, increase resistance by stepping farther onto the band or using a heavier band. Volume progression—adding sets or repetitions—builds endurance and definition. Tempo manipulation, particularly slowing the lowering phase, dramatically increases muscle fatigue without heavier resistance.
Exercise variation introduces new challenges as you master basics. Progress from standing curls to concentration curls, and from basic tricep extensions to single-arm variations. Each progression demands more from your muscles, stimulating continued growth.
Safety Essentials for Band Training
Never position your face in line with stretched bands—recoil from snapping bands can cause serious injury. Always stand to the side of anchored bands and test tension gradually before max-effort sets. Start each session with light warm-up sets to prepare muscles and connective tissue.
Listen to your body’s signals—sharp pain means stop immediately, while muscle fatigue is normal. Incorporate rest days and vary your training focus to prevent overuse injuries. Proper form matters more than resistance level for long-term arm development.
Maximizing Results with Combined Training
Resistance bands complement other training methods beautifully. Use them for high-rep pump work after weight sessions, or as warm-up tools before heavy lifting. Add bands to bodyweight exercises like push-ups for increased tricep challenge. Even integrate arm movements with cardio circuits to maintain muscle while improving fitness.
The journey to impressive arms rewards patience and consistency more than heavy resistance. Master proper form with lighter bands before progressing, respect your body’s recovery needs, and celebrate small improvements. Your arms will transform through consistent, intelligent training—not through ego-driven attempts at resistance you can’t control properly. Start today with what you have, progress methodically, and watch your arms develop strength and definition that turns heads.


