
Resistance bands have become a secret weapon for anyone serious about building arm strength, and when it comes to biceps, these humble elastic tools deliver results that rival traditional free weights. Whether you’re a beginner setting up your first home gym or an experienced lifter looking to add variety to your routine, mastering resistance band bicep exercises can transform your arm development. The unique tension profile of bands—providing more resistance as they stretch—creates continuous muscle engagement that dumbbells simply can’t replicate. This comprehensive guide walks you through everything you need to know to build impressive bicep peaks using nothing more than a few bands and proper technique.
Understanding why resistance bands work so effectively for bicep development starts with recognizing how they challenge muscles differently than static weights. When you curl a dumbbell, the hardest point is at the bottom of the movement where gravity creates peak tension. Resistance bands do the opposite: tension increases as the band elongates, meaning your biceps work hardest at the peak contraction point where the muscle is already shortened. This reversed tension curve makes band curls incredibly effective for overloading the shortened position of the bicep curl, which is crucial for developing full arm development and impressive muscle peaks.
Selecting Proper Resistance Bands for Bicep Development
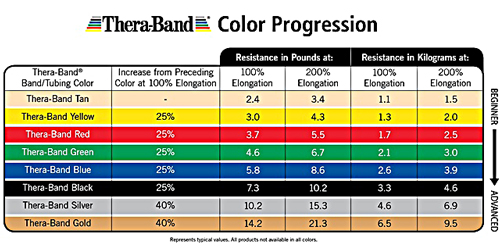
Choosing the right resistance bands for bicep training requires understanding the different resistance levels available and how they match your current strength. Resistance bands typically come color-coded with light, medium, heavy, and extra-heavy options, though manufacturers use different color systems so checking the actual resistance rating in pounds matters more than relying on color alone. For bicep curls, most beginners should start with a medium-resistance band that allows 12-15 clean repetitions with good form, while intermediate to advanced trainees often need heavy or layered bands to achieve the 8-12 rep range that maximizes hypertrophy.
The material quality of your bands directly impacts both safety and effectiveness during bicep workouts. Look for bands made from natural latex or thermoplastic elastomer (TPE), which offer consistent resistance and greater durability than cheaper alternatives that stretch out quickly. Bands with fabric handles attached provide more comfortable gripping during high-repetition sets, though handle-less bands offer greater exercise variety when anchored under feet or around poles. Inspect your bands regularly for tiny tears, especially near attachment points, as degraded bands can snap unexpectedly and cause injury or damage surrounding objects.
Setting Up for Effective Band Bicep Training
Before diving into bicep exercises, taking 5-10 minutes to properly warm up your arms and shoulders prevents injury and improves performance. Arm circles in both directions, wrist rotations, and gentle shoulder rolls loosen the joint capsules and increase blood flow to the muscles you’ll be targeting. Follow this with a few light sets of band curls using minimal resistance—these practice sets activate the neural pathways to your biceps and ensure the muscle fibers are primed for heavier work. Cold muscles respond poorly to resistance training, so never skip this preparation phase regardless of how eager you are to start your workout.
Setting up your training space correctly makes the difference between an effective session and a frustrating one. For standing curls, ensure you have about 6-8 feet of clear space in all directions so the band can extend fully without hitting walls or furniture. If you’ll be using anchor points for seated or bent-over variations, verify that door anchors, poles, or sturdy furniture can handle the tension—never anchor to anything that could break, tip over, or damage when you pull against it. A yoga mat or comfortable floor covering makes seated exercises more pleasant and provides stable footing for exercises requiring you to sit on the band.
Mastering Standing Band Curl Technique
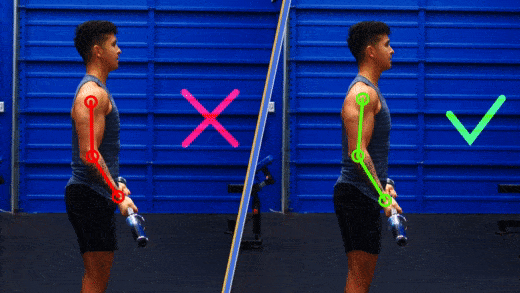
The standing band curl serves as the foundation of resistance band bicep training, building the basic curling pattern that translates directly to barbell and dumbbell work. To perform this exercise correctly, stand on the band with feet shoulder-width apart, holding one handle in each hand with palms facing forward and arms hanging completely straight at your sides. Keep your elbows pinned tightly to your ribs throughout the movement—allowing them to drift forward cheats the biceps out of effective work and shifts tension to your shoulders. Curl your hands toward your shoulders by bending at the elbows only, squeezing your biceps hard at the top of the movement before slowly releasing back to the starting position under control.
The tempo at which you perform band curls dramatically impacts their effectiveness for muscle building. Fast, jerky repetitions recruit momentum and reduce time under tension, undermining the hypertrophy benefits you’re seeking. Instead, aim for a 2-1-2 cadence: two seconds lifting (concentric phase), one second pause at the top with maximum contraction, and two seconds lowering (eccentric phase). This controlled tempo maximizes muscle fiber recruitment throughout the entire range of motion and creates the mechanical tension that drives muscle growth. Counting aloud or using a metronome helps maintain consistent timing during sets.
Correcting Common Standing Curl Mistakes
Common errors in standing band curls often stem from using too much resistance or neglecting proper elbow positioning. When bands are too heavy, trainees unconsciously swing their bodies, rock back on their heels, or let their elbows flare outward to generate momentum—none of these compensations effectively target the biceps. If you cannot complete 10-12 clean repetitions with perfect form, switch to a lighter band immediately. Elbows drifting forward during the curl transforms the exercise into more of a shoulder raise, reducing bicep activation by up to 40% compared to proper form with elbows stationary at the sides.
Maximizing Bicep Isolation with Seated Variations
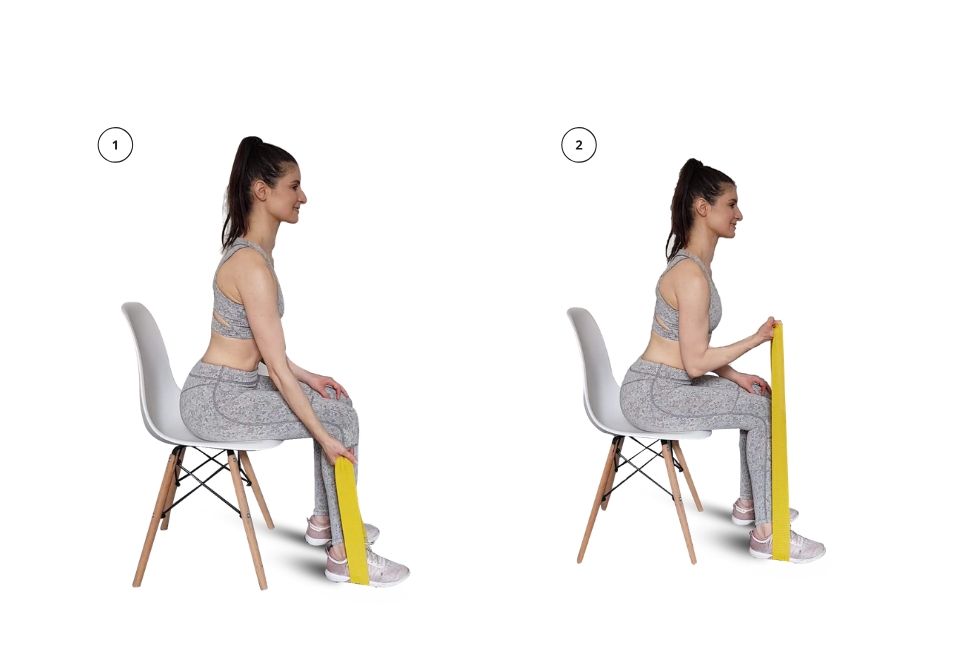
Seated band curls eliminate the ability to cheat by swaying your body, forcing your biceps to handle all the resistance without assistance from leg drive or core stabilization. Sit on the floor with your legs extended straight, place the band under your arches, and hold the handles with arms straight and palms facing upward. Curl your hands toward your shoulders while keeping your elbows pressed firmly into the floor beside your hips—this position locks your upper arms in place and creates maximum bicep isolation. The seated position also reduces shoulder involvement, making this variation particularly valuable for trainees recovering from shoulder issues who still want to train biceps effectively.
Concentration Curls for Targeted Bicep Growth
The concentration curl variation takes isolation a step further by supporting one arm at a time, removing even the minimal stability demands of the standard seated position. Sit on a bench or chair, place your elbow against the inside of your same-side thigh, and perform curls with that arm while your other hand provides stability. This position allows you to focus entirely on the working arm, mind-muscle connection improves dramatically, and you can often use slightly heavier resistance because you’re not splitting effort between both arms. Perform 3-4 sets of 10-15 repetitions per arm before switching sides, maintaining strict form throughout.
Advanced Anchor-Based Bicep Techniques
Door anchor exercises open up possibilities that standing or seated variations simply cannot match, allowing you to direct resistance from behind, above, or below to create entirely new training angles. Attach a band to a door anchor positioned at chest height, grasp the handle with one hand, and step back until the band offers firm resistance. Perform curls with your elbow moving from straight at your side to fully bent, focusing on squeezing your bicep hard at each contraction. The angle created by anchoring behind you forces your biceps to work through a slightly different range of motion than traditional curls, hitting the muscle fibers at unique lengths that complement standard variations.
Overhead Band Curls for Peak Contraction
Overhead band curls, with the anchor point positioned above your head, create peak resistance when your arm is already overhead—a position where gravity normally unloads the bicep. Attach the band to a high anchor point like a pull-up bar, door frame, or sturdy hook, grasp one handle in each hand, and face away from the anchor. With arms extended overhead and palms facing forward, curl your hands down toward your ears by bending at the elbows while keeping your upper arms stationary. This reverse angle means your biceps work hardest at the shortened position, exactly where standard curls provide the least challenge, making overhead curls an excellent supplementary exercise for complete bicep development.
Avoiding Critical Training Errors
Using momentum rather than muscle power represents the most widespread error in resistance band bicep training, and correcting this habit dramatically improves results. When bands are too heavy or trainees rush through sets, the natural elasticity of the bands creates a rebound effect that makes lifting easier but working muscles harder. Fight this tendency by performing every repetition slowly and deliberately, pausing briefly at full contraction, and releasing the band under complete muscular control. Some athletes find that wrapping the band around their hands once or twice—shortening the effective working length—increases control and reduces the temptation to use momentum.
Ensuring Full Range of Motion
Neglecting the full range of motion cheats your biceps out of significant development potential. Many trainees stop just before their arms straighten completely, leaving the bottom portion of the movement untrained, or fail to achieve full contraction at the top, missing the opportunity for maximum fiber recruitment. At the bottom of each curl, your arms should be completely straight with the band providing substantial tension—if the band goes slack at full extension, you’re standing too close to the anchor point or using a band that’s too long for your height. At the top, your biceps should be fully contracted with your hands as close to your shoulders as possible without resting them there.
Building Your Resistance Band Bicep Routine
Structuring effective resistance band bicep workouts requires understanding rep ranges, set volumes, and recovery requirements that drive muscle adaptation. For hypertrophy, research consistently supports performing 3-4 sets of 8-12 repetitions with 60-90 seconds rest between sets, using resistance that creates failure within that rep range. If you can easily complete 15+ reps, the band is too light; if you cannot reach 8 reps with good form, the band is too heavy. This moderate rep range balances mechanical tension, metabolic stress, and time under tension—all factors contributing to muscle growth.
Begin your bicep session with your strongest compound variation—typically standing band curls or seated curls using your heaviest available band—while you’re fresh and can handle the most resistance. Move to isolation exercises like concentration curls or hammer curls afterward, when fatigue is acceptable because the loads are lower. Finish with high-repetition pump work using lighter bands, which flushes the muscle with blood and delivers nutrients while creating the metabolic stress that complements mechanical tension for complete growth stimulation.
Maintaining Equipment and Training Consistency
Proper band storage extends equipment life and prevents the degradation that leads to unexpected breakage. Keep bands coiled neatly in a drawer or hung on a pegboard when not in use, away from direct sunlight, extreme temperatures, and sharp objects. UV exposure breaks down latex over time, making stored bands brittle and prone to snapping, so never leave bands in a sunny window or car interior. Inspect bands before each use by stretching them fully and checking for small cracks, thin spots, or fraying edges—any band showing signs of damage should be replaced immediately rather than risking injury during use.
Consistency trumps intensity when building bicep mass with resistance bands. Training biceps 2-3 times per week with adequate recovery produces optimal results for most trainees. Even brief 15-minute band sessions performed consistently outperform occasional intense workouts, so establish a sustainable frequency and stick with it rather than alternating between periods of high volume and complete inactivity. The portability of resistance bands makes consistent training possible anywhere—keep a set in your suitcase for travel or at your office for quick midday sessions that add up to significant progress over time.


