
Your resistance band is gathering dust in the corner while your glutes remain stubbornly flat. You’ve tried squats and lunges, but without the right resistance progression, your results have plateaued. The truth is, resistance bands offer a scientifically-backed method to activate and strengthen your glute muscles more effectively than bodyweight exercises alone. By strategically placing bands at different points on your body, you can create targeted tension that forces your gluteus maximus, medius, and minimus to work harder throughout each movement. In this guide, you’ll discover exactly where to position your band, which exercises deliver the strongest muscle contractions, and how to progress your routine for noticeable shape improvements in just weeks. Whether you’re working out at home or supplementing your gym routine, these resistance band techniques will transform your lower body results.
Position Your Resistance Band for Maximum Glute Activation

The placement of your resistance band dramatically impacts which glute muscles get targeted and how intensely they work. Many beginners make the critical error of using bands incorrectly, reducing effectiveness by up to 60% according to exercise science principles. For optimal glute engagement, position your band just above your knees rather than around your ankles. This placement creates horizontal resistance that forces your gluteus medius and minimus to fire constantly to prevent your knees from collapsing inward during movements. The band should feel snug but not restrictive—when properly positioned, you’ll immediately feel your outer hips engage as you move.
Why Knee Placement Beats Ankle Placement for Glute Growth
Placing your resistance band above your knees activates more muscle fibers in your glutes compared to ankle placement. When the band sits above your knees, each time you perform a squat or hip hinge movement, your gluteus medius must work overtime to maintain proper knee alignment against the band’s lateral pull. This targets the often-neglected side glutes responsible for that coveted shelf-like appearance. Ankle placement primarily engages your hamstrings with minimal additional glute activation, defeating the purpose of targeted glute development. The knee position also allows for greater range of motion and more natural movement patterns that prevent strain on your hip joints.
How Tight Should Your Resistance Band Feel?
Your resistance band should provide noticeable tension but never compromise your form. When standing with feet hip-width apart and the band positioned above your knees, you should feel consistent pressure pushing your knees inward. If you can easily pull your knees together without engaging your hips, the band is too light. Conversely, if the band digs into your skin or restricts your ability to spread your knees slightly wider than hip-width, it’s too heavy. Start with light or medium resistance to master proper form before progressing. The ideal band creates enough resistance that your glutes begin to fatigue by the final repetitions of each set, but not so much that you sacrifice movement quality.
Execute These 7 Resistance Band Glute Exercises Correctly
Banded Glute Bridge: The Foundation Movement
Lie on your back with knees bent and feet flat on the floor, placing the resistance band just above your knees. Press through your heels to lift your hips until your body forms a straight line from shoulders to knees, squeezing your glutes hard at the top. Lower with control, but don’t let your hips touch the floor between repetitions. Perform 3 sets of 15-20 repetitions, focusing on the mind-muscle connection with your glutes. Pro tip: Place a yoga block or pillow between your thighs to add another activation layer—your glutes must work even harder to maintain both the block position and resist the band’s pull.
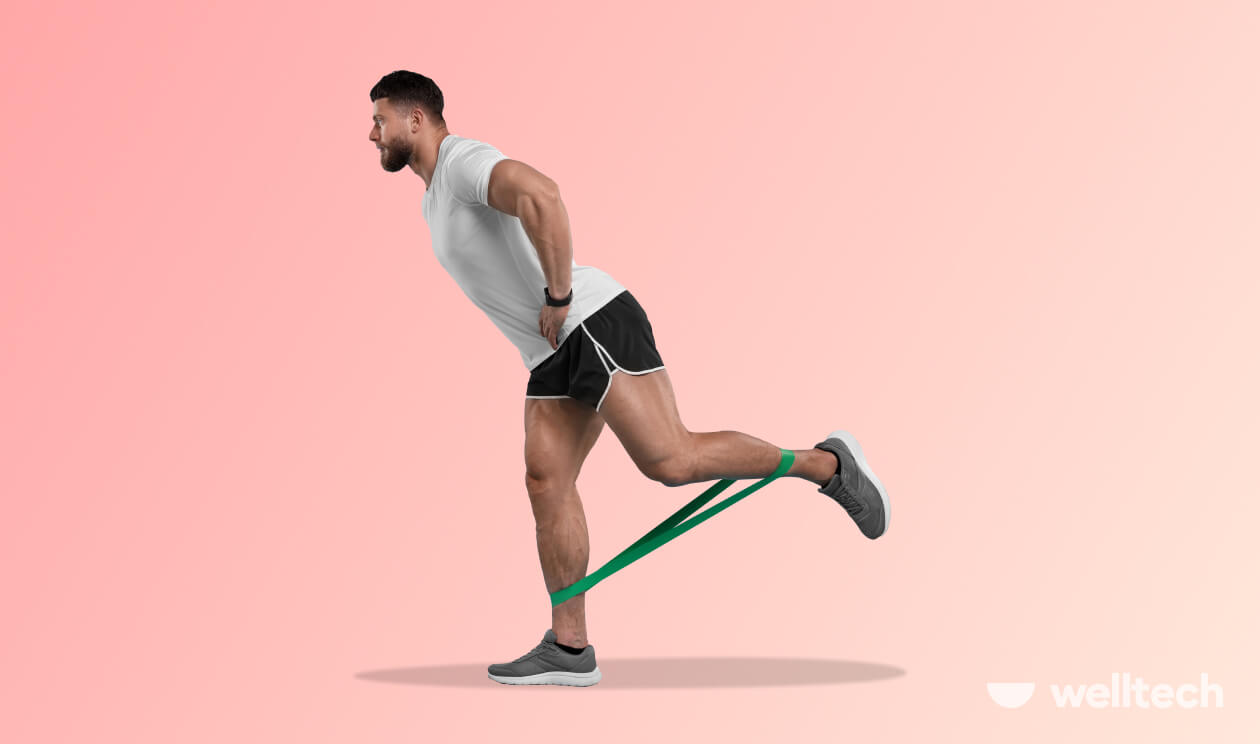
Standing Kickbacks: Activate Dormant Glute Fibers
Stand tall with the resistance band secured above your knees, holding onto a wall or chair for balance if needed. Keeping your core engaged and back straight, slowly kick one leg straight back while maintaining band tension, stopping when your thigh is parallel to the floor. Avoid leaning forward or rotating your hip outward. Complete 12-15 controlled repetitions per leg for 3 sets. Critical mistake to avoid: Don’t use momentum to swing your leg back—this shifts work to your lower back instead of your glutes. Imagine trying to tap something directly behind you with just your heel.
Lateral Walks: Target Your Side Glutes for Wider Hips
Stand with feet hip-width apart and the resistance band above your knees, lowering into a quarter squat position. Step sideways with one foot while maintaining tension, then follow with the other foot without letting the band lose resistance. Complete 10-12 steps in one direction, then return. Perform 3 sets total. Expert note: Keep your toes pointed forward throughout the movement—turning them outward shifts focus to your quads. The shallower your squat position, the more isolated the work becomes on your gluteus medius.
Create an Effective Weekly Resistance Band Glute Routine

How Often to Train Glutes with Resistance Bands
For optimal glute development, train your glutes with resistance bands 2-3 times weekly with at least one rest day between sessions. Your glute muscles respond exceptionally well to higher frequency training compared to other muscle groups. Monday and Thursday sessions allow sufficient recovery while maintaining training stimulus. Each workout should last 20-30 minutes focused solely on glute activation—any longer leads to diminishing returns as fatigue compromises form. Important: Never skip warm-up sets, as cold glutes won’t activate properly and increase injury risk.
Progressive Overload Strategies for Continued Growth
Simply repeating the same band and exercises won’t deliver ongoing results. Implement these progression methods every 2-3 weeks:
– Increase band resistance to the next level when you complete all sets with perfect form
– Slow your tempo by adding 2-3 seconds to the lowering phase of each movement
– Add pauses at the point of maximum tension (e.g., hold the top of a glute bridge for 3 seconds)
– Combine exercises into supersets (e.g., glute bridges immediately followed by kickbacks)
Warning: Don’t progress too quickly—maintain proper form above all else. Better to use lighter resistance with perfect technique than heavier bands with compromised movement.
Avoid These 5 Common Resistance Band Glute Mistakes
Letting Your Knees Collapse Inward During Exercises
This is the single most common error that drastically reduces glute activation. When your knees cave inward against the band’s resistance, you shift work to your quads and knees while bypassing your gluteus medius. To correct this, consciously push your knees outward against the band throughout each movement, imagining you’re trying to spread the floor apart with your feet. Place a mirror in front of you during initial sessions to monitor knee alignment.
Using Bands That Are Too Heavy
Many beginners grab the heaviest band available, thinking more resistance equals better results. In reality, excessive resistance forces your body to recruit other muscle groups to compensate, reducing glute isolation. Start with light resistance to establish proper movement patterns and neuromuscular connection before progressing. You should feel the burn specifically in your glutes by the last few repetitions of each set—not in your lower back or quads.
Maintain Proper Form for Injury Prevention
Keep Your Spine Neutral During All Movements
Arching your lower back during glute bridges or kickbacks transfers stress from your glutes to your lumbar spine. To maintain a neutral spine, engage your core by gently drawing your belly button toward your spine before initiating movement. Imagine holding a tennis ball between your ribcage and pelvis. If you notice your back arching, reduce your range of motion until you can maintain proper alignment throughout the entire movement.
Don’t Rush Through Repetitions
Speed kills glute activation. Slow, controlled movements create more time under tension, which is crucial for muscle development. Aim for a 3-second lowering phase and 2-second contraction at the peak of each movement. Set a timer for your sets if needed—quality always trumps quantity when building glute strength with resistance bands.
Boost Results with Strategic Post-Workout Recovery
Activate Your Glutes Before Every Session
Your glutes often remain dormant from hours of sitting. Before your resistance band workout, spend 5 minutes activating these muscles with bodyweight exercises: 20 bodyweight glute bridges, 15 fire hydrants per side, and 10 clamshells per side. This neural priming ensures your glutes engage properly during your band workout rather than letting other muscles compensate.
Implement Daily Glute Activation Habits
Integrate subtle glute engagement throughout your day to reinforce neural pathways. When standing in line, sitting at your desk, or walking, consciously squeeze your glutes for 5-10 seconds at a time. These mini-contractions build the mind-muscle connection that translates to better performance during your resistance band workouts.
Final Note: Consistent resistance band glute training delivers visible results in 4-6 weeks when performed correctly. Focus on perfect form over resistance level, prioritize knee placement for maximum activation, and implement progressive overload as your strength improves. Remember that resistance bands work best as part of a comprehensive approach that includes proper nutrition and adequate recovery. By avoiding common mistakes and implementing these targeted techniques, you’ll develop stronger, rounder glutes that enhance both your physique and functional strength.


