
Weak or underdeveloped calves don’t have to be a permanent problem. Resistance bands offer a surprisingly effective solution for building stronger, more defined calf muscles without expensive gym equipment or heavy weights. Whether you’re an athlete seeking explosive power, a fitness enthusiast wanting balanced leg development, or someone recovering from an ankle injury, mastering resistance band calf exercises can transform your lower leg strength. These portable tools provide unique advantages that traditional weights can’t match—continuous tension throughout your entire range of motion and joint-friendly resistance that adapts to your movement patterns.
Your calf muscles—comprising the gastrocnemius and soleus—play crucial roles in everyday movements from walking and climbing stairs to running and jumping. Yet many people neglect these powerful muscles, either because they don’t know how to train them effectively or assume bodyweight exercises alone will deliver results. The truth is, resistance bands solve both problems by providing scalable resistance that challenges your calves through full range of motion while fitting easily into any home workout space or travel bag.
Why Resistance Bands Outperform Traditional Calf Training
Resistance bands provide progressive resistance that increases throughout your entire movement range, unlike free weights where gravity creates peak loading only at certain points. This constant tension demands more muscular effort during each repetition, potentially stimulating greater hypertrophy and strength development. Your calf muscles work harder throughout every phase of the exercise—from the stretched position at the bottom to the fully contracted position at the top—creating superior muscle fiber recruitment.
The portability factor makes resistance bands ideal for consistent calf training regardless of your location. A quality band weighs mere ounces and fits into any bag, suitcase, or even a large pocket. This accessibility eliminates common barriers to entry and makes advanced training accessible to practitioners at all levels without requiring gym memberships. For travelers, home exercisers, or those with limited space, bands provide legitimate physiological adaptations including improved strength, muscular endurance, and definition.
Joint-friendly training deserves special attention for lower leg development. Bands provide smooth resistance that reduces shear forces on ankle and knee joints compared to heavy free weights. This quality proves especially valuable for individuals recovering from ankle injuries, those with joint sensitivities, or older adults seeking to maintain lower leg function. The controlled movement patterns possible with bands also allow you to develop greater mind-muscle connection, enhancing proprioceptive awareness that transfers directly to daily activities.
Essential Equipment Setup for Maximum Calf Activation

Selecting the right resistance band forms the foundation of effective calf training. Loop bands (41-48 inches when flat) work best for most calf exercises, allowing you to position the band beneath your feet or across your thighs. Choose medium resistance for beginners, progressing to heavier bands as your strength improves. For standing exercises, ensure you have a stable surface like a step or platform that allows your heels to drop below foot level for full range of motion.
Anchor points determine what exercises you can perform safely. A door anchor system distributes force across a larger door surface area, enabling standing calf raises facing away from or toward the door. For home settings without door anchors, simply stepping on the band with your forefoot creates effective resistance for standing raises. Training shoes with flat, stable soles provide consistent contact with ground surfaces, though barefoot training offers superior proprioceptive feedback for those who can tolerate it.
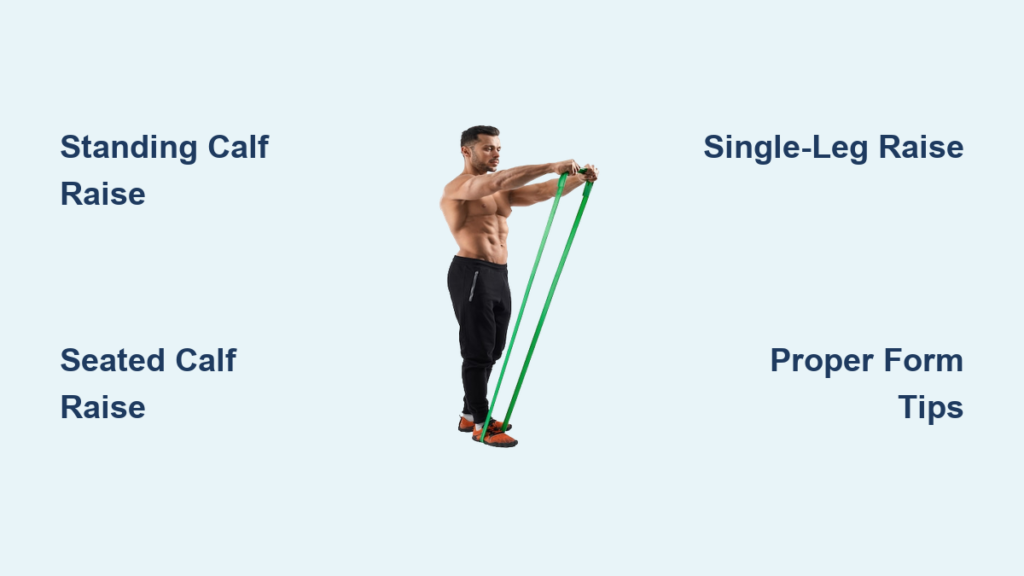
Master the Standing Calf Raise with Perfect Form
The standing calf raise targets both gastrocnemius and soleus muscles through controlled movement patterns. Position a resistance band beneath the balls of both feet, spacing feet shoulder-width apart with toes pointing forward. Grip the band handles at hip level, creating tension before you begin. This initial position establishes the resistance vector that will challenge your calf muscles throughout the movement.
Begin by pressing through the balls of both feet, lifting your heels away from the ground while maintaining controlled tension. Continue rising until achieving full plantar flexion with heels as high as possible, squeezing your calf muscles at the peak. The controlled tempo should emphasize the lowering phase as much as the lifting phase—aim for two seconds up, one second hold, and two seconds down for optimal time under tension.
Critical form cues to maximize results:
– Keep your knees slightly bent but stable throughout
– Avoid letting your heels drop below foot level before starting
– Maintain constant tension by stopping just before the band goes slack
– Complete 12-20 repetitions for hypertrophy development
Single-Leg Standing Calf Raise for Balanced Development
Advanced practitioners can increase difficulty through single-leg variations, effectively doubling the resistance load on the working calf. Stand on a platform with one foot positioned near the edge and the heel hanging freely. Place the resistance band beneath the working foot and hold both handles, creating tension that pulls against your upward movement.
Rise onto the ball of your working foot, squeezing the calf before slowly lowering to the stretched position. The reduced base of support demands enhanced core engagement and balance. Research shows strength imbalances exceeding 10-15% between limbs increase injury risk during athletic activities, making single-leg calf training valuable for both assessment and correction.
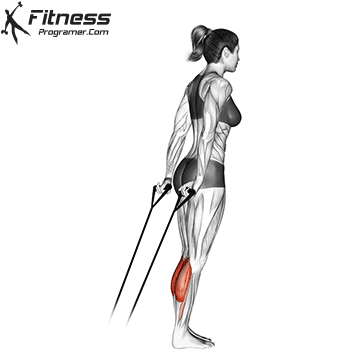
Seated Calf Raise Technique for Soleus Development

The seated calf raise shifts emphasis toward the soleus muscle by positioning your knees in flexion, which reduces gastrocnemius involvement. Sit on a bench or sturdy surface with feet flat on the floor. Position a resistance band across the tops of your thighs just above the knees, crossing it behind your thighs or securing it beneath your feet while holding the ends outside your legs.
Press through the balls of both feet simultaneously, lifting your heels while keeping the balls of your feet in contact with the floor. Your knees remain bent at approximately 90 degrees throughout the movement. Hold the peak contraction briefly before slowly lowering, maintaining band tension throughout.
This seated position enables greater focus on the soleus muscle and allows higher training volumes without the balance demands of standing exercises. Athletes seeking to enhance ankle stability for running, jumping, or court sports benefit significantly from incorporating seated variations alongside standing exercises. Perform 3 sets of 15-20 repetitions with moderate resistance for optimal soleus development.
Common Calf Training Mistakes That Limit Results
Partial Range of Motion Errors
Many practitioners perform calf raises through limited ranges that fail to develop muscles through their full functional capacity. Correct this by ensuring complete heel drop below your working surface, allowing your calf to stretch fully before each repetition. Platform edges, step boxes, or simply positioning your forefoot on a weight plate enables the necessary range of motion.
Momentum and Body Swing
Swinging your body or using momentum reduces training effectiveness while increasing injury risk. Controlled tempo with minimal body sway distinguishes effective calf training from ineffective bouncing. When form deteriorates before reaching your target repetition count, reduce resistance rather than sacrificing technique.
Neglecting Both Calf Muscles
Standing calf raises with straight knees primarily load the gastrocnemius, while seated raises with bent knees emphasize the soleus. Comprehensive development requires incorporating both exercise types within your training program. Ignoring either muscle group creates imbalances that limit both aesthetics and functional performance.
Sample Beginner Training Program
Train calves twice weekly with at least two full rest days between sessions for adequate recovery. Each session begins with five minutes of dynamic warm-up including ankle circles and heel/toe walks.
Session Structure:
– 3 sets of 12 standing calf raises with medium resistance (60s rest)
– 2 sets of 15 seated calf raises with light resistance (45s rest)
– 2 sets of 10 single-leg calf raises per leg (60s rest)
– Finish with 30-second calf stretches per side
Progress by increasing resistance when you can complete all sets with proper form. After 4 weeks, add tempo variations (3-second lowering phase) and increase volume to 4 sets per exercise. Consistency with proper form delivers better results than sporadic high-intensity efforts.
Building stronger, more defined calves with resistance bands requires consistent effort, proper technique, and patience. Start with these fundamental exercises, master perfect form, and progress gradually to more advanced variations as your strength develops. The journey to stronger calves begins with a single band and the commitment to train regularly—your first step is entirely within your control. With just 15 minutes twice weekly, you’ll develop the resilient, powerful lower legs that support all your movement goals.


