
Your glutes have likely been underused since you sat down this morning. Resistance bands offer the perfect solution to activate and strengthen these powerhouse muscles—no gym required. Unlike free weights that lose tension at certain points, bands provide constant muscle engagement from start to finish, making them exceptionally effective for glute development. This guide reveals exactly how to use resistance bands for glutes to build strength, shape, and function. You’ll discover the right bands to choose, specific exercises that deliver results, and how to avoid the most common mistakes that prevent progress.
Most people struggle with weak glutes due to prolonged sitting, yet these muscles drive everything from walking upstairs to explosive athletic movements. The beauty of resistance band training is its accessibility—you can transform your glutes anywhere, anytime. By the end of this guide, you’ll know precisely which exercises to perform, how to select appropriate resistance levels, and how to structure your workouts for maximum growth.
Select Your Ideal Resistance Band Type
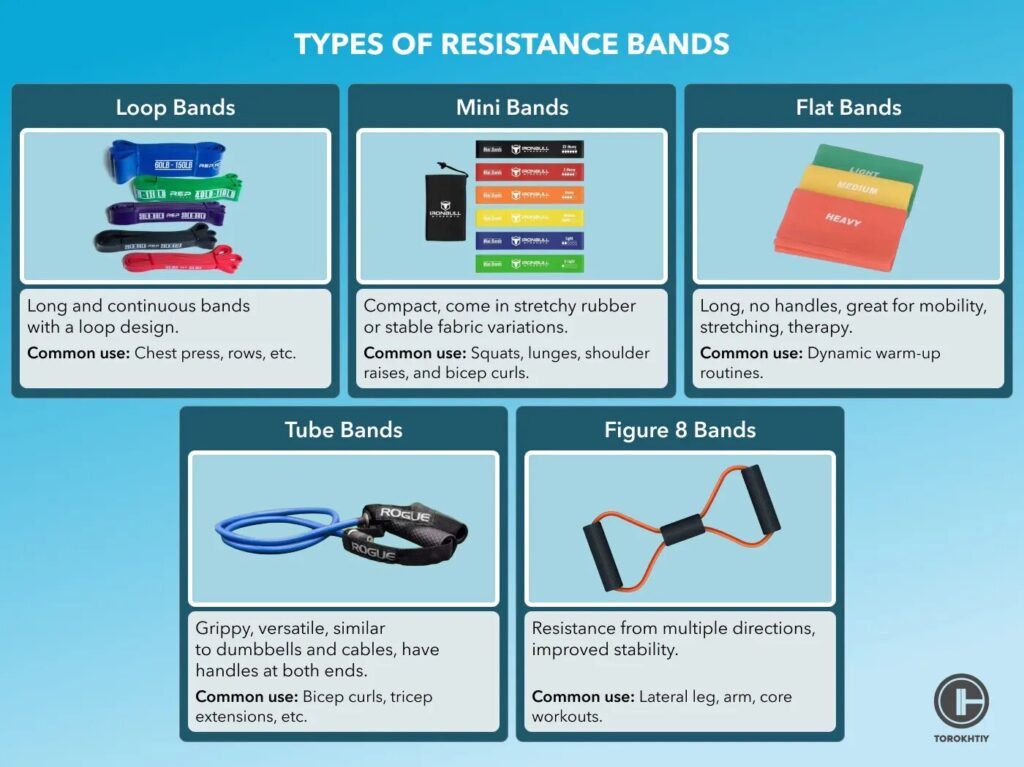
Choosing the right resistance band makes or breaks your glute development results. Not all bands work equally well for targeting the three distinct glute muscles.
Fabric bands with velcro closures stay securely positioned during dynamic movements without pinching or rolling. These distribute pressure evenly around your thighs and typically feature color-coded resistance levels (light to extra heavy). Their stability makes them perfect for monster walks and abduction exercises where band slippage would ruin effectiveness.
Mini bands (9-12 inch loops) provide intense resistance even at rest, making them exceptional for activating the gluteus medius and minimus. Position these just above your knees during squats and lunges to prevent knee collapse while forcing your outer glutes to work harder. Their compact size makes them ideal for travel and warm-up activation.
Long resistance bands (4-6 feet) enable anchoring exercises like pull-throughs and standing kickbacks. Secure these under furniture or around a pole to create the resistance vector needed for proper hip hinge mechanics. The length allows for full range of motion while maintaining consistent tension on the gluteus maximus.
Start with medium resistance (typically blue or green) for most exercises. You’ve selected the right band when the last 3-4 repetitions of each set feel challenging but maintain perfect form. As strength improves, progress to heavier bands or stack multiple bands for increased resistance.
Target Each Glute Muscle with Precision
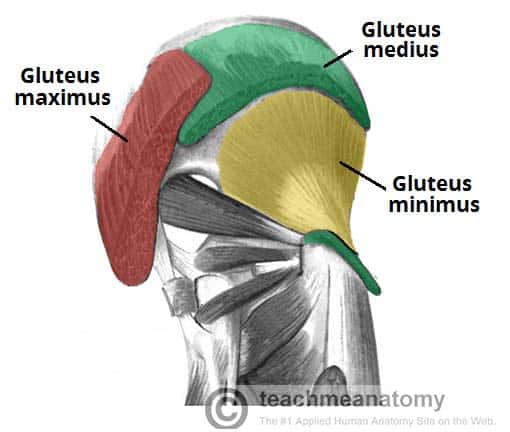
Effective glute training requires understanding which exercises activate which muscles—your three glute muscles respond differently to specific movement patterns.
Gluteus Maximus: Drive Hip Extension Power
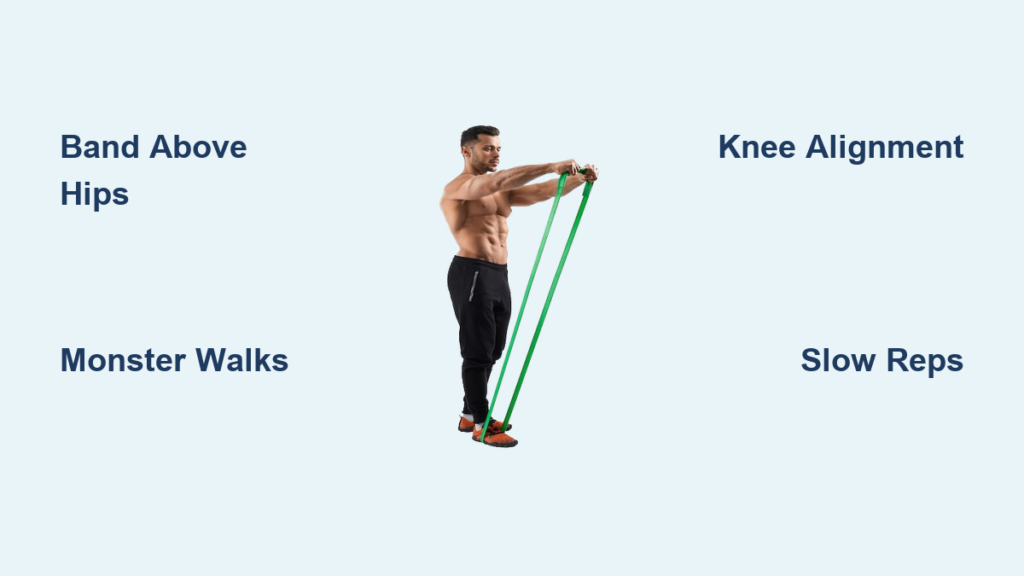
This largest muscle powers movements like rising from chairs and climbing stairs. Hip thrusts with band above hips deliver maximum activation—sit with upper back against a bench, band positioned just above hip bones, and drive through heels until body forms straight line from shoulders to knees. Squeeze glutes intensely at the top for 1-2 seconds before lowering slowly. Complete 3-4 sets of 12-15 reps with 60-90 seconds rest.
Banded pull-throughs also powerfully target this muscle: secure long band under feet, hinge forward 45 degrees, and step one foot back while pulling band through legs. Maintain flat back throughout and feel the glute squeeze as you return to standing position.
Gluteus Medius: Fix Knee Collapse with Abduction
Weakness here causes knees to cave inward during squats, increasing injury risk. Monster walks solve this: position band above knees, assume quarter-squat, and step sideways while maintaining tension. Complete 10-15 steps per direction for 3 sets. This exercise lights up your outer glutes while improving hip stability.
Standing hip abduction provides direct isolation: anchor band at ankle height, stand sideways, and lift working leg against resistance. Lead with heel (not toes) and pause at top before lowering slowly. Perform 12 reps per side for 3 sets to strengthen this critical stabilizer muscle.
Fix These 3 Glute Band Mistakes Immediately
Knee Collapse During Squats
When knees cave inward during banded squats, you’re missing glute activation and risking knee injury. Solution: Position mini band above knees and focus on pushing knees outward against resistance throughout entire movement. If knees still collapse, reduce band resistance until you can maintain proper alignment for all repetitions.
Lower Back Arching in Hip Thrusts
Excessive arching shifts work from glutes to lower back. Solution: Maintain neutral spine position by drawing navel toward spine before each repetition. Avoid driving hips too high—stop when body forms straight line from shoulders to knees. Use bench against upper back to limit excessive range.
Using Momentum Instead of Muscle
Swinging to complete repetitions reduces effectiveness by 70% according to biomechanical studies. Solution: Slow down repetitions—take 3 seconds to lower, 1 second pause, 1 second to lift. If you can’t control the movement, reduce band resistance immediately. Each rep should feel like pure glute contraction, not momentum.
Build Your 15-Minute Glute Band Routine
This science-backed routine delivers maximum results in minimal time. Perform 3 times weekly with at least 48 hours between sessions.
Banded Hip Thrust: 3 sets of 15 reps
Position band above hips with ends under feet. Drive through heels until body forms straight line, squeezing glutes intensely at top. Rest 60 seconds between sets.
Banded Squat: 3 sets of 12 reps
Place band above knees. Lower until thighs reach parallel, pushing knees outward against band throughout movement. Rest 45 seconds between sets.
Monster Walks: 3 sets of 12 steps each direction
Maintain quarter-squat position while stepping sideways. Keep constant tension in band with controlled steps.
Standing Hip Abduction: 2 sets of 12 per leg
Anchor band at ankle height. Lift working leg against resistance, leading with heel. Pause at top before lowering slowly.
Progress Beyond Plateaus
Increase Resistance Strategically
Upgrade to heavier bands when you can complete 15+ reps with perfect form. Pro tip: Stack two bands together for intermediate resistance levels between standard color options.
Extend Time Under Tension
Slow the eccentric (lowering) phase to 3-4 seconds. Add 2-second pauses at peak contraction. This metabolic stress triggers 40% more muscle growth than standard tempo according to hypertrophy research.
Add Volume Gradually
Increase from 3 to 4 sets per exercise once you’ve mastered form. Add 1-2 reps per set weekly while maintaining quality movement. More isn’t better—better is better.
Support Recovery Like a Pro
Protein timing matters: Consume 20-30g protein within 45 minutes post-workout to maximize muscle repair. Greek yogurt with berries or a protein shake work perfectly.
Sleep drives growth: Aim for 7-9 hours nightly—muscle development occurs during deep sleep cycles, not during workouts.
Stretch smartly: Perform pigeon pose and seated figure-four stretch for 30 seconds per side post-workout. Tight glutes limit range of motion and reduce exercise effectiveness.
Resistance bands provide the most accessible path to stronger, more defined glutes—but only when used correctly. Start with proper band selection, master the fundamental movements targeting each glute muscle, and fix form errors immediately. Implement this 15-minute routine 3x weekly while progressively increasing resistance, and you’ll feel and see dramatic improvements in 8-12 weeks. Your glutes have been waiting for this wake-up call—now give them the targeted resistance band training they deserve.


