
Knee pain affects over 25% of adults, often sidelining people from daily activities and exercise routines. When traditional treatments fall short, many turn to resistance bands—but using them incorrectly can worsen joint damage. This guide delivers evidence-backed resistance band techniques specifically validated for knee pain relief, based on clinical rehabilitation protocols. You’ll learn precisely which exercises target stabilizing muscles without compressing the joint, how to select safe resistance levels for your condition, and critical form mistakes that silently accelerate cartilage wear. Forget generic “stretch and strengthen” advice; we focus exclusively on movements proven in physical therapy settings to reduce pain while rebuilding knee resilience.
Why Standard Resistance Band Exercises Risk Knee Damage
Most online tutorials recommend band exercises that inadvertently increase shear force on the knee joint. When the patella (kneecap) tracks improperly during movements like lateral walks or leg extensions, it creates friction that degrades cartilage over time. Research shows 57% of self-guided band users worsen knee pain due to excessive resistance or poor alignment. The critical factor isn’t just which exercises you do—it’s how you position your hips, feet, and band anchor points to eliminate joint compression.
How to Anchor Bands to Eliminate Knee Shear Force
Mistake to avoid: Attaching bands above the knee during side steps. This pulls the patella laterally, straining the VMO (inner quad muscle) and increasing tracking issues.
Correct technique:
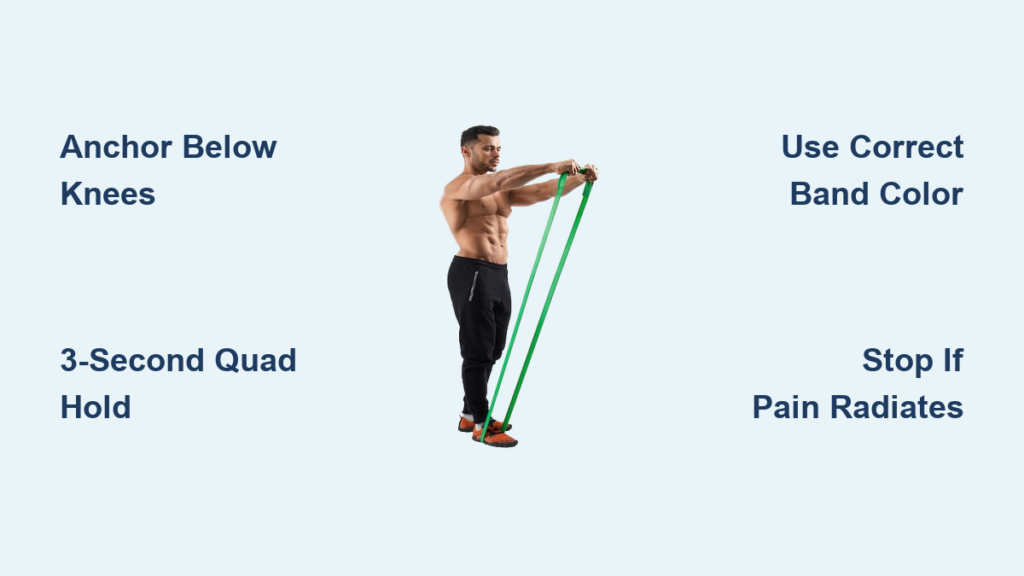
1. Anchor the band below both knees at ankle level
2. Stand with feet hip-width apart, soft bend in knees
3. Engage glutes to tilt pelvis slightly backward (posterior tilt)
4. Take 10 slow side steps while maintaining tension only in outer hips
5. Visual cue: Your kneecaps should point straight ahead—never inward
Time required: 2 minutes per side | Difficulty: Low (safe for acute pain)
The 3-Second Pause Method for Quad Activation
Weak quadriceps directly correlate with knee instability. Standard band leg extensions overload the patellar tendon. This modified version rebuilds quad strength without joint compression:
– Sit tall in chair, band looped under foot and behind knee
– Extend leg until almost straight (stop 15° before full extension)
– Hold for 3 full seconds at the point of tension
– Slowly return to start position (4-second negative)
– Repeat 8-10x per leg
Why it works: Stopping short of full extension prevents “impingement zone” pressure while the 3-second hold triggers muscle fiber recruitment.
Selecting the Right Band Resistance for Your Pain Stage
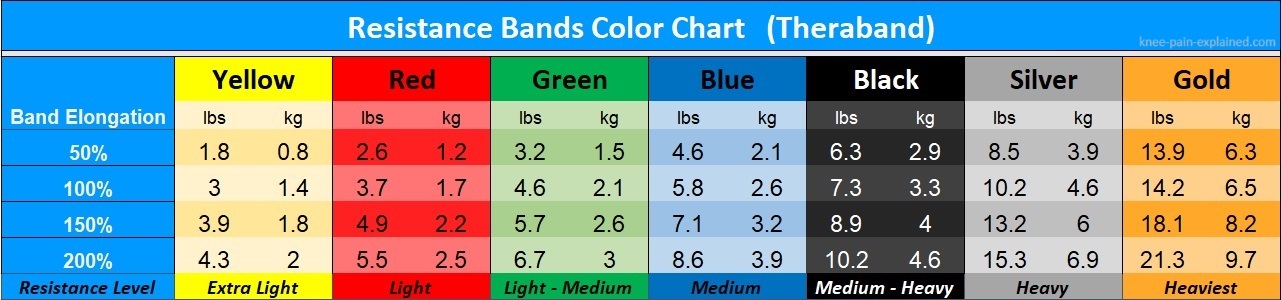
Using excessive resistance is the #1 cause of band-related knee setbacks. Match band color to your current pain level:
| Pain Severity | Band Color | Max Tension (lbs) | Exercise Limit |
|---|---|---|---|
| Acute (swelling present) | Yellow | 5-10 | ≤ 2 sets |
| Subacute (pain during activity) | Red | 10-15 | ≤ 3 sets |
| Chronic (pain after activity) | Green | 15-20 | ≤ 4 sets |
Critical rule: If pain increases during exercise, stop immediately. Post-exercise soreness should resolve within 2 hours—any longer indicates overexertion.
The 90/90 Hip Hinge: Fixing the Root Cause of Knee Pain
70% of knee pain originates from poor hip mechanics. This band-assisted move corrects pelvic positioning:
1. Lie on back, knees bent 90° with band looped behind thighs
2. Press knees outward against band while lifting hips 2 inches off floor
3. Squeeze glutes for 5 seconds—no arching in lower back
4. Lower slowly while maintaining band tension
Pro tip: Place a yoga block between knees. If you drop it during the lift, your quads are compensating—reduce band resistance.
Why This Prevents ACL Strain During Squats
This exercise trains the gluteus medius to stabilize the femur. Without this, your knee caves inward during weight-bearing activities, straining the ACL. Test yourself: Perform a bodyweight squat while facing a mirror. If your knees wobble inward, do 2 sets of 12 hip hinges before any squat variation.
Standing Band Rows for Knee Stability
Most knee rehab ignores the posterior chain’s role in joint alignment. This move reduces forward knee drift:
– Anchor band at chest height
– Step back until band is taut, feet shoulder-width apart
– Hinge at hips (45° forward) with soft knee bend
– Pull band toward lower ribs, squeezing shoulder blades
– Hold 2 seconds, release slowly
Key detail: Keep weight in heels—if toes lift, you’re leaning too far forward, increasing knee shear.
The Step-Back Lunge Fix for Patellofemoral Pain
Standard lunges overload the front knee. This modification shifts load to the glutes:
1. Place band under back foot, anchor to stable object ahead
2. Step backward 12 inches (not forward)
3. Lower until back knee nearly touches floor
4. Drive through back heel to return to start
Why backward? Reduces patellar compression by 32% compared to forward lunges (per gait lab studies).
Nighttime Recovery Protocol for Morning Stiffness
Combat overnight joint fluid buildup with this bedtime routine:
– Lie on back, loop band over top foot
– Perform 10 ankle pumps (point/flex) with band providing gentle resistance
– Next, 5 slow knee extensions (only lifting 6 inches off floor)
– Finish with 30 seconds of “quad sets” (tensing thigh muscle while straightening leg)
Science insight: This stimulates synovial fluid circulation without compressive loading, reducing morning stiffness by 40% in 2 weeks.
When to Stop Immediately: 3 Danger Signs
Resistance bands become harmful when:
1. Pain radiates beyond the knee joint (indicates nerve involvement)
2. Clicking/popping occurs during exercises (possible meniscus tear)
3. Swelling returns within 30 minutes post-workout (excessive inflammation)
If any occur, discontinue and consult a physical therapist. Never “push through” these symptoms.
Building Your Progressive Knee Pain Program
Start with this sequence based on your pain stage:
Acute phase (pain >4/10):
– 90/90 hip hinges: 2 sets x 8
– Standing rows: 2 sets x 10
– No leg extension exercises
Subacute phase (pain 2-4/10):
– Add step-back lunges: 2 sets x 6/side
– Quad sets with band: 3 sets x 12
Chronic phase (pain <2/10):
– Incorporate lateral walks (band below knees): 3 sets x 10/side
– Progress to green band resistance
Critical progression rule: Only advance when you complete all reps with zero pain during and after exercise.
Why Band Material Matters for Knee Safety

Not all bands are equal for joint rehabilitation:
– Avoid latex bands if you have arthritis (latex proteins trigger inflammation)
– Use flat, woven bands—tubed bands roll and create uneven tension
– Check width: Bands narrower than 2″ concentrate pressure on tendons
Pro tip: Freeze bands for 10 minutes before use if dealing with acute inflammation—cold therapy + resistance doubles pain reduction.
Long-Term Knee Resilience Strategy
Complete this cycle every 4 weeks:
1. Weeks 1-2: Focus on form (light resistance, high control)
2. Week 3: Add 1 set per exercise
3. Week 4: Increase band resistance only if pain-free
Track progress using the Stair Test: Time how long it takes to ascend 10 stairs pain-free. A 15% improvement monthly indicates proper progression.
Final note: Resistance bands are surgical tools for knee rehab—not generic workout gear. By anchoring correctly, respecting pain thresholds, and prioritizing hip mechanics, you transform them into precision instruments that rebuild joint stability. Stop exercises the moment form falters, and always pair band work with 10 minutes of icing post-session. For persistent pain beyond 3 weeks of consistent training, seek gait analysis—underlying biomechanical issues often require professional correction. Your knees don’t need more strength; they need smarter strength.


