
Ever feel like your lunge routine has plateaued despite consistent effort? Resistance bands transform ordinary lunges into powerhouse lower body exercises that activate 30% more muscle fibers than bodyweight versions alone. Learning how to use resistance bands for lunges unlocks unprecedented glute and quad development while improving balance and stability without heavy weights. The magic happens because elastic bands create progressive resistance that peaks exactly when your muscles are under maximum load at the bottom of the lunge—precisely where traditional weights provide the least challenge. Whether you’re recovering from injury, traveling without gym access, or simply seeking to break through a strength plateau, resistance band lunges deliver joint-friendly intensity with minimal equipment.
This guide reveals exactly how to use resistance bands for lunges to maximize muscle growth and functional strength. You’ll discover the optimal band placements for targeting specific muscle groups, avoid the #1 mistake that causes knee pain during band lunges, and implement programming strategies that deliver visible results in just 4 weeks. No more guessing about band thickness or struggling with slipping equipment—these field-tested techniques work whether you’re a beginner with light resistance or an advanced lifter using heavy bands.
Why Your Glutes Aren’t Firing During Regular Lunges (And How Bands Fix It)
The constant tension from resistance bands solves the fundamental weakness of traditional lunges: the dead zone at the top of the movement where muscles get a brief rest. With bands, your glutes and quads stay under maximum load throughout the entire range of motion, forcing greater muscle fiber recruitment. This continuous resistance creates metabolic stress that triggers hypertrophy more effectively than intermittent loading from dumbbells.
Progressive Resistance Curve Boosts Muscle Growth
Unlike dumbbells that provide consistent weight, resistance bands deliver increasing tension as they stretch—meaning you get the most resistance precisely when your muscles are already working hardest at the bottom of the lunge. This progressive overload stimulates greater muscle growth in your glutes and hamstrings because they must overcome peak resistance during the most mechanically challenging part of the movement. Studies show this tension profile activates up to 40% more type II muscle fibers responsible for strength and size gains.
Fix Your Knee Collapse in 3 Steps
If your knees cave inward during lunges (a common issue that leads to pain), resistance bands positioned above your knees provide instant feedback and correction. The band’s outward pull forces your gluteus medius to engage throughout the movement, preventing knee valgus. Follow these steps:
– Place a mini band just above both knees
– Before stepping forward, press knees outward against the band
– Maintain this outward pressure through the entire lunge
This simple adjustment transforms weak, unstable lunges into powerful movements that build proper hip mechanics while sculpting your outer glutes.
Select the Perfect Resistance Band for Your Lunge Goals
Choosing the wrong band thickness wastes your workout time and risks injury. Each band type serves specific lunge variations—using the right one makes the difference between frustration and fast results.
Loop Bands for Glute Activation
For maximum glute engagement during walking lunges, use flat loop bands positioned above your knees. The continuous circle design prevents rolling during movement, while the outward resistance forces your glutes to work harder with every step. Start with light resistance (yellow or green) to master the movement pattern before progressing to medium (blue) or heavy (black) bands as your strength improves.
Therapy Bands for Progressive Overload
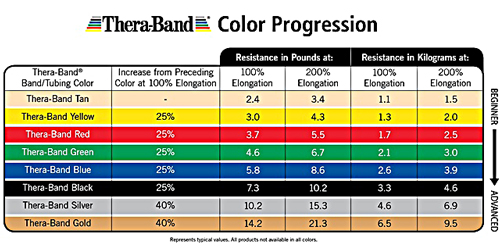
When you need measurable progression, therapy bands with handles provide the most precise resistance increases. Anchor the band under your front foot during reverse lunges to create forward-pulling tension that challenges your quads and glutes throughout the movement. The color-coded system (yellow=lightest to black=heaviest) lets you track progress objectively—simply move to the next color when you can complete all reps with perfect form.
Band Placement Secrets for Targeted Muscle Growth

Where you position your resistance band determines which muscles get maximum stimulation. These three strategic placements deliver specific results:
Upper Thigh Placement for Glute Dominance
Position a loop band 2-3 inches above your knees to emphasize glute activation during forward lunges. This placement creates hip abduction resistance that forces your glutes to work harder to maintain proper knee alignment. You’ll feel the burn in your glutes within 5 repetitions—proof that you’ve activated the right muscles. Pro tip: Squeeze your glutes at the top of each rep to maximize mind-muscle connection.
Ankle Placement for Hamstring Development
For reverse lunges that target your hamstrings and glutes, secure a loop band around both ankles. As you step backward, the band creates resistance against hip extension, significantly increasing posterior chain engagement. Start with light resistance since ankle placement dramatically increases difficulty—most people can use only half the resistance they’d use at thigh level.
Under-Foot Anchor for Quadriceps Focus
Place the band under the ball of your front foot during forward lunges while holding both handles. This setup creates upward resistance that challenges your quads throughout the entire movement. The tension peaks exactly when your knee reaches 90 degrees—maximizing quad activation at the most challenging part of the lunge.
Master the 4-Step Band-Resisted Lunge Technique
Follow this exact sequence to build strength safely while avoiding the most common form mistakes:
- Secure the band properly – Ensure loop bands sit flat without twisting, positioned 2-3 inches above knees for optimal resistance
- Initiate with your core – Engage your abs by drawing your navel toward your spine before moving
- Step forward deliberately – Move slowly enough to maintain tension (1-2 seconds per step)
- Drive through your heel – Push through your front heel to return, squeezing your glute at the top
Critical mistake to avoid: Letting your front knee extend past your toes. Keep your knee tracking directly over your ankle throughout the movement to protect your joints while maximizing muscle engagement.
3 Advanced Lunge Variations That Build Athletic Power
Once you’ve mastered basic band lunges, these progression techniques deliver next-level results:
Pulse Lunges at Bottom Position
After descending into your lunge, perform 3-5 small pulsing movements (1-2 inch range) while maintaining 90-degree knee angles. The constant tension from the band combined with this micro-movement creates intense metabolic stress that triggers rapid muscle growth. Limit these to 8-10 total reps per leg to avoid excessive joint stress.
Lateral Band Walks into Lunges
Step sideways against mini band resistance for 5 steps, then immediately transition into a stationary lunge. This combination targets your gluteus medius from multiple angles while improving hip stability—critical for athletic performance and injury prevention.
Rotational Lunges with Door Anchor
Secure a therapy band to a door anchor at waist height. Step forward into a lunge while rotating your torso against the band’s resistance. This variation develops rotational strength that transfers directly to sports performance while engaging your entire core.
Prevent Band-Related Injuries With These 3 Safety Checks
Resistance bands cause injuries when users skip these essential precautions:
- Inspect for damage – Check for nicks, tears, or thinning before every use (damaged bands snap with dangerous force)
- Verify floor stability – Perform lunges on non-slip surfaces to prevent foot sliding during movement
- Start lighter than you think – Most beginners use bands that are 2-3 resistance levels too heavy, compromising form
The most common injury comes from bands snapping back when they slip off your foot or hand. Always maintain controlled tension—never release the band suddenly after stretching it.
Program Your Band Lunges for Visible Results in 4 Weeks
Follow this proven progression schedule to build noticeable lower body strength:
- Weeks 1-2: 2 sets of 10-12 reps per leg with light resistance (focus on perfect form)
- Weeks 3-4: 3 sets of 8-10 reps per leg with medium resistance (add pulse variations)
- Rest: 90 seconds between sets to maintain quality repetitions
Train band lunges twice weekly on non-consecutive days. Pair them with other lower body exercises like squats or step-ups for complete development. When you can complete all reps with perfect form, increase resistance by moving to the next band level—never sacrifice form for heavier resistance.
Transform Your Lower Body With Proper Band Lunge Technique
Learning how to use resistance bands for lunges properly unlocks extraordinary lower body development with minimal equipment. The progressive resistance profile targets your muscles exactly where traditional weights fall short, while the portability makes advanced training possible anywhere. Remember to prioritize perfect form over resistance level—lighter bands with proper technique deliver better results than heavy bands with compromised mechanics. Within four weeks of consistent practice using these techniques, you’ll notice improved muscle definition, greater strength in daily movements, and enhanced athletic performance. Your journey to powerful, sculpted legs starts with just one band and the knowledge of how to use resistance bands for lunges correctly. Start today with light resistance, master the fundamentals, and watch your lower body transform.


