
If your flexibility routine still relies solely on static holds without assistance, you’re missing out on one of the most effective tools for improving mobility. Learning how to use resistance bands for stretching transforms ordinary flexibility work into a dynamic practice that delivers faster results with less strain on your joints. Unlike traditional stretching methods, resistance bands provide controlled tension throughout your entire range of motion, allowing you to engage muscles while lengthening them for deeper, more sustainable flexibility gains. Whether you’re recovering from a workout, combating the effects of prolonged sitting, or simply want to move with greater ease in daily life, incorporating resistance bands can unlock new levels of mobility you never thought possible.
The magic of resistance band stretching lies in its simplicity and adaptability. You can perform these exercises anywhere—at home, in the office, or while traveling—with equipment that costs less than a single gym session. The elastic nature of bands creates variable resistance, meaning tension increases as you extend further, which activates muscle fibers that static stretching alone often misses. This comprehensive guide will show you exactly how to use resistance bands for stretching properly, from selecting the right band to mastering essential techniques that deliver real results.
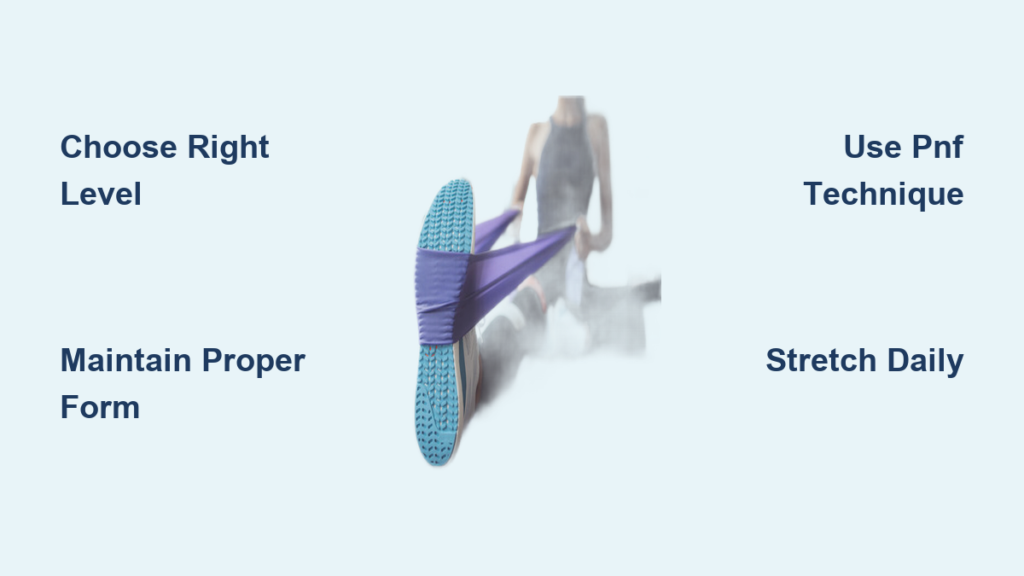
Choose the Right Resistance Band Level for Your Stretching Needs
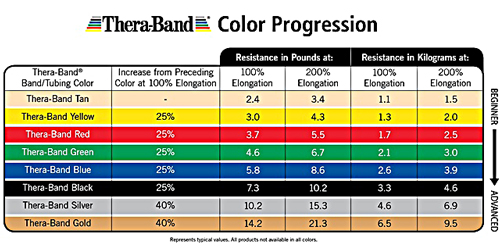
Selecting an appropriate resistance level forms the foundation of effective band stretching. Using bands with resistance that matches your current flexibility prevents compensation patterns where you use momentum instead of proper technique to achieve range of motion. Bands are typically color-coded by resistance level, though standards vary between manufacturers, so understanding what each level offers ensures you get the most from your stretching sessions.
Light Resistance for Beginners and Rehabilitation
If you’re new to band stretching or recovering from injury, light resistance bands (typically yellow or red) provide 5 to 15 pounds of resistance at full extension. These bands allow you to focus entirely on technique without struggling against excessive tension. Light bands are particularly effective for smaller muscle groups and for individuals with limited baseline flexibility. Beginners should resist grabbing heavier bands immediately—even if you feel capable—as building flexibility requires patience. Starting with appropriate resistance protects you from overstretching tissues unprepared for deeper work.
Medium to Heavy Resistance for Progressive Stretching
As your flexibility improves, medium resistance bands (green or blue) offer 15 to 30 pounds of tension and work excellently for larger muscle groups like hamstrings, glutes, and back. These bands allow you to deepen stretches progressively while maintaining control. Advanced users ready for intense sessions benefit from heavy resistance bands (black, purple, or orange), which provide 30 to 50+ pounds of tension for deep stretches and contract-relax techniques that accelerate flexibility gains.
Material Quality Matters for Safety and Effectiveness
The material composition of your resistance bands directly impacts performance and safety. Natural latex bands offer superior elasticity but may cause allergic reactions, while thermoplastic elastomer (TPE) provides hypoallergenic alternatives. Look for bands with reinforced ends that prevent tearing at stress points, consistent width for even resistance distribution, and seamless construction that eliminates weak spots. Flat bands generally prove more comfortable than tube-style bands when the band contacts your skin directly.
Essential Upper Body Resistance Band Stretches
Upper body tension accumulates quickly from daily activities like typing, driving, or lifting weights. Learning how to use resistance bands for stretching these muscles dramatically improves posture and range of motion.
Open Your Chest and Shoulders Effectively
Counteract forward-rounded posture with this simple yet powerful stretch. Stand on the center of your resistance band with feet shoulder-width apart, holding the band with both hands slightly wider than shoulder distance. Keep arms straight as you raise them overhead while squeezing shoulder blades together. Slowly lower the band behind your head, feeling the stretch across your chest and shoulders. Hold for 20-30 seconds while maintaining steady breathing—this stretch is particularly valuable before upper body workouts or when you notice posture collapsing during daily activities.
Target Your Triceps with Precision
Address the often-neglected muscles on the back of your upper arms by holding one end of the band in your right hand and extending your arm overhead, bending at the elbow to reach down your back. Use your left hand to grab the band behind your lower back and pull downward, keeping your elbow pointing straight up. Hold for 20-30 seconds before switching sides. Increase intensity by moving your bottom hand further up the band—this stretch proves especially beneficial after pushing exercises like bench presses.
Strengthen Your Rotator Cuff While Stretching
Hold the resistance band with both hands, arms extended at shoulder height with elbows slightly bent. Rotate your arms outward, pulling the band apart while keeping shoulders down and back. Return to the starting position slowly and repeat for 10-15 repetitions. This external rotation stretch targets the infraspinatus and teres minor muscles, helping maintain shoulder health and mobility while stretching.
Key Lower Body Stretching Techniques with Resistance Bands

The lower body houses powerful muscles that frequently become tight from sitting, making resistance bands essential tools for deep, effective stretching.
Flexible Hamstring Stretches That Actually Work
Sit on the floor with legs extended straight, loop the band around one foot’s ball, and hold both ends. Keeping that leg straight, use the band to gently pull your leg toward you while leaning forward from the hips, not rounding your spine. Maintain a straight back throughout—this targets hamstrings rather than simply flexing your spine. Hold for 20-30 seconds before switching legs. Increase intensity by walking your hands further down the band.
Unlock Tight Hips and Glutes Efficiently
For a glute and piriformis stretch, lie on your back with knees bent, cross your right ankle over your left knee, and loop the band around your left foot. Hold both ends, pulling your left leg toward your chest while feeling the stretch in your right glute. Hold for 20-30 seconds before switching sides. For hip flexors, kneel in a lunge position, loop the band around your back ankle, and pull gently to increase the stretch.
Stretch Your Calves and Achilles Properly
Stand facing a wall for support, step one foot back keeping the heel flat, and loop the band around the ball of your back foot. Hold both ends, pulling your toes toward your shin while maintaining a straight back leg. Hold for 20-30 seconds before switching legs. This stretch targets both gastrocnemius and soleus muscles, preventing stiffness that leads to Achilles tendon issues.
Build a Complete 10-Minute Morning Stretching Routine
Consistent practice matters more than occasional intense sessions, so building habits around shorter daily routines produces better flexibility gains.
Quick Morning Wake-Up Flow
Start with cat-cow stretches by positioning the band around your hands and knees, pulling hands apart slightly. Arch your back up while tucking your chin, then release and let your belly drop while looking up. Perform 10-15 slow repetitions. Move into hip circles by kneeling with the band looped around one knee, extending the leg out and making slow circles—10 in each direction per leg. Finish with child’s pose by sitting back on heels, reaching arms forward, and looping the band around feet to gently increase the stretch in your ankles.
Advanced Stretching Methods for Faster Results
Once you’ve mastered basic techniques, incorporate these advanced methods to accelerate progress.
Contract-Relax PNF Technique
Assume your stretching position and use the band to bring your limb to mild tension. Contract the target muscle against the band’s resistance for 5-7 seconds, pushing without allowing movement. After contracting, relax completely and use the band to pull into a deeper stretch position. Hold for 20-30 seconds. This technique increases range of motion significantly faster than static stretching alone.
Dynamic Stretches with Bands
Stand with feet hip-width apart and loop the band around your thighs just above knees. Take wide steps side to side while maintaining tension—this forces inner thighs and hip muscles to work hard while stretching them. Banded good mornings (hinging forward at hips with band under feet) stretch hamstrings while engaging the entire posterior chain.
Avoid Common Resistance Band Stretching Mistakes
Even when you know how to use resistance bands for stretching, certain errors can limit progress or cause injury.
Maintain Proper Form and Alignment
Joint stacking prevents unnecessary stress—knees should track over toes in lower body stretches; shoulders should remain down and back in upper body stretches. Keep your spine neutral throughout stretches, avoiding excessive rounding or arching. Gradual progression matters more than aggressive stretching—never force to the point of pain.
Prioritize Band Safety and Maintenance
Inspect bands before every use for cracks, tears, or thinning areas. Store bands in a cool, dry location away from direct sunlight, as UV exposure degrades latex. Quality bands last 6-12 months with proper care, though daily users may need replacement every 3-6 months.
Special Applications for Desk Workers and Rehabilitation
Resistance band stretching serves diverse needs beyond general fitness.
Combat Desk Job Stiffness
Prolonged sitting causes shortened hip flexors and rounded shoulders. Perform short 2-3 minute band stretching sessions every hour to prevent end-of-day stiffness. Hip opener stretches counteract seated positions, while chest-opening stretches restore proper posture.
Support Injury Recovery Safely
Physical therapists use resistance bands extensively in rehabilitation because their controlled nature suits recovering tissues perfectly. Following ankle sprains, bands allow controlled dorsiflexion stretching with easily adjustable resistance. Post-shoulder surgery, light band exercises enable gradual rotator cuff strengthening without overloading healing tissues.
Conclusion
Mastering how to use resistance bands for stretching unlocks faster flexibility gains with less strain than traditional methods. Success requires selecting appropriate resistance levels, maintaining proper form, practicing consistently, and progressing gradually. Whether you follow the 10-minute morning routine or incorporate advanced PNF techniques, making band stretching a regular habit delivers lasting benefits of improved mobility and reduced pain. Start with beginner techniques, build consistency, and enjoy the freedom of a body that moves with greater ease in everything you do.


