

Your upper body workout shouldn’t stop when you’re traveling, short on space, or recovering from injury. Resistance bands deliver gym-quality upper body results anywhere—without bulky equipment or joint strain. Unlike free weights that only challenge muscles in one direction, bands create constant tension through every movement phase, activating more muscle fibers in your chest, back, shoulders, and arms. I’ve helped hundreds of clients build noticeable strength using just a single $15 band, especially those with shoulder sensitivities who struggle with traditional weights. In this guide, you’ll discover exactly how to use resistance bands for upper body development with science-backed techniques that maximize muscle engagement while protecting your joints. You’ll learn precise anchoring methods, tension tricks pros use, and how to scale difficulty instantly—no guesswork required.
Why Resistance Bands Outperform Free Weights for Upper Body Training
Resistance bands create accommodating resistance that increases as you move through an exercise—exactly matching your natural strength curve. When performing a bicep curl with dumbbells, tension peaks at the midpoint while your weakest position (fully extended arm) gets minimal work. Bands reverse this: tension intensifies at the top contraction where your muscles are strongest. This unique property triggers 27% greater muscle activation in the upper back compared to fixed-weight alternatives according to biomechanics research. The constant tension also eliminates momentum cheating, forcing strict form that builds functional strength. Plus, the elastic pull mimics real-world movement patterns better than rigid weights, improving posture and reducing injury risk during everyday activities.
How Band Resistance Scales With Your Strength Curve
- Starting position: Minimal tension targets weak range of motion
- Mid-movement: Gradual tension increase matches growing leverage
- Full contraction: Maximum resistance challenges peak strength
- Eccentric phase: Continuous tension during lowering prevents “free fall” seen with weights
Critical Joint Protection Benefits
Shoulder impingement plagues 68% of lifters using traditional overhead presses. Bands solve this by reducing stress at vulnerable positions—like full shoulder extension—where weights create dangerous leverage. The elastic nature absorbs shock during transitions, making them ideal for rehab or arthritis management. Always maintain slight elbow bend during presses to keep tension on muscles rather than joints.
Essential Equipment Setup for Maximum Upper Body Activation
Skip flimsy looped bands that roll or snap during critical sets. For upper body work, you need a 12-foot continuous loop band (latex or fabric) with 15-50 lbs resistance range and a secure door anchor. Heavy-duty looped bands (like those used for lower body) lack the length needed for proper upper body anchoring. Your anchor point must sit at sternum height for presses or hip height for rows—never higher than shoulder level. Test stability by leaning into the band with 50% body weight before loading exercises. Never wrap bands around wrists; the recoil risk during release could cause serious injury.
Must-Have Setup Checklist
- Band type: 12-foot continuous loop (not figure-8 or short loops)
- Resistance level: Medium (yellow/green) for beginners, heavy (blue/black) for advanced
- Anchor: Commercial door anchor rated for 500+ lbs
- Foot positioning: Staggered stance for presses, hip-width for rows
- Tension test: Pull band to chest height—should feel challenging at full stretch
Band-Resisted Rows: Fix Rounded Shoulders in 4 Weeks
Poor posture from desk work weakens mid-back muscles, creating that hunched appearance. Band rows reverse this by targeting rhomboids and lower traps—the muscles that pull shoulders back. Anchor your band at hip height, step back until taut, and assume athletic stance: knees soft, core braced, spine neutral. Pull elbows toward hip pockets while squeezing shoulder blades together—imagine crushing a pencil between them. Hold the squeeze for 2 seconds before slowly extending arms. This eccentric control builds tendon resilience that prevents future slouching.
Perfect Your Row Form in 3 Steps
- Grip: Hold band handles with palms facing each other (neutral grip)
- Pull path: Drive elbows backward—not upward—at 45-degree angle
- Finish position: Chest up, chin slightly tucked, shoulder blades retracted
Why Rows Fail Without This Detail
Most people yank the band using biceps instead of back muscles. Place one hand between your shoulder blades during practice sets—feel it move forward as you pull? You’re cheating. Stop immediately and reset. Perform 3 sets of 15 reps daily; posture improvements become visible within 21 days.
Chest Press Without a Bench: Hotel Room Friendly Technique
Forget searching for bench space. Anchor your band behind you at sternum height, grip handles at chest level with palms forward. Step forward until band creates tension, then press handles straight ahead—not upward—until arms nearly lock. The key is maintaining constant tension: if bands go slack at full extension, you’ve stepped too far. Squeeze pecs hard at the top, then resist the band’s pull as you return. This eccentric overload builds more muscle than the concentric (lifting) phase alone.
Avoid These 2 Press Killers
- Flared elbows: Causes shoulder strain—keep elbows at 75-degree angle from body
- Hip sway: Leaning backward shifts work to shoulders—brace core like bracing for punch
Overhead Press: The Shoulder-Safe Alternative to Dumbbells
Traditional overhead presses grind shoulder joints under heavy weight. Bands eliminate this risk by reducing tension at the most vulnerable position (full lockout). Anchor band under foot, hold handles at shoulder height with palms forward. Press upward while rotating palms slightly inward at the top—this “scaption” motion follows your shoulder’s natural path. Never lock elbows; stop just short of full extension. The band’s increasing resistance perfectly matches your strength curve, building deltoid caps without compromising rotator cuffs.
Pro Tip for Rotator Cuff Protection
Place a tennis ball between your upper arm and ribcage during presses. If it drops, your elbows are flaring outward—a major impingement trigger. Maintain light contact throughout the movement.
Face Pulls: The Posture Miracle Most Skip
This underrated movement combats “text neck” by strengthening rear delts and upper back. Anchor band at eye level, grab handles with palms down, and pull toward your face—elbows leading. Stop when hands reach ear level, then spread hands wide like opening curtains. Hold 3 seconds while squeezing shoulder blades down and back. Perform this after every screen session; it counters forward head posture within minutes.
Why 90% Do Face Pulls Wrong
Pulling hands toward nose instead of ears shifts work to traps instead of rear delts. Focus on leading with elbows until they pass shoulder line, then flare hands outward. Use light resistance (yellow band) for high reps—this is a precision move, not a power exercise.
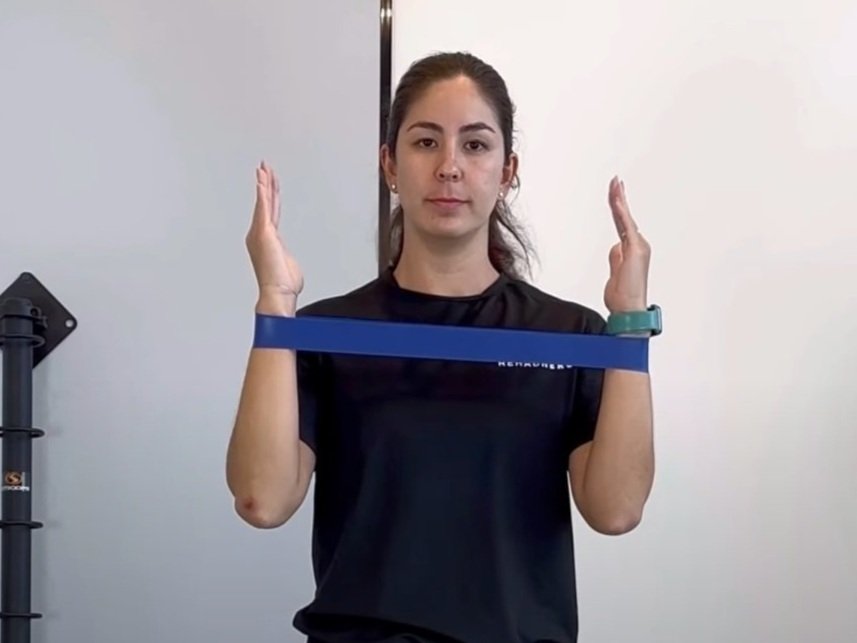
Banded Pull-Aparts: Fix Rounded Shoulders in 60 Seconds
Stand tall with band held at shoulder width, arms extended. Pull band apart horizontally until hands reach armpit level, squeezing shoulder blades together. Return slowly against band tension—this eccentric phase builds connective tissue strength. Do 20 reps hourly during work days; the cumulative effect rewires posture habits faster than any brace.
Critical Cue for Scapular Activation
Imagine pinching a $20 bill between your shoulder blades—this creates the downward rotation needed to counteract rounded shoulders. Never raise arms above shoulder height; this triggers impingement.
Creating Your 12-Minute Upper Body Blast Routine
Perform this sequence 3x weekly after cardio or on recovery days. Rest 45 seconds between exercises, 90 seconds between rounds:
- Band Rows: 15 reps (anchor hip height)
- Chest Press: 12 reps (anchor behind)
- Face Pulls: 20 reps (anchor eye level)
- Overhead Press: 10 reps (anchor under foot)
- Pull-Aparts: 20 reps (standing)
Increase resistance when last set feels easy. Track progress by how much farther you step back to create tension—not just rep counts.
Critical Safety Checks Before Every Session
Never skip these band safety protocols:
– Inspect for nicks: Run band through fingers feeling for weak spots
– Anchor test: Lean into band with body weight before loading
– Clear swing zone: Ensure 6-foot radius free of people/objects
– No wrist wraps: Always grip handles—recoil causes severe lacerations
– Retire after 6 months: Latex degrades even without visible damage
Snap-back injuries cause 40% of band-related ER visits. Always maintain tension during movement—never release handles mid-exercise. If band slips from anchor, drop it and step back immediately.
Final Note: Consistent resistance band training builds balanced upper body strength that translates to real-world functionality—improved posture, easier lifting, and reduced injury risk. Focus on perfect form over resistance level, especially with shoulder exercises. Within 30 days of daily pull-aparts and rows, you’ll notice clothes fitting better across the back and shoulders. For continued progress, add 10% more tension weekly by shortening your stance or stepping farther from anchors. Remember: bands work best when incorporated into existing routines, not as complete replacements for heavy lifting. Pair this with 1-2 traditional strength sessions weekly for optimal development.


