
Combining resistance bands with vibration plate training creates a powerful synergy that can transform your fitness routine. This dynamic duo amplifies muscle activation, burns more calories, and delivers faster results than either modality alone. Whether you’re a beginner exploring vibration training or an experienced athlete looking to intensify your workouts, understanding how to properly integrate resistance bands with your vibration plate will help you achieve maximum benefit while staying safe. This comprehensive guide walks you through everything you need to know—from setup and safety to specific exercises and workout programming—that will have you training smarter and seeing results faster.
Why Resistance Bands and Vibration Plates Work Together
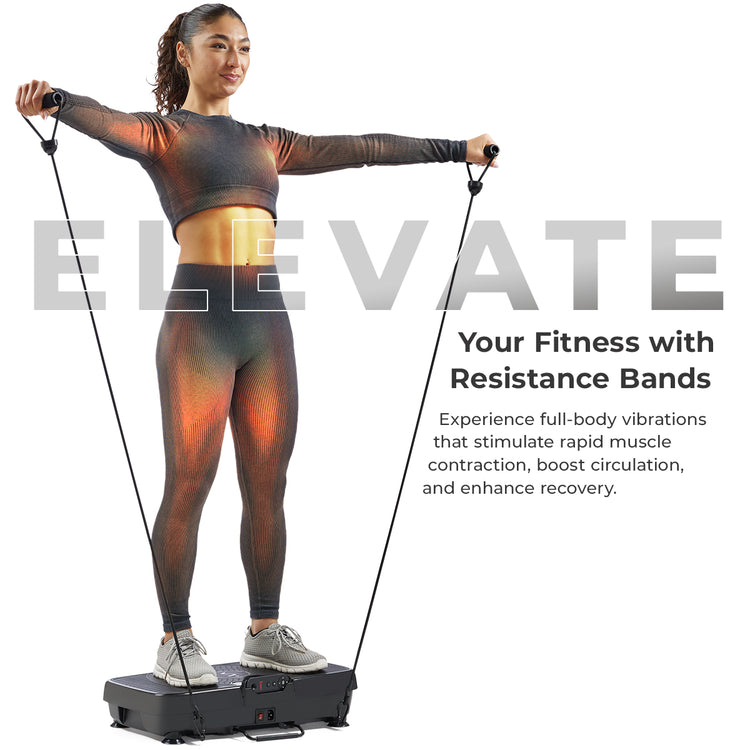
Vibration plates work by sending rapid oscillations through your body, forcing your muscles to contract and relax dozens of times per second. When you add resistance bands to this equation, you introduce constant tension that your muscles must work against throughout those vibrations. This combination creates what fitness professionals call “amplified muscle activation”—your muscles receive both the mechanical stress from the bands and the neurological stimulus from the vibrations simultaneously.
The science behind this pairing is compelling. Whole-body vibration increases muscle strength, improves flexibility, and enhances blood circulation. Resistance bands provide variable resistance that challenges muscles throughout their entire range of motion. When used together, these two modalities create an environment where your muscles must work harder to maintain stability while simultaneously fighting against band tension. The result is a more efficient workout that recruits more muscle fibers in less time. Additionally, the instability introduced by the vibration plate forces your stabilizer muscles to engage more intensely than they would during traditional resistance training, helping you develop better balance and coordination alongside raw strength.
Critical Safety Steps Before Using Resistance Bands on Vibration Plate
Before attaching your first resistance band to a vibration plate, understanding and implementing proper safety measures will protect you from injury and ensure your training remains effective. Safety should never be an afterthought—this combination creates unique challenges that require preparation and awareness.
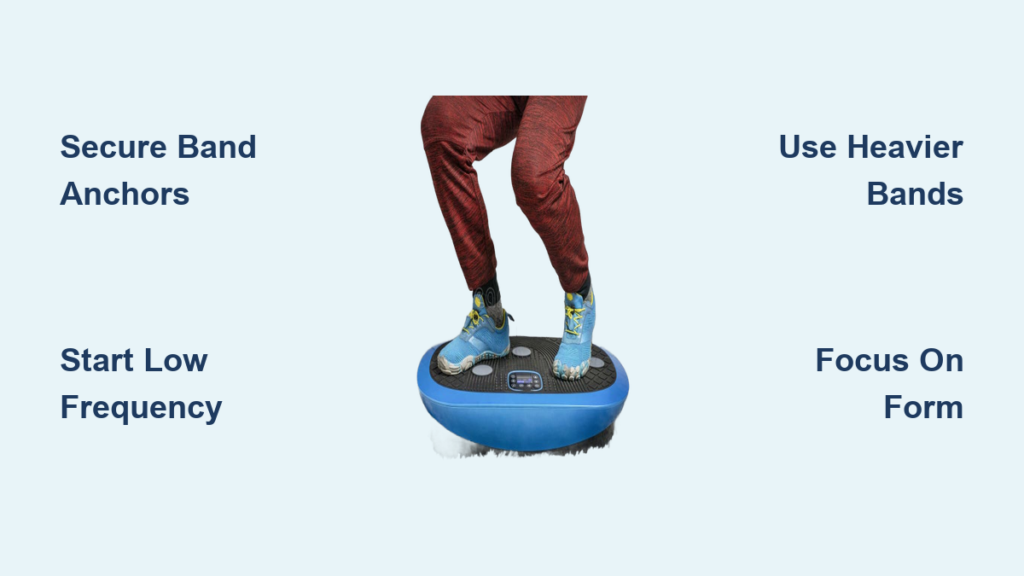
Start by examining your vibration plate’s weight capacity and ensuring it exceeds your body weight plus any additional resistance from the bands. Most quality vibration plates handle between 250 and 400 pounds, but checking your model’s specifications is crucial. Next, inspect your resistance bands for any tears, weak spots, or degradation. Bands that have been stored improperly or used extensively may snap under the increased tension created by vibrations, so replace any questionable equipment immediately. Wear appropriate athletic footwear with good grip, as the vibrations will challenge your balance constantly. Avoid loose clothing that could become entangled in bands or machinery, and consider wearing workout gloves if your bands have handles that might cause blistering during extended sessions.
One of the most important safety rules is to start at low vibration frequencies and gradually increase intensity as your body adapts. Your muscles and joints need time to adjust to the combined stimulus, and jumping straight into high-intensity settings often leads to strain or fatigue-related injuries. Beginners should spend the first two to three sessions at settings below 20 Hz, focusing entirely on balance and proper form before progressing to more challenging workouts.
Choosing the Right Resistance Bands for Vibration Plate Training
Selecting appropriate resistance bands for vibration plate work requires understanding how band specifications interact with plate dynamics. Not all bands perform equally in this unique environment, and selecting the right ones will dramatically affect your training experience and results.
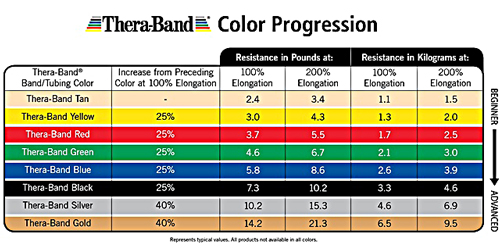
Resistance bands come in different resistance levels, typically color-coded from light to extra-heavy. For vibration plate work, you’ll generally want to select bands that are one to two levels heavier than what you would use for traditional resistance training. The constant muscle activation required by vibrations means your muscles fatigue faster, so heavier bands help maintain adequate tension throughout your set. Light and medium bands work well for isolation exercises and beginners, while intermediate to advanced users should gravitate toward medium-heavy and heavy bands for compound movements.
Consider band types carefully as well. Loop bands are excellent for lower body exercises and wraparound movements, while bands with handles provide better control for upper body pulling motions. Figure-eight bands with built-in handles can be particularly useful for chest and back exercises on the vibration plate. The material matters too: latex bands offer the most consistent resistance but can cause allergic reactions in some users, while non-latex alternatives made from synthetic materials provide similar performance without allergy concerns.
Securing Resistance Bands to Your Vibration Plate Properly
Correctly setting up your resistance bands with your vibration plate creates the foundation for effective, safe training. Improper attachment points and band positioning can reduce exercise effectiveness and increase injury risk, making this step worth getting right every time.
Most vibration plates include attachment points or anchor straps specifically designed for resistance bands. If your plate lacks built-in anchors, you’ll need to create secure attachment points using the plate’s base or sturdy nearby structures. Never attach bands to unstable objects, door handles not designed for band resistance, or furniture that could tip or break under tension. Some users position their vibration plate against a wall and anchor bands to wall-mounted hooks or heavy-duty door anchor systems—ensure any anchor you use can withstand sudden force without giving way.
When attaching bands to the plate itself, verify that the connection point is secure before placing any weight on it. Many plates have designated anchor loops or carabiner-friendly openings at the base. Attach your band using a secure knot or heavy-duty carabiner, leaving enough slack to reach your starting position without strain. Before beginning each exercise, give the band a gentle tug to confirm secure attachment, and never step onto or pull against a band you haven’t personally verified is properly connected.
Effective Lower Body Resistance Band Exercises on Vibration Plate
Your lower body contains the largest muscle groups in your body, making it the most efficient area for generating results with vibration plate resistance band training. These exercises target your glutes, quadriceps, hamstrings, and calves while challenging your balance and stability in ways traditional training cannot replicate.
Banded Squats for Maximum Leg Development transform an already effective exercise into a muscle-building powerhouse. Place the resistance band under both feet slightly wider than shoulder-width, holding the handles or gripping the band at your shoulders with elbows bent. As you descend into your squat, the band creates increasing resistance that peaks at the bottom of your movement. The vibration plate amplifies this by forcing your stabilizer muscles to work harder maintaining balance throughout the range. Perform three sets of twelve to fifteen repetitions, focusing on controlled descent and explosive ascent.
Banded Glute Bridges with Enhanced Activation specifically target your posterior chain with intense focus on the gluteal muscles. Lie flat on your vibration plate with your knees bent and feet planted, looping a resistance band just above your knees. Press through your heels to raise your hips toward the ceiling, simultaneously pushing your knees outward against the band’s resistance. The vibrations intensify the glute contraction and force your core to stabilize your spine throughout the movement. Hold the top position for two seconds, squeezing your glutes maximally before lowering with control.
Upper Body Resistance Band Techniques for Vibration Plate Training
While vibration plates excel at lower body training, incorporating upper body exercises expands your workout’s total-body benefits and addresses the unique challenge of maintaining stability through your core and spine while training your arms and shoulders.
Banded Chest Presses with Vibration Enhancement deliver intense pectoral development while requiring significant core engagement to maintain position on the vibrating platform. Anchor your resistance band behind you at chest height, grasp one handle in each hand, and step forward to create tension. Press the handles forward until your arms are nearly straight, then return with control. The vibration forces your chest muscles to maintain tension throughout the entire range rather than relaxing at the extension point, increasing time under tension and muscle fiber recruitment.
Seated Rows for Back Strength and Posture target your back muscles while requiring postural stability that becomes significantly more challenging on a vibrating platform. Anchor a resistance band at foot level or secure it under the plate’s base, grasp the handles, and sit with legs extended. Pull the handles toward your waist, squeezing your shoulder blades together at the finish position. The vibration plate intensifies the challenge to your erector spinae and deep back stabilizers, which must work continuously to maintain your seated position while your arms perform the pulling motion.
Creating Your Resistance Band Vibration Plate Workout Routine
Structuring your vibration plate resistance band workouts properly ensures progressive overload, adequate recovery, and continuous improvement. Without thoughtful programming, even the most effective exercises fail to produce lasting results.
For general fitness, aim to train three to four times per week with at least one full rest day between sessions. Structure each workout to hit all major muscle groups rather than focusing exclusively on one area—this approach maximizes the cardiovascular and metabolic benefits of vibration training while ensuring balanced development. Begin each session with five to ten minutes of dynamic warm-up movements—light marching, arm circles, and leg swings prepare your muscles and joints for the increased demands ahead.
For your main workout, select two to three exercises targeting your lower body and two to three for your upper body, performing three sets of each with eight to fifteen repetitions depending on the exercise and your fitness level. Rest sixty to ninety seconds between sets, using this time to adjust band tension or plate settings. Your total workout time should fall between twenty and forty minutes—shorter sessions work well for maintenance training while longer sessions accommodate more advanced athletes seeking muscle growth.
Avoiding Common Resistance Band Vibration Plate Mistakes
Learning from others’ errors helps you progress faster and stay safer. Several mistakes frequently occur among vibration plate resistance band users, and avoiding these pitfalls will improve your training experience significantly.
Using inappropriate vibration intensity ranks as the most common error. Many beginners either start too aggressively or remain stuck at unnecessarily low settings. Starting low allows your body to adapt to the unique demands of vibration training, but progressing too slowly wastes potential. Aim to increase intensity every one to two weeks if you’re training consistently and recovering adequately. Conversely, jumping to high frequencies too quickly often results in joint pain, excessive fatigue, or injury that sidelines your training entirely.
Poor band maintenance creates unnecessary danger. Inspect your bands before every use—fraying, small tears, or permanent stretching indicate it’s time for replacement. Store bands away from direct sunlight and extreme temperatures, as UV exposure and heat degradation weaken latex and synthetic materials over time. Rolling bands neatly rather than leaving them tangled extends their lifespan and makes your workouts more efficient by eliminating the frustrating tangle-time that interrupts training flow.
Equipment Care for Long-Lasting Resistance Band Vibration Training
Proper equipment maintenance ensures safety, extends the life of your investment, and maintains consistent training conditions over time. Your vibration plate and resistance bands require regular attention to perform optimally.
Clean your vibration plate after each use with a slightly damp cloth, paying particular attention to the platform surface where your feet make contact. Sweat and skin oils create slippery conditions that affect balance and can harbor bacteria over time. For resistance bands, wipe them down with a mild disinfectant solution, especially if multiple people share equipment. Allow all equipment to dry completely before storing to prevent mold and material degradation.
Inspect your vibration plate’s power cord and electrical connections regularly. Any fraying, exposed wires, or malfunctioning controls require immediate attention from a qualified technician—electrical failures on workout equipment can cause serious injury. Check that the platform’s rubber feet or vibration-dampening pads remain intact and properly positioned, as worn feet can cause the plate to “walk” during use and create instability hazards.
Maximizing Your Results with Resistance Bands on Vibration Plate
Understanding how to optimize your vibration plate resistance band sessions separates mediocre workouts from exceptional results. Small refinements in technique, timing, and approach can dramatically impact your outcomes.
Breathing correctly during intense vibration training deserves special attention. Many beginners hold their breath during challenging exercises, which increases blood pressure and reduces performance. Breathe out during the exertion phase of each movement and inhale during the return phase, maintaining a steady rhythm that matches your movement tempo. This breathing pattern oxygenates your working muscles and helps you sustain effort longer.
Mind-muscle connection significantly influences training effectiveness. Rather than going through the motions mechanically, focus intentionally on the muscle group you’re targeting. For glute exercises, consciously squeeze and engage your glutes throughout each repetition. For chest presses, feel your pectorals doing the work rather than letting your arms do all the effort. This mental focus, combined with the heightened muscle activation from vibrations, creates superior muscle development compared to purely mechanical training.


