
You’ve probably seen resistance bands gathering dust in the corner of your home gym or tucked away in a drawer, wondering if they’re actually useful when you’re limited to seated exercises. Whether you’re recovering from an injury, managing chronic pain, working at a desk all day, or simply prefer low-impact workouts, learning how to use resistance bands sitting down unlocks a surprisingly effective strength training solution that builds muscle without stressing your joints. Seated resistance band exercises deliver up to 90% of the muscle activation found in standing versions while reducing fall risk and accommodating various mobility limitations—making them perfect for seniors, rehabilitation patients, office workers, and anyone seeking accessible fitness.
This practical guide reveals exactly how to transform your chair into a complete strength training station using just one resistance band. You’ll discover specific exercises targeting every major muscle group, learn which band resistance levels deliver optimal results for seated work, and avoid the three most common mistakes that sabotage progress. By the end, you’ll have a 15-minute seated routine you can perform anywhere—whether at your desk, in a wheelchair, or while watching TV—that builds functional strength and improves posture without ever standing up.
Selecting the Perfect Resistance Band for Chair Exercises
Choosing the right band makes the difference between frustrating struggle and satisfying progress in seated workouts. Loop-style resistance bands outperform flat bands for seated exercises because they stay securely positioned during movement, eliminating the constant readjustment that disrupts your workout flow. Look for bands with a thickness between 1/8 to 1/4 inch—thinner bands snap more easily under seated tension while thicker bands become unwieldy when anchored to chair legs.
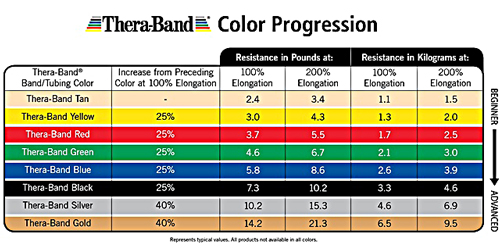
Color-coded resistance levels provide the simplest selection method: yellow or red bands (light resistance) work best for beginners and rehabilitation, green or blue (medium resistance) suit most adults performing seated upper body work, while black or purple (heavy resistance) challenge advanced users during lower body exercises. Test your band by anchoring it under your feet while seated—proper resistance should allow 10-15 controlled repetitions before muscle fatigue sets in. If you complete 20+ reps easily, move up a resistance level; if you struggle to complete 8 reps with good form, choose a lighter band.
How to Identify Worn-Out Bands Before They Snap
A snapped band during seated exercises can cause injury to your face or eyes, so inspect your equipment before every workout. Run your fingers along the entire band length, feeling for thin spots, rough patches, or uneven texture—these indicate structural weakness even if visible damage isn’t apparent. Hold the band up to light to check for micro-tears, particularly where it contacts chair edges. Replace bands showing any signs of wear immediately, as resistance degrades significantly after 3-6 months of regular use. Store bands away from direct sunlight and extreme temperatures to maximize their lifespan.
Critical Safety Setup for Seated Band Training
Your chair selection determines both exercise effectiveness and injury risk during seated band workouts. Choose a standard dining chair with a firm seat, straight back, and no wheels—wheeled chairs shift during resistance movements, forcing stabilizer muscles to compensate instead of your target muscles. Position your feet flat on the floor with knees bent at 90 degrees; if your feet don’t reach the floor, place a sturdy book or step under them to maintain proper alignment.
Anchor Points That Prevent Band Slippage
Securing your band properly eliminates dangerous slippage during seated exercises. For lower body work, loop the band under both chair legs near the floor—place folded towels under the band to prevent chair scratches and increase friction. When anchoring behind your back for upper body exercises, wrap the band around the chair back twice before gripping the ends to create secure tension. Never anchor bands to unstable objects like table edges or wheelchair footrests, as sudden release can cause injury. Test your anchor by gently tugging the band before beginning each exercise.
Upper Body Seated Exercises You Can Do at Your Desk
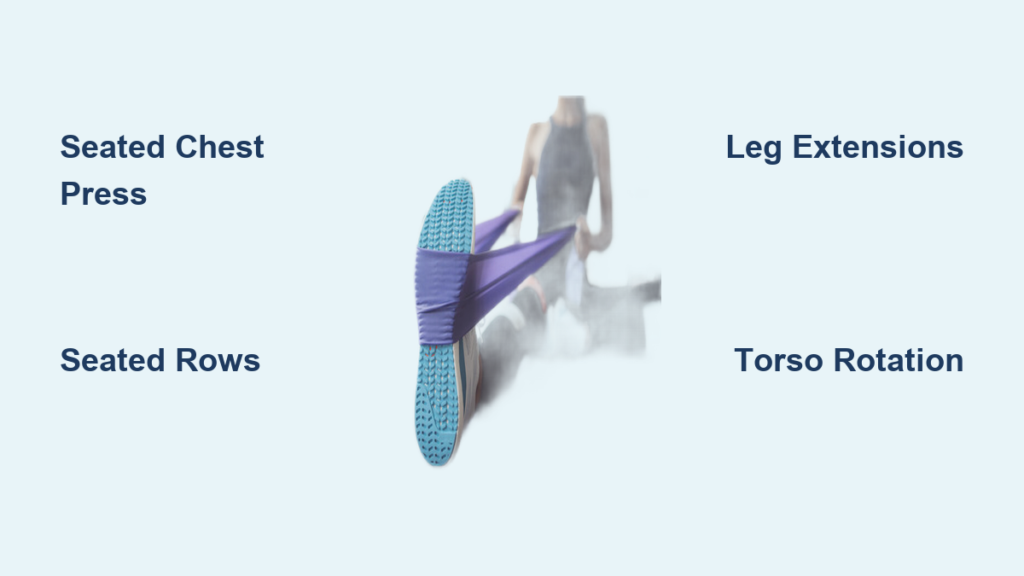
The seated band chest press builds functional pushing strength for daily activities like opening doors or pushing a wheelchair. Sit tall with your back against the chair, loop the band behind your shoulders at armpit level, and grip both ends with palms facing forward. Press hands forward until arms fully extend (without locking elbows), squeeze your chest muscles for 2 seconds, then slowly return. Perform 3 sets of 12-15 reps with 60 seconds rest between sets—this movement targets your pectorals while improving posture after hours of desk work.
Fixing Common Form Mistakes in Seated Rows
Many people unknowingly cheat seated rows by using momentum instead of back muscles. To maximize effectiveness: sit with feet hip-width apart, loop the band under both feet, and grip ends with palms facing your body. Pull elbows back while squeezing shoulder blades together—imagine trying to hold a pencil between your shoulder blades. Keep your chest lifted throughout the movement; if your shoulders round forward, reduce resistance immediately. Complete 3 sets of 10-12 controlled reps, focusing on the burn between your shoulder blades rather than arm movement.
Core Strengthening Moves for Better Posture
The seated band torso rotation builds rotational strength essential for everyday twisting motions like reaching for items in your car. Sit tall with feet flat, hold the band taut in front of your chest with both hands, and slowly rotate your upper body to one side while keeping hips facing forward. Hold for 2 seconds when you feel core engagement, then return to center. Perform 10 rotations per side for 3 sets—this exercise specifically targets the obliques that stabilize your spine during sitting.
Why Anti-Rotation Holds Beat Traditional Crunches
Seated band anti-rotation holds build functional core strength that protects your spine better than crunches. Anchor the band at chest height to a sturdy object, grip both ends at your sternum, and press forward while resisting the band’s pull. Your core muscles will engage to prevent rotation—hold this position for 20-30 seconds while maintaining steady breathing. Complete 3 holds per side; this isometric exercise develops the deep stabilizing muscles that prevent lower back pain during prolonged sitting.
Lower Body Exercises for Stronger Legs Without Standing
Seated leg extensions with resistance bands build quadriceps strength crucial for rising from chairs and climbing stairs. Loop the band behind chair legs, sit with knees bent 90 degrees, and place the band across your shins. Extend one leg straight out while keeping the other foot flat, hold for 2 seconds at full extension, then slowly lower. Complete 15 reps per leg for 3 sets—this movement provides constant tension through the entire range of motion unlike machine-based extensions.
Fixing Hip Abduction Form for Better Results
Many people unknowingly cheat seated hip abductions by tilting their pelvis. To properly engage outer thighs: sit tall with band looped around thighs just above knees, place hands on chair for stability, and push knees outward while keeping feet parallel and heels together. Focus on using your hip muscles rather than leaning back—the band should create tension but not cause your chair to slide. Perform 20 controlled reps for 3 sets; this exercise strengthens the muscles that prevent knee collapse during walking.
Creating Your 15-Minute Seated Workout Routine
Combine these exercises into an efficient seated circuit that builds full-body strength without equipment changes: perform chest presses (12 reps), seated rows (10 reps), leg extensions (15 reps per leg), and torso rotations (10 per side) back-to-back with 30 seconds rest between exercises. Repeat the circuit twice for a complete 15-minute workout you can do during lunch breaks or while watching TV. This routine hits all major muscle groups while accommodating limited mobility.
How to Progress When Exercises Feel Too Easy
Increase difficulty every 2-3 weeks by: switching to a thicker band, slowing down your movement speed (4 seconds out, 4 seconds back), adding 2-5 extra reps per set, or reducing rest time between exercises. Never increase resistance more than one level at a time—gradual progression prevents injury and ensures consistent gains. Track your improvements in a simple notebook; when an exercise that once challenged you now feels easy, it’s time to advance.
Three Critical Mistakes That Sabotage Seated Band Results
Using improper breathing technique during seated exercises reduces strength output by up to 40% and increases injury risk. Never hold your breath—exhale during the exertion phase (when pushing or pulling against resistance) and inhale during the return. Practice this pattern slowly at first until it becomes automatic.
Selecting bands that are too heavy forces compensatory movements that develop poor muscle patterns. If you can’t complete 10 repetitions with perfect form, reduce resistance immediately—light resistance with proper technique builds more functional strength than heavy resistance with compromised form.
Neglecting full range of motion limits functional strength gains. Always move joints through their complete available range—stop briefly at both endpoints of each movement—to build strength that translates to real-world activities.
Seated resistance band training delivers remarkable strength benefits with minimal equipment investment, making fitness accessible regardless of mobility limitations. Start with light resistance and focus on perfect form before progressing—consistency matters far more than intensity. Within 4-6 weeks of performing these seated exercises 3 times weekly, you’ll notice improved posture, easier chair transitions, and greater confidence in daily movements. Keep your band by your favorite chair and commit to just 10 minutes daily; your stronger, more resilient body will thank you for making seated strength training a non-negotiable part of your routine.


