

Resistance bands have become a game-changer for women’s fitness routines, offering a versatile, affordable way to build strength without bulky equipment. If you’ve ever wondered how to use resistance bands women rely on for effective home workouts, you’re in the right place. These elastic powerhouses deliver constant tension throughout movements, activating more muscle fibers than traditional weights in many cases. Whether you’re recovering from injury, traveling frequently, or simply prefer training at home, mastering resistance band techniques can transform your physique and performance. This guide reveals exactly how to use resistance bands women swear by to sculpt stronger arms, lift your glutes, and build core stability—no gym membership required.
Selecting Your Perfect Resistance Band Level
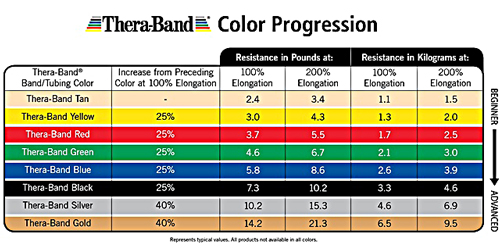
Choosing the right resistance band intensity makes or breaks your training results. Women often make the critical mistake of grabbing bands that are too heavy before mastering proper form—this leads to compromised technique and potential injury. Start with light or medium resistance bands (typically yellow, green, or red) that allow you to complete 12-15 repetitions with perfect form while creating significant muscle fatigue by the final reps. As you progress, gradually move to heavier bands (blue, black, or purple) when your current resistance no longer challenges you through the full range of motion.
How to Test Your Band Resistance Level
Stand on your band with feet hip-width apart, holding both ends at shoulder height. Perform a bicep curl—your elbows should stay pinned to your sides while you curl toward your shoulders. If you can complete 20+ repetitions without feeling substantial muscle burn by the end, the band is too light. If you struggle to complete 8 repetitions with proper form, it’s too heavy. The ideal resistance creates noticeable tension at the peak contraction point while allowing full range of motion. Remember that different exercises require different resistance levels—your squat band will likely be heavier than your shoulder band.
Why Band Material Matters for Women’s Training
Latex bands provide superior elasticity and durability but can trigger allergies in some women. If you experience skin irritation, switch to latex-free options made from thermoplastic elastomer (TPE), which offer similar performance without the allergy risk. Loop-style bands (fabric or rubber) excel for lower body work like squats and glute bridges, while tube bands with handles better serve upper body pulling movements. Invest in a complete set with multiple resistance levels rather than individual bands—this allows seamless progression as your strength improves without interrupting your training momentum.
Mastering Proper Resistance Band Form Techniques
Many women unknowingly sabotage their resistance band results through common form mistakes that shift work away from target muscles. The key to effective band training lies in controlling the eccentric (lengthening) phase of each movement—this is where bands truly shine compared to free weights.
How to Anchor Bands for Maximum Glute Activation
When performing glute bridges or clamshells, position the band just above your knees rather than around your ankles. This placement forces your gluteus medius to fire throughout the movement, creating that coveted outer thigh sweep and preventing knee collapse during squats. Lie on your back with knees bent, feet flat, and press your knees outward against the band while simultaneously lifting your hips. Squeeze your glutes hard at the top position for two full seconds before lowering—this extended time under tension triggers greater muscle growth than rushing through repetitions.
Avoiding Shoulder Injury During Band Pull-Aparts
Stand with feet shoulder-width apart, holding the band taut at chest height with arms extended. Instead of pulling the band apart by shrugging your shoulders, initiate the movement by squeezing your shoulder blades together as if trying to hold a pencil between them. Keep a slight bend in your elbows throughout—locking them out transfers stress to your joints rather than your muscles. Perform 15-20 controlled repetitions as part of your warm-up routine to activate your upper back before heavier pulling movements. This technique prevents the rounded shoulder posture many women develop from desk work and phone use.
Effective Lower Body Resistance Band Workouts
Women consistently report remarkable glute and thigh transformations from properly executed band training. The secret lies in maintaining constant tension throughout movements rather than relying on momentum.
How to Perform Band Squats That Actually Build Glutes
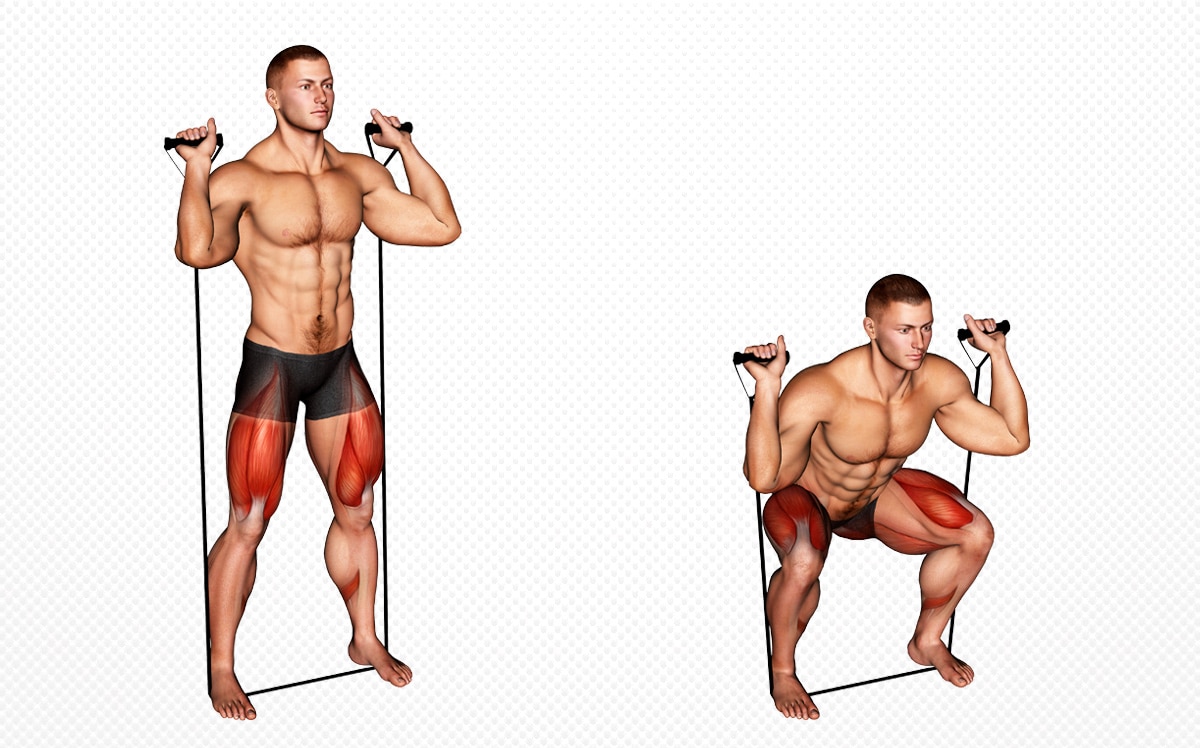
Stand on your band with feet slightly wider than hip-width, holding the ends at your shoulders. Initiate the movement by pushing your hips back as if sitting in a chair, keeping your chest lifted and knees tracking over toes. The band’s increasing tension as you stand up provides maximal resistance exactly where your glutes are strongest—the top portion of the movement. Drive through your heels while squeezing your glutes at the top position. Complete 3 sets of 15-20 repetitions, selecting a band that makes the final 3-5 reps challenging but doable with perfect form. For extra burn, add a 2-second pause at the bottom position of each squat.
Fixing Knee Collapse During Lunges with Bands
Loop a light resistance band just above your knees before performing walking lunges. As you step forward, actively press your front knee outward against the band’s resistance throughout the movement. This simple cue engages your gluteus medius, preventing the common “knee cave” that leads to joint pain and inefficient muscle activation. Complete 10-12 lunges per leg for 3 sets, focusing on controlled movement quality over speed. You’ll immediately feel the difference in your outer glutes and thigh muscles—this is the key to developing that sculpted lower body appearance many women seek.
Upper Body Resistance Band Techniques That Deliver Results
Women often struggle to develop defined arms and back muscles without heavy weights, but resistance bands provide the perfect solution when used correctly.
Building Stronger Shoulders Without Injury Risk
Anchor your band at shoulder height, stand facing away, and grip the handles with palms forward. Press directly upward while keeping your core engaged to prevent lower back arching. The band’s variable resistance provides less tension at the bottom (where shoulder joints are most vulnerable) and more at the top (where your muscles are strongest)—this natural resistance curve protects your rotator cuff while maximizing deltoid development. Perform 3 sets of 12-15 controlled presses, lowering slowly against the band’s tension. For broader shoulders, widen your hand placement on the band during presses.
Creating Defined Arms with Proper Bicep Curl Mechanics
Stand on the band with one foot, holding the other end with your palm facing forward. Keep your upper arm completely stationary against your side—this isolation is critical for bicep development. Curl by bending only at the elbow while rotating your palm slightly inward at the top position (supination). Most women unknowingly swing their bodies or move their elbows during curls, shifting work to the shoulders rather than targeting the biceps. Perform 3 sets of 12-15 repetitions with strict form, feeling the burn specifically in your bicep muscle rather than your forearm or shoulder.
Core Exercises That Actually Flatten Your Stomach
Resistance bands transform core training by adding resistance to rotational movements that traditional crunches can’t match.
How to Perform Anti-Rotation Presses for a Stronger Midsection
Anchor your band at chest height, stand sideways to the anchor point, and hold the handle with both hands at your sternum. Step away until the band creates tension, then press the handle straight out in front of you while resisting the band’s pull to rotate your torso. Hold for 2-3 seconds before returning to center. This Pallof press variation targets your transverse abdominis—the deep core muscle responsible for that tight, flat stomach appearance. Complete 3 sets of 10-12 presses per side, focusing on maintaining perfect spinal alignment throughout.
Fixing Common Core Training Mistakes with Bands
Many women arch their lower backs during core exercises, shifting work away from abdominal muscles. When performing standing band crunches (holding handles behind your head while crunching toward your knee), keep a slight bend in your standing leg and imagine pressing your lower back into a wall. This pelvic tilt activates your deep core muscles while protecting your spine. Perform 2 sets of 20 alternating crunches, moving slowly enough that you feel genuine muscle contraction rather than momentum carrying you through the movement.
Safety Protocols Every Woman Must Follow
Resistance bands create incredible results when used properly, but improper technique leads to snapped bands and potential injury.
How to Inspect Bands Before Every Workout
Examine your entire band length for nicks, tears, or thinning spots—pay special attention to areas that contact door anchors or floor surfaces. Stretch the band slightly to check for weak spots that appear thinner than surrounding material. Never use a band with visible damage, as it could snap under tension. Store bands away from direct sunlight and heat sources, which degrade elastic materials over time. Replace bands immediately if they show permanent stretching (no longer return to original length) or inconsistent resistance throughout.
Proper Anchoring Techniques to Prevent Injury
Always use a dedicated door anchor rather than makeshift solutions like doorknobs. Close the door firmly on the anchor strap, then test it by pulling gently before loading the band. When anchoring at floor level, ensure the anchor point won’t slide during exercise—place heavy objects against furniture if needed. Keep your hands and face clear of the band’s path during exercises, as snapped bands can cause serious eye injuries. Maintain awareness of band tension throughout each movement, adjusting your stance to keep proper resistance vectors without overstretching the band.
Consistently applying these resistance band techniques delivers noticeable strength and physique improvements within weeks. Start with lighter resistance to master perfect form, then progressively challenge yourself with heavier bands and advanced techniques. Focus on muscle contraction quality over resistance amount—your body responds to tension, not just weight. Incorporate these band exercises 2-3 times weekly alongside proper nutrition, and you’ll develop the strong, sculpted physique you’ve been working toward. The most successful women view resistance bands not as a compromise to gym training, but as a superior tool for building functional strength anywhere, anytime. Your journey to a stronger, more confident body starts with mastering how to use resistance bands women trust for real results.


