
Resistance tube bands have revolutionized home fitness with their portability and versatility, offering effective strength training without bulky equipment. If you’ve ever wondered how to use resistance tube bands properly to build real muscle and strength, you’re not alone—many beginners struggle with proper technique and progression. These elastic powerhouses provide variable resistance that increases throughout your movement range, forcing muscles to work harder exactly where they’re strongest. Whether you’re recovering from injury, traveling frequently, or simply building a home gym on a budget, mastering resistance tube bands delivers impressive results. In this guide, you’ll discover precise techniques for every major muscle group, safety protocols to prevent injury, and progression strategies that keep your muscles challenged month after month.
Why Resistance Tube Bands Outperform Traditional Weights
Resistance tube bands offer unique benefits that traditional weights simply can’t match, particularly the variable resistance profile that increases tension as you extend the band. This means your muscles work hardest at the peak contraction point—exactly where they’re strongest—which creates superior muscle activation compared to fixed-weight dumbbells. When performing a bicep curl with a dumbbell, the resistance remains constant while your mechanical advantage changes throughout the movement; with bands, the resistance perfectly matches your strength curve for maximum efficiency.
Portability makes resistance tube bands indispensable for travelers and home exercisers. A complete set weighing less than two pounds fits in any suitcase yet provides everything from light warm-up resistance to heavy strength-building tension. Unlike gym machines with fixed movement patterns, bands allow natural movement through multiple planes, building functional strength that transfers directly to real-world activities and sports performance. The affordability factor is equally compelling—a quality band set costs less than a single gym session but delivers years of effective training.
Selecting Your First Resistance Band Set
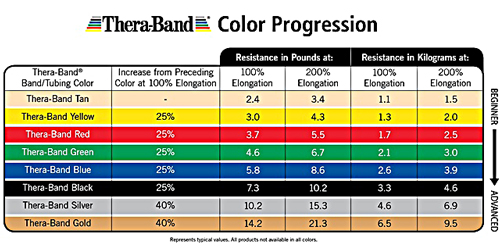
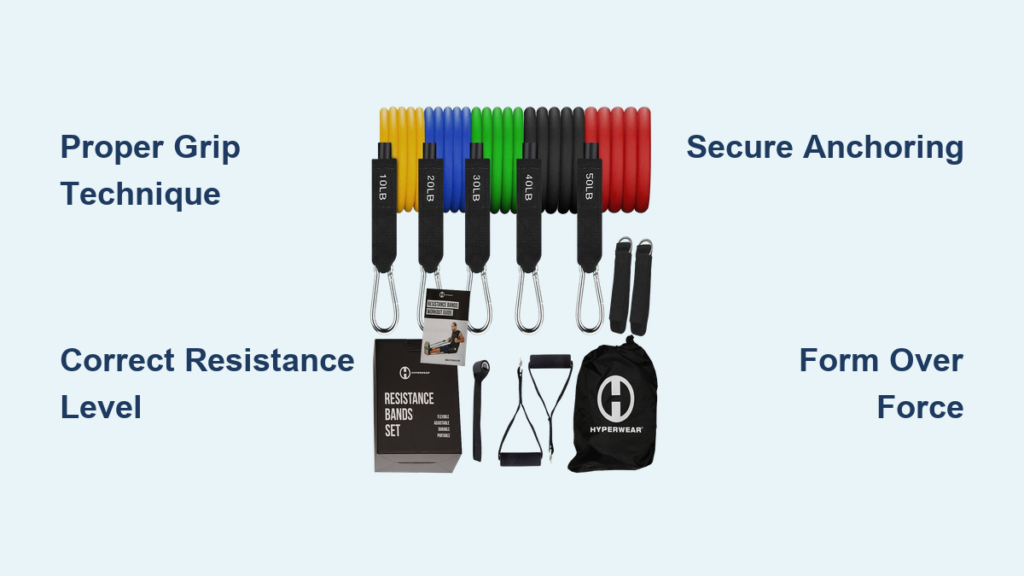
Choosing the right resistance level prevents frustration and ensures proper muscle development when learning how to use resistance tube bands effectively. Most manufacturers use color-coded resistance levels ranging from extra light (2-5 pounds) to extra heavy (50+ pounds), though standards vary between brands. Beginners should start with light to medium bands (5-15 pounds) to master movement patterns before adding significant resistance. Attempting heavy resistance too soon compromises form and increases injury risk while delivering suboptimal results.
Consider your target muscle groups when selecting bands, as lower body exercises require substantially more resistance than upper body work. Your glutes and legs generate tremendous force compared to arms and shoulders, so plan for heavier bands for squats, deadlifts, and hip thrusts. Many exercisers find purchasing a complete set with multiple resistance levels provides the best long-term value, allowing you to match band resistance precisely to each exercise’s demands. Test bands before buying if possible—proper resistance should allow 10-15 controlled repetitions with perfect form while creating significant muscle fatigue by the final rep.
Essential Setup for Safe Band Training

Before using resistance tube bands, establish a safe training environment with proper anchoring points and non-slip surfaces. Door anchors transform any standard door into a secure attachment point for horizontal pulls and rows, but always inspect the door frame for stability first—never anchor to door knobs or flimsy closet doors. When standing on bands for exercises like squats or presses, place them on a yoga mat or carpeted surface to prevent slipping, positioning your feet shoulder-width apart for maximum stability.
Handle attachments significantly expand your exercise options while reducing hand fatigue during extended sets. Straight handles work well for presses and rows, while angled handles reduce wrist strain during overhead movements. Some advanced sets include ankle straps for lower body exercises like kickbacks and abduction walks. Keep a small towel nearby to wipe sweat from your hands and bands—moisture reduces grip security and accelerates band deterioration. Always inspect bands for nicks, tears, or weak spots before each workout, replacing any showing visible wear to prevent dangerous snapping during use.
Perfecting Your Band Grip Technique
How you grip resistance tube bands dramatically impacts exercise effectiveness and joint safety. For upper body pulling movements like rows and pulldowns, use an overhand grip with palms facing down and thumbs wrapped around the band. This position engages your back muscles more effectively while protecting your shoulder joints from unnecessary strain. When performing pressing movements, try both overhand and underhand grips to determine which creates better muscle activation with comfortable joint positioning—many find underhand grips reduce shoulder discomfort during chest presses.
For exercises where bands wrap around your body, proper positioning prevents slipping and ensures consistent tension. Place looped bands just above knee level for abduction walks, not on the softer tissue below the knee cap. When anchoring bands around your waist for rotational movements, position them at hip bone level rather than across your stomach for better stability and comfort. Never wrap bands tightly around joints—maintain at least two inches of clearance around knees, ankles, and elbows to prevent pinching during movement.
Upper Body Band Exercises Done Right
Master these three foundational upper body exercises to build serious strength when learning how to use resistance tube bands:
Standing Bicep Curls with Band Underfoot – Stand on the center of your band with feet hip-width apart, gripping handles with palms facing forward. Keep elbows fixed at your sides as you curl hands toward shoulders, then slowly lower against band tension for 3 seconds. The increased resistance at the top position builds peak contraction strength that dumbbells can’t match.
Single-Arm Rows with Door Anchor – Attach band to door anchor at waist height, step back to create tension, and grip handle with one hand. Hinge forward at hips with slight knee bend while keeping back straight. Pull handle toward lower rib cage while squeezing shoulder blades together, then slowly extend arm against resistance. This horizontal pulling pattern builds back thickness better than vertical pulls for most people.
Overhead Shoulder Press – Stand on band center with feet together, gripping handles at shoulder height with palms forward. Press hands straight overhead until arms fully extend, then slowly lower through the full range of motion. The band provides maximum resistance at the top position where your shoulders are strongest, creating exceptional deltoid activation.
Lower Body Power Moves
These band exercises build functional lower body strength that transfers directly to athletic performance and daily activities:
Banded Squats with Hip Abduction – Place looped band just above knees while standing with feet shoulder-width apart. Perform squats while actively pressing knees outward against band resistance. This engages your gluteus medius for improved knee stability while building overall squat strength. Maintain tension throughout by controlling the upward phase.
Glute Bridges with Band – Lie on back with knees bent, placing band just above knees. Drive through heels to lift hips while pressing knees outward. Squeeze glutes hard at the top position before slowly lowering. This exercise specifically targets posterior chain muscles often neglected in traditional workouts.
Lateral Walks for Hip Strength – Position band above knees in athletic stance with slight knee bend. Take controlled steps sideways against band tension, maintaining constant resistance without allowing band to go slack. Perform 10-15 steps each direction for improved hip stability crucial for runners and athletes.
Core Stability Band Techniques
Most people overlook these band-powered core exercises that build real-world stability:
Anti-Rotation Holds – Anchor band at chest height, grip handle with both hands, and step back to create tension. From stable stance, push band straight out while fighting rotation force. Hold position for 20-30 seconds per side to build deep core stability that protects your spine during lifting and daily movements.
Standing Woodchops – Anchor band high, grip handle with both hands, and rotate torso diagonally downward against resistance. Control the return phase slowly—this rotational movement builds functional core strength used in sports and daily activities.
Safety First: Avoiding Band Training Injuries
Prevent common band training injuries by following these critical safety protocols. Always inspect bands for wear before use, replacing any showing nicks, tears, or loss of elasticity. Never anchor bands to unstable objects or door knobs that could release under tension. When stepping on bands, ensure your feet are positioned to prevent slipping and that bands won’t slide out during movement.
Progress gradually—attempting too much resistance too soon causes most band-related injuries. Start with lighter bands and perfect your form before increasing resistance. If your form breaks down during sets, immediately reduce resistance rather than pushing through with compromised technique. Allow 48 hours between band sessions targeting the same muscle groups for proper recovery and growth.
Creating Your First Band Workout
Combine these exercises into an effective 20-minute full-body routine that demonstrates how to use resistance tube bands properly:
- Banded Squats: 3 sets of 12-15 reps
- Single-Arm Rows: 3 sets of 10-12 reps per side
- Standing Bicep Curls: 3 sets of 12-15 reps
- Glute Bridges: 3 sets of 15-20 reps
- Anti-Rotation Holds: 3 sets of 20-30 seconds per side
Perform exercises back-to-back with 60 seconds rest between rounds. Use resistance that challenges you during the final reps while maintaining perfect form. As you get stronger, increase resistance by stepping further from anchors, using heavier bands, or slowing your movement tempo.
Resistance tube bands deliver exceptional strength-building potential when used correctly. By mastering proper technique, selecting appropriate resistance, and following safe progression principles, you’ll build functional strength that enhances every aspect of your physical performance. Start with lighter resistance to perfect your form, then systematically increase challenge as your muscles adapt. With consistent practice using these techniques, you’ll transform your physique and performance without ever setting foot in a gym.


