
Feeling stuck in your fitness routine without access to a full gym? Rubber resistance bands offer a surprisingly effective solution that fits in your pocket. These simple elastic tools create progressive resistance throughout your entire movement range, building strength where traditional weights often fall short. Whether you’re rehabbing an injury, traveling for work, or just want to add variety to your workouts, knowing how to use rubber resistance bands properly transforms them from cheap novelties into serious training equipment. This guide reveals the exact techniques professional trainers use to maximize muscle activation, prevent common mistakes, and get real results with resistance bands—no gym required.
Proper Grip Techniques for Effective Resistance Band Training
Your hands make or break your resistance band workout. Many beginners simply pinch the band between their fingers, causing slippage and inconsistent tension. Instead, wrap the band completely around your palm before grasping it firmly—this creates a secure anchor point that transfers force directly to your target muscles. For tube bands with handles, maintain a neutral wrist position throughout each movement to avoid strain. Always start each exercise with slight tension in the band; beginning from a slack position reduces muscle engagement and increases the risk of the band snapping back unexpectedly.
How to Anchor Resistance Bands Securely for Lower Body Exercises
Stepping on resistance bands seems straightforward until you lose your balance during squats. Place your feet shoulder-width apart directly on the band’s center point, with equal lengths extending upward on both sides. Distribute your weight evenly across both feet and press firmly downward throughout the movement. For exercises like banded deadlifts, position the band just above the arches of your feet rather than the balls to maintain stability. Check that the band isn’t twisting under your feet before initiating movement—this uneven tension can cause the band to slip sideways during your set.
Why Hand Position Determines Muscle Activation
Where you position your hands relative to the band dramatically changes which muscles work hardest. For bicep curls, keeping your palms facing up throughout the movement isolates the biceps, while rotating to a neutral grip (palms facing each other) engages more brachialis muscle. During chest presses, placing your hands wider than shoulder-width emphasizes the outer pectorals, while a narrow grip shifts focus to the triceps and inner chest. Experiment with hand positioning during your first few sets to feel how subtle changes redirect tension to different muscle fibers.
Transform Your Lower Body Workouts with Band-Resisted Squats
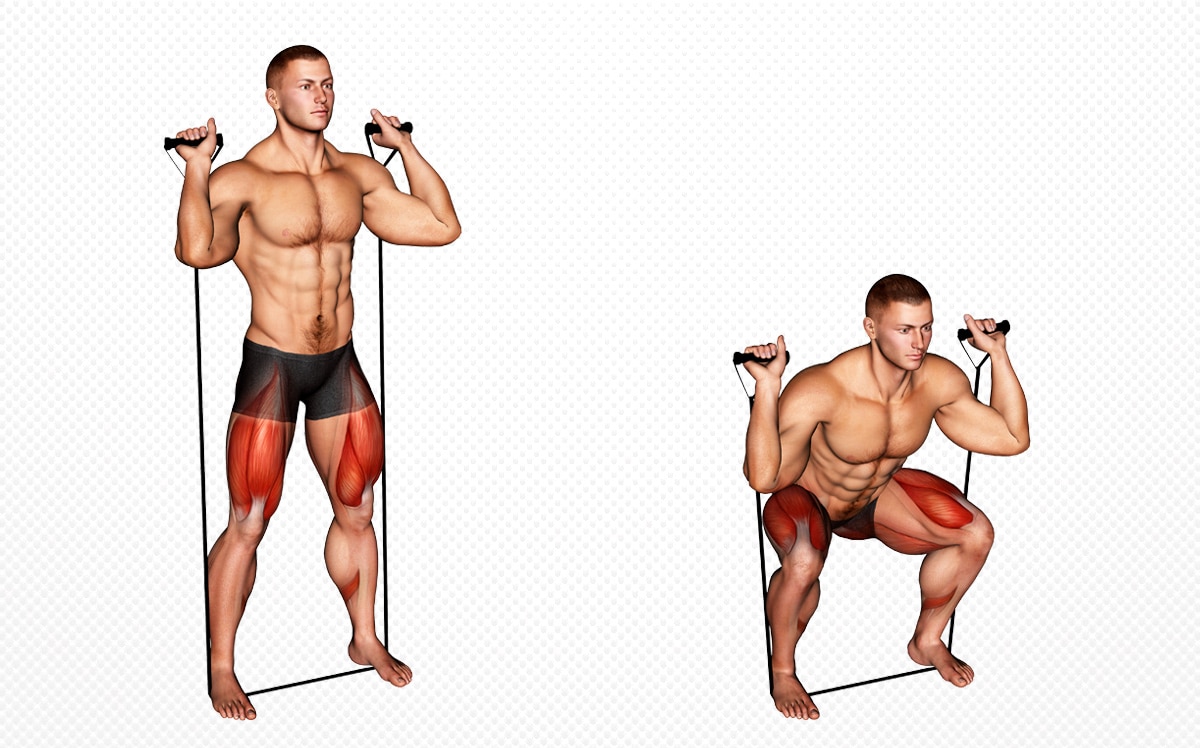
Squats with resistance bands activate 37% more glute fibers compared to bodyweight squats alone, according to biomechanical studies. Stand with feet slightly wider than hip-width on the band’s center, holding both handles at shoulder height. As you descend into the squat, actively push your knees outward against the band’s resistance—this external rotation torque targets the often-neglected gluteus medius. Drive through your heels to return to standing while maintaining outward knee pressure. The band creates maximum tension at the top of the movement, forcing your glutes to work harder during hip extension.
Monster Walks: The Secret to Stronger Hips and Knees
Physical therapists prescribe monster walks with resistance bands to prevent ACL injuries and correct knee valgus (inward knee collapse). Place a loop band just above your knees and stand with feet hip-width apart. Take a controlled step sideways while actively pushing against the band’s resistance, maintaining tension throughout the movement. Immediately follow with the other foot to prevent the band from snapping back. Complete 10-12 steps in one direction before reversing. Keep your chest up and core engaged—leaning forward reduces glute activation and shifts work to your quads.
How to Modify Band Lunges for Knee Safety
Traditional lunges can aggravate knee pain, but resistance bands create counter-tension that stabilizes the joint. Stand on the band with your front foot during reverse lunges, holding the handles at your shoulders. As you step backward, the band pulls your front knee forward, forcing your quadriceps to work eccentrically (lengthening under tension) to control the descent. This reduces shear forces on the knee while building strength through the full range of motion. Perform 8-10 controlled repetitions per leg with a 3-second lowering phase for maximum joint protection.
Upper Body Resistance Band Exercises That Build Real Muscle
Resistance bands uniquely challenge your muscles during the lowering phase of each movement—the phase responsible for 80% of muscle growth. For standing rows, anchor the band at chest height and grip both handles with palms facing each other. Pull the band toward your lower ribs while squeezing your shoulder blades together, then slowly extend your arms forward against the band’s pull. The increasing tension as you extend creates greater time under tension than traditional cable rows, triggering more muscle fiber recruitment.
The One Resistance Band Exercise for Better Posture
Hours at a desk weaken your rear shoulder muscles, causing rounded shoulders and neck pain. Face pulls with resistance bands specifically target these neglected muscles. Anchor the band at eye level, grab both handles with an overhand grip, and pull the band toward your face while separating your hands to shoulder width. Focus on leading with your elbows rather than your hands, imagining you’re trying to squeeze a tennis ball between your shoulder blades. Perform 15-20 slow repetitions daily to reverse “tech neck” posture.
How to Make Bicep Curls More Effective with Bands

Most people cheat during bicep curls by swinging their torso, but resistance bands eliminate this possibility. Stand on the band with feet hip-width apart and grip the handles with palms facing forward. Keep your elbows pinned to your sides and curl both hands toward your shoulders while maintaining constant tension. As you lower, fight the band’s pull for a 3-second eccentric phase—this controlled descent builds more muscle than the lifting portion. For increased intensity, perform single-arm curls while anchoring the band under your opposite foot.
Avoid These 3 Critical Resistance Band Mistakes
Using Bands That Are Too Heavy for Proper Form
Many beginners select resistance bands based on ego rather than technique. If you can’t complete 12 repetitions with perfect form, the band is too heavy. Start with lighter resistance and focus on muscle-mind connection—feeling your target muscles work throughout each movement. You’ll build more strength in the long run by using proper form with lighter bands than by straining with excessive resistance. The last 2-3 repetitions of each set should feel challenging but maintainable without compromising technique.
Allowing Bands to Snap Back Uncontrolled
Releasing tension suddenly causes bands to snap back violently, potentially striking your face or eyes. Always return to the starting position under control, even when fatigued. For exercises like standing chest presses, step closer to the anchor point as you fatigue rather than rushing the return phase. When finishing your set, slowly reduce tension by taking small steps toward the anchor before releasing your grip. This simple habit prevents 95% of resistance band injuries reported in fitness facilities.
Ignoring Band Wear and Tear Until Failure
Rubber degrades with use and exposure to environmental factors. Inspect your bands before each workout for small cracks, thinning areas, or loss of elasticity. Stretch the band gently and feel for weak spots that give way more easily than surrounding material. Most quality bands last 3-6 months with regular use—replace them at the first sign of wear rather than risking injury from sudden failure. Store bands away from direct sunlight and heat sources to maximize their lifespan.
Create Your First Resistance Band Workout Routine
Start with two full-body resistance band sessions per week, allowing 48 hours between sessions for recovery. Perform each exercise for 2 sets of 12-15 repetitions with 60 seconds rest between sets. Focus on controlled movements—2 seconds lifting, 1 second pause, 3 seconds lowering. This beginner routine takes just 20 minutes:
- Banded squats (glutes, quads)
- Standing rows (back, biceps)
- Chest presses (chest, triceps)
- Monster walks (glute medius)
- Face pulls (rear shoulders)
As you gain strength, progress by increasing to 3 sets, reducing rest time to 45 seconds, or moving to a heavier resistance band. After 4-6 weeks, split your workouts into upper body/lower body days for more focused training. Remember that consistency with proper form trumps intensity—master the basics before advancing to complex exercises.
Resistance bands deliver gym-quality strength training anywhere, but only when used correctly. By implementing these precise techniques for grip, anchoring, and movement control, you’ll transform basic elastic bands into powerful muscle-building tools. Start with lighter resistance to master form, prioritize controlled lowering phases, and inspect your equipment regularly for safety. Within weeks of consistent practice, you’ll notice improved strength, better posture, and greater joint stability—proof that sometimes the simplest tools deliver the most profound results. Keep this guide handy as you begin your resistance band journey, and you’ll unlock their full potential for lifelong fitness.


