
Your Sperax walking pad sits in the corner of your living room, still wrapped in plastic after arriving last week. You’ve been meaning to use it for daily exercise but feel intimidated by the controls and unsure how to get started safely. You’re not alone—many new owners struggle with basic operation, speed adjustments, and proper maintenance of their walking pads. This guide delivers exactly what you need to confidently operate your Sperax walking pad from unboxing to daily use, without technical jargon or confusing instructions. By the end, you’ll know how to safely operate your machine, adjust settings for optimal results, and maintain it for years of reliable service.
Unboxing and Assembly Process

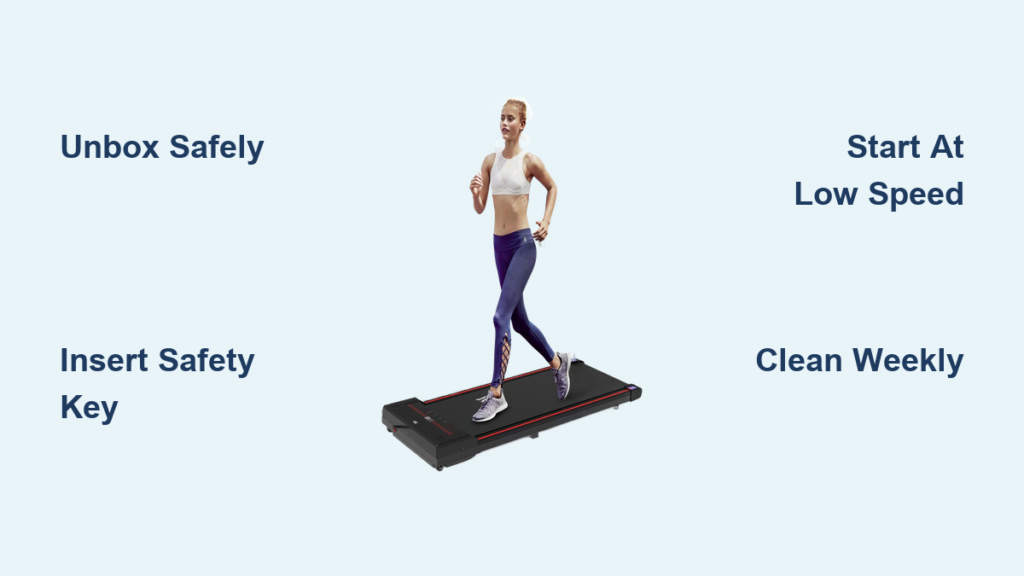
When your Sperax walking pad arrives, carefully cut the external packaging without damaging the box contents. Remove all components and verify you have the walking pad frame, power adapter, safety key, user manual, and any included tools for assembly.
Setting Up Your Walking Pad Correctly
Place the walking pad on a flat, hard surface at least 3 feet away from walls and furniture. The Sperax model requires this clearance for proper ventilation and safety during operation. Insert the safety key into its designated slot on the control panel before proceeding—this serves as an emergency stop mechanism if you need to quickly halt the treadmill.
Connect the power adapter to the walking pad’s port and plug it into a grounded electrical outlet. Never use extension cords with your walking pad as they can cause power fluctuations that damage the motor. The Sperax specifically requires direct wall outlet connection for safe operation according to manufacturer specifications.
Powering On and Basic Operation
Starting Your First Session Safely
Stand to the side of the walking pad, not on the belt, when powering on the machine. Press the power button once—your Sperax will initialize with a brief system check. Wait for all display elements to illuminate before stepping onto the platform. This initialization sequence ensures all safety systems are active before operation.
Insert the safety key to activate the walking belt. Without this key in place, the belt won’t move, serving as a critical safety feature especially in households with children. The Sperax design makes this key impossible to lose during operation as it attaches to your clothing via a clip.
Adjusting Speed for Your Fitness Level
Begin at the lowest speed setting (0.5 mph) while holding the handrails. Allow the belt to move under your feet before attempting to walk. Gradually increase speed in 0.1 mph increments as you find your balance. The Sperax walking pad features precise speed control that responds smoothly to button presses.
Never jump onto a moving belt—this common mistake causes most walking pad accidents. Increase speed only when comfortably walking at the current pace. The maximum safe starting speed for beginners is 1.5 mph; experienced users can gradually work up to the Sperax’s top speed of 3.7 mph.
Control Panel Functions Explained
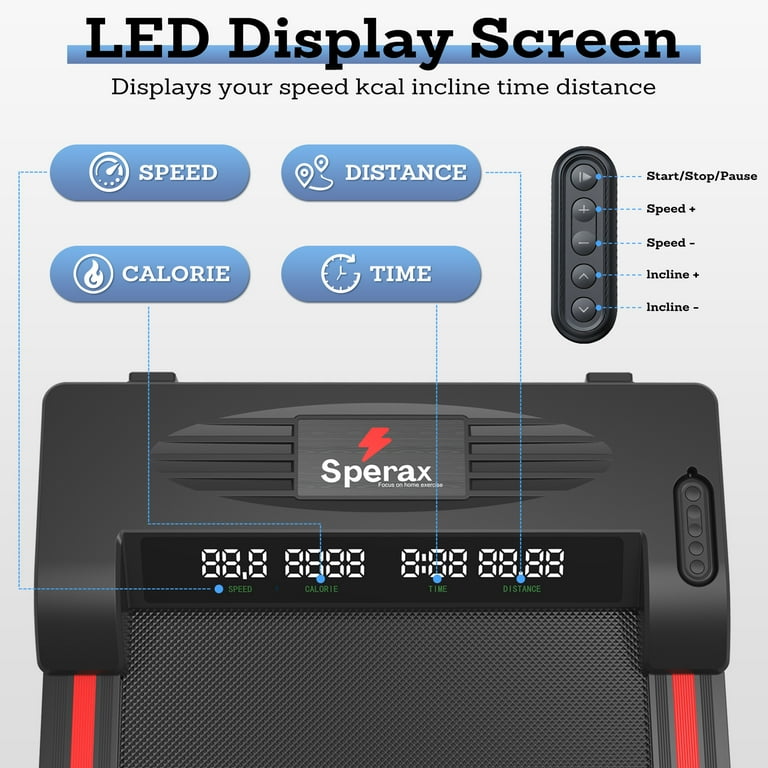
Understanding Display Metrics
Your Sperax control panel shows essential metrics: time elapsed, distance traveled, calories burned, and current speed. The time display counts upward from zero as you exercise. Distance measurement calculates based on your set speed and duration—no manual input required.
Calorie estimates provide general guidance based on average user profiles but aren’t medical-grade accurate. For most users, the Sperax’s calorie counter offers reasonable estimates when used consistently under similar conditions.
Using Preset Programs Effectively
The Sperax walking pad includes three preset workout programs accessible via dedicated buttons. Program 1 offers a gradual speed increase followed by cooldown, ideal for beginners. Program 2 maintains a steady pace for consistent cardio, while Program 3 features interval training with alternating speeds.
Select a program by pressing its dedicated button before inserting the safety key. The walking pad will automatically follow the programmed speed changes—you don’t need to manually adjust during your workout. These programs reset to default settings after each use, so you’ll need to select your preferred program each session.
Safety Features and Emergency Procedures
Recognizing Automatic Shutdown Triggers
Your Sperax walking pad automatically stops under three conditions: when the safety key is removed, if the machine detects uneven weight distribution, or after 30 minutes of continuous use. This auto-shutdown protects both the motor and user from potential hazards.
If the machine stops unexpectedly during use, check that the safety key remains properly inserted and that you’re centered on the walking belt. Uneven weight distribution—like favoring one side—triggers the safety mechanism to prevent belt misalignment.
Emergency Stop Protocol
In any emergency situation, immediately remove the safety key from the control panel. The walking belt will stop within 2 seconds. Never attempt to stop the belt with your hands—this risks serious injury. If the safety key fails to stop the machine (extremely rare), unplug the power adapter immediately.
Keep children and pets away from the walking pad during operation. The Sperax model includes additional child lock features that prevent accidental startup when not in use—activate this after each session by holding the power button for 5 seconds.
Maintenance and Troubleshooting Common Issues
Weekly Cleaning Routine
Unplug your Sperax walking pad after each use and wait 15 minutes for components to cool before cleaning. Wipe the display and handrails with a dry microfiber cloth to prevent screen damage. For the walking belt, use a slightly damp cloth to remove dust and foot debris, avoiding excessive moisture near electrical components.
Monthly, inspect the belt tension by lifting the center—it should rise about 2-3 inches before snapping back. Proper tension ensures smooth operation and prevents premature wear. The Sperax requires no belt lubrication under normal use conditions, unlike traditional treadmills.
Fixing Belt Slippage Quickly
If the walking belt slips during use, first check that nothing obstructs the rear roller area. Common culprits include loose clothing fibers, pet hair, or small objects that have fallen beneath the machine. Unplug the unit and carefully remove any obstructions with a soft brush.
For persistent slippage, adjust the rear roller bolts using the included Allen wrench. Turn both bolts clockwise by ¼ turn simultaneously, then test operation. Never adjust more than ½ turn total without testing, as over-tightening damages the motor. The Sperax design minimizes belt slippage when maintained properly.
Optimizing Your Walking Pad Experience
Creating Effective Workout Routines
Start with 10-minute sessions three times weekly, gradually increasing to 30 minutes daily as your fitness improves. The Sperax walking pad excels for low-impact cardio that’s gentle on joints while still providing effective exercise. For best results, maintain proper posture: look forward, not down at your feet, and keep a natural arm swing.
Incorporate interval training by alternating 2 minutes at your base speed with 1 minute at a slightly faster pace. This technique burns more calories than steady-state walking and keeps workouts engaging. The Sperax’s responsive controls make these transitions smooth and intuitive.
Storage Solutions for Small Spaces
When not in use, stand your Sperax walking pad vertically using the folding mechanism. Engage the locking pin securely before releasing the main frame. Store in a corner against a wall, ensuring at least 6 inches of clearance from other objects to prevent dust accumulation on ventilation ports.
For frequent users, consider placing the folded unit against a wall with a decorative screen in front to blend with your home decor. Never store the walking pad horizontally with objects placed on top—that pressure can damage internal components over time.
Final Maintenance and Safety Checklist
Before each use, verify the walking belt moves freely when manually turned (with power off). Check that all control buttons respond immediately and that the safety key mechanism operates smoothly. Monthly, inspect the power cord for fraying or damage—replace immediately if any issues are found.
Always unplug your Sperax walking pad when not in use for more than 24 hours. This prevents potential electrical issues and extends the machine’s lifespan. The walking pad’s motor requires complete cooling periods between sessions—wait at least 30 minutes after a 30-minute workout before using again.
Your Sperax walking pad delivers reliable, convenient exercise when used correctly. By following these specific operational guidelines, you’ll maximize both safety and effectiveness during every session. Remember that consistent, moderate use yields better long-term results than occasional intense workouts. Now that you understand proper operation, maintenance, and safety protocols, you’re ready to make your walking pad a sustainable part of your daily routine.


