
Yoga resistance bands have revolutionized how practitioners build strength and flexibility in their practice. These simple elastic tools—whether made from latex, fabric, or synthetic materials—add progressive resistance to traditional yoga poses, engaging muscles throughout their full range of motion in ways that static stretching alone cannot achieve. Originally developed for rehabilitation purposes, resistance bands have become essential accessories for yoga studios, home practices, and travelers seeking consistent workout options. Understanding how to use yoga resistance bands effectively opens new dimensions in your practice, allowing you to deepen stretches, build targeted strength, and address muscle imbalances that might otherwise limit your progress.
This comprehensive guide covers everything you need to know about incorporating resistance bands into your yoga routine, from selecting the right band for your fitness level to mastering essential exercises and avoiding common mistakes that can undermine your training or lead to injury.
Select the Right Resistance Band for Your Yoga Practice
Choosing an appropriate resistance band sets the foundation for successful practice. Bands come in various materials, resistance levels, and configurations, each suited to different exercises and experience levels. Selecting wisely ensures you can perform exercises with proper form while challenging your muscles appropriately.
Latex vs. Fabric Bands: Which Material Works Best?
Latex bands represent the most common option, offering consistent resistance and significant elongation capacity for deeper stretches and higher-resistance exercises. These bands work exceptionally well for exercises involving hand grips and upper body work. However, latex can trigger allergic reactions in some users and tends to degrade faster than synthetic alternatives. Fabric bands, constructed from woven cotton or polyester blends, provide superior grip and comfort during lower body exercises where the band contacts the feet or body. Their flat design prevents the rolling and sliding common with thin latex bands and distributes pressure more evenly across the skin, eliminating the pinching sensation that occurs with narrower bands during certain movements.
Decoding Resistance Levels: Color Codes Explained
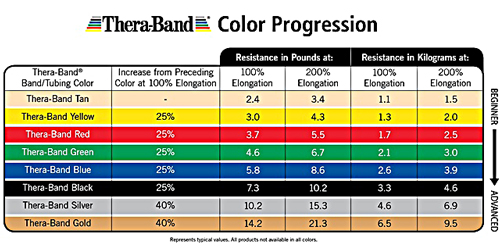
Resistance levels typically follow a color-coding system, though manufacturers vary in their conventions. Light resistance bands—usually yellow or green—suit beginners, seniors, and upper body work where lower resistance allows focus on form and technique. Medium resistance bands, often blue or red, provide balanced challenge for general strengthening throughout the body. Heavy resistance bands in black or purple serve advanced practitioners and lower body training where greater force production is necessary. Extra-heavy bands in gray or orange target experienced users focusing on maximum strength development. Resistance measurements generally range from two to fifteen pounds for light bands up to thirty to fifty pounds for heavy variants, though these numbers vary by manufacturer and elongation percentage.
Measuring Band Length and Width for Optimal Performance
Consider length and width when making your selection. Standard bands measure approximately forty-one to seventy-two inches, with longer bands providing more versatility for exercises requiring significant elongation. Taller individuals or those planning full-body workouts benefit from longer options that allow comfortable stretching without the band pulling them off balance. Wider bands measuring three to four inches distribute resistance more comfortably across hands and body contact points, making them preferable for exercises involving foot placement or body wrapping. Narrower bands between one-half and one inch concentrate resistance for targeted work but may cause discomfort during exercises where they cut into skin.
Master Fundamental Techniques Before Starting
Proper technique with resistance bands prevents slippage, maximizes exercise effectiveness, and reduces injury risk. Before attempting any specific exercises, understand the core principles that apply across all resistance band work.
Proper Grip and Hand Placement for Safety
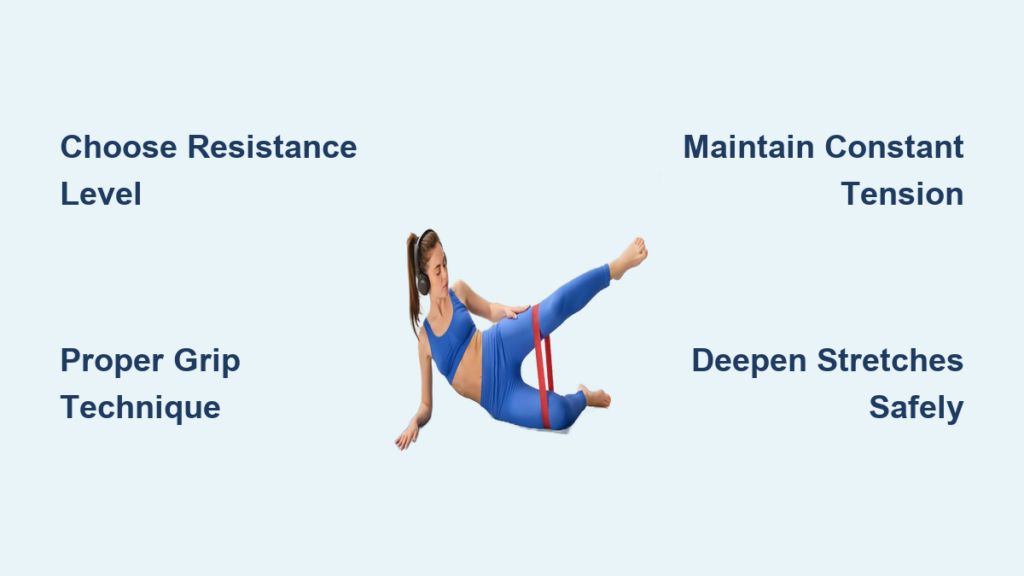
When holding a resistance band, wrap it around your hand once or twice to create friction, ensuring the flat portion contacts your palm rather than cutting into your fingers. Maintain a firm but relaxed grip—tension in the hands transfers to the shoulders, creating unwanted upper body involvement during lower body exercises. For exercises requiring the band to be positioned under your feet, place the band across the ball of your foot with equal amounts extending on both sides, and keep your toes flexed upward to engage the foot’s intrinsic muscles and maintain secure positioning.
Maintaining Constant Tension Through Movements
Always maintain slight tension in the band at the starting position of every exercise. A completely slack band requires immediate tension generation at the movement’s start, creating a jarring effect and inconsistent resistance application. Instead, begin each exercise with the band already under light tension, allowing smooth progression through the entire movement pattern. Control both the concentric phase, where muscles shorten, and the eccentric phase, where muscles lengthen, rather than letting the band snap back quickly. This controlled tempo maximizes muscle time under tension and reduces strain on connective tissues.
Aligning Your Body for Maximum Effectiveness
Body alignment and posture remain crucial throughout resistance band exercises. Maintain neutral spine positioning, avoiding excessive arching or rounding that transfers stress to the lumbar or cervical spine. Your core should remain engaged, creating a stable cylinder that transmits force efficiently between your upper and lower body. Ground through all contact points with the floor—feet, hands, or sitting bones—to establish a stable base from which movement originates. Whenever possible, position your body so the band’s line of pull runs perpendicular to the working muscle’s line of action, ensuring optimal resistance distribution.
Essential Upper Body Exercises with Resistance Bands
Resistance bands develop upper body strength that supports arm balances, inversions, and transitions in your yoga practice. These exercises target the shoulders, arms, and upper back muscles essential for maintaining proper form throughout various poses.
Band-Assisted Chaturanga Flow for Stronger Transitions
Begin in a high plank position with the resistance band looped around your upper back and held under both hands, creating resistance that pulls your shoulders back and down. This scapular engagement establishes proper positioning before initiating the movement. Lower through a modified plank or chaturanga position while maintaining the band-induced shoulder blade depression and retraction. Press back to plank while continuing to resist the band’s pull across your back. Perform eight to twelve repetitions, focusing on smooth transitions and sustained band tension throughout.
Rotator Cuff Strengthening for Shoulder Stability
Hold the band with hands slightly wider than shoulder-width, maintaining enough tension that the band is straight but not stretched at rest. Rotate your arms externally to pull the band apart, leading with your thumbs and keeping your elbows pinned to your sides at a ninety-degree angle. Complete three sets of fifteen to twenty repetitions, progressing to a heavier band as strength improves. For additional challenge, perform the same rotation with elbows elevated to ninety degrees at shoulder height, targeting the rotator cuff from a different angle.
Bicep and Tricep Integration for Arm Balances
Stand on the resistance band with feet hip-width apart, holding handles or gripping the band at hip level with palms facing forward. Curl your hands toward your shoulders while maintaining stationary elbows at your sides. The band provides maximum resistance at the bottom of the movement and lessens as your hands approach your shoulders. Perform three sets of twelve to fifteen repetitions with controlled lowering, ensuring your shoulders remain down and relaxed throughout. This builds the arm strength necessary for arm balances and inversions.
Target Lower Body Muscles with Resistance Bands
Lower body resistance band work addresses the glutes, hips, and legs—muscle groups that directly impact standing poses, balance, and overall athletic performance in yoga practice.
Glute Bridge Activation for Better Hip Stability

Position the resistance band just above your knees, creating constant outward pressure against the band’s resistance. Lie on your back with knees bent and feet flat, hip-width apart. Press your knees outward against the band’s resistance while lifting your hips toward the ceiling, squeezing your glutes at the top position. Hold for two to three seconds before lowering with control. This exercise targets the gluteus medius and maximus simultaneously. Perform fifteen to twenty repetitions, focusing on consistent outward knee pressure throughout the movement.
Lateral Band Walks for Knee Alignment in Standing Poses
Step onto the resistance band with both feet, positioning it across the lateral aspect of both ankles. Assume an athletic stance with knees slightly bent and core engaged. Step laterally to one side, maintaining the band’s tension and keeping your feet pointing forward. Take ten to twelve steps in one direction before returning in the opposite direction. For increased difficulty, position the band higher around your thighs or use a heavier resistance band. This strengthens the hip abductors critical for single-leg balance and knee alignment.
Squat Patterns with Resistance for Deeper Folds
Stand on the resistance band with feet slightly wider than hip-width, gripping the band at shoulder height or holding handles at your shoulders. Descend into a squat while pressing your knees outward against the band’s resistance, maintaining your chest lifted and weight balanced through your heels. The band’s tension increases as you stand, adding resistance to the hip extension phase of the squat. Complete three sets of twelve to fifteen repetitions, focusing on depth and form rather than resistance load.
Enhance Flexibility with Band-Assisted Stretching
Resistance bands transform static stretching into active, engaged stretches that simultaneously build strength while improving flexibility. The elastic assistance allows deeper stretching while maintaining muscle engagement throughout the pose.
Hip Flexor Release for Deeper Lunges
Kneel on one knee with the resistance band looped around the top of your back foot and held in the corresponding hand. Lean forward slightly while gently pressing your hip forward, using the band to pull your back foot closer and increase the hip extension stretch. Hold for sixty to ninety seconds per side, breathing deeply and allowing your hip to relax progressively into the stretch.
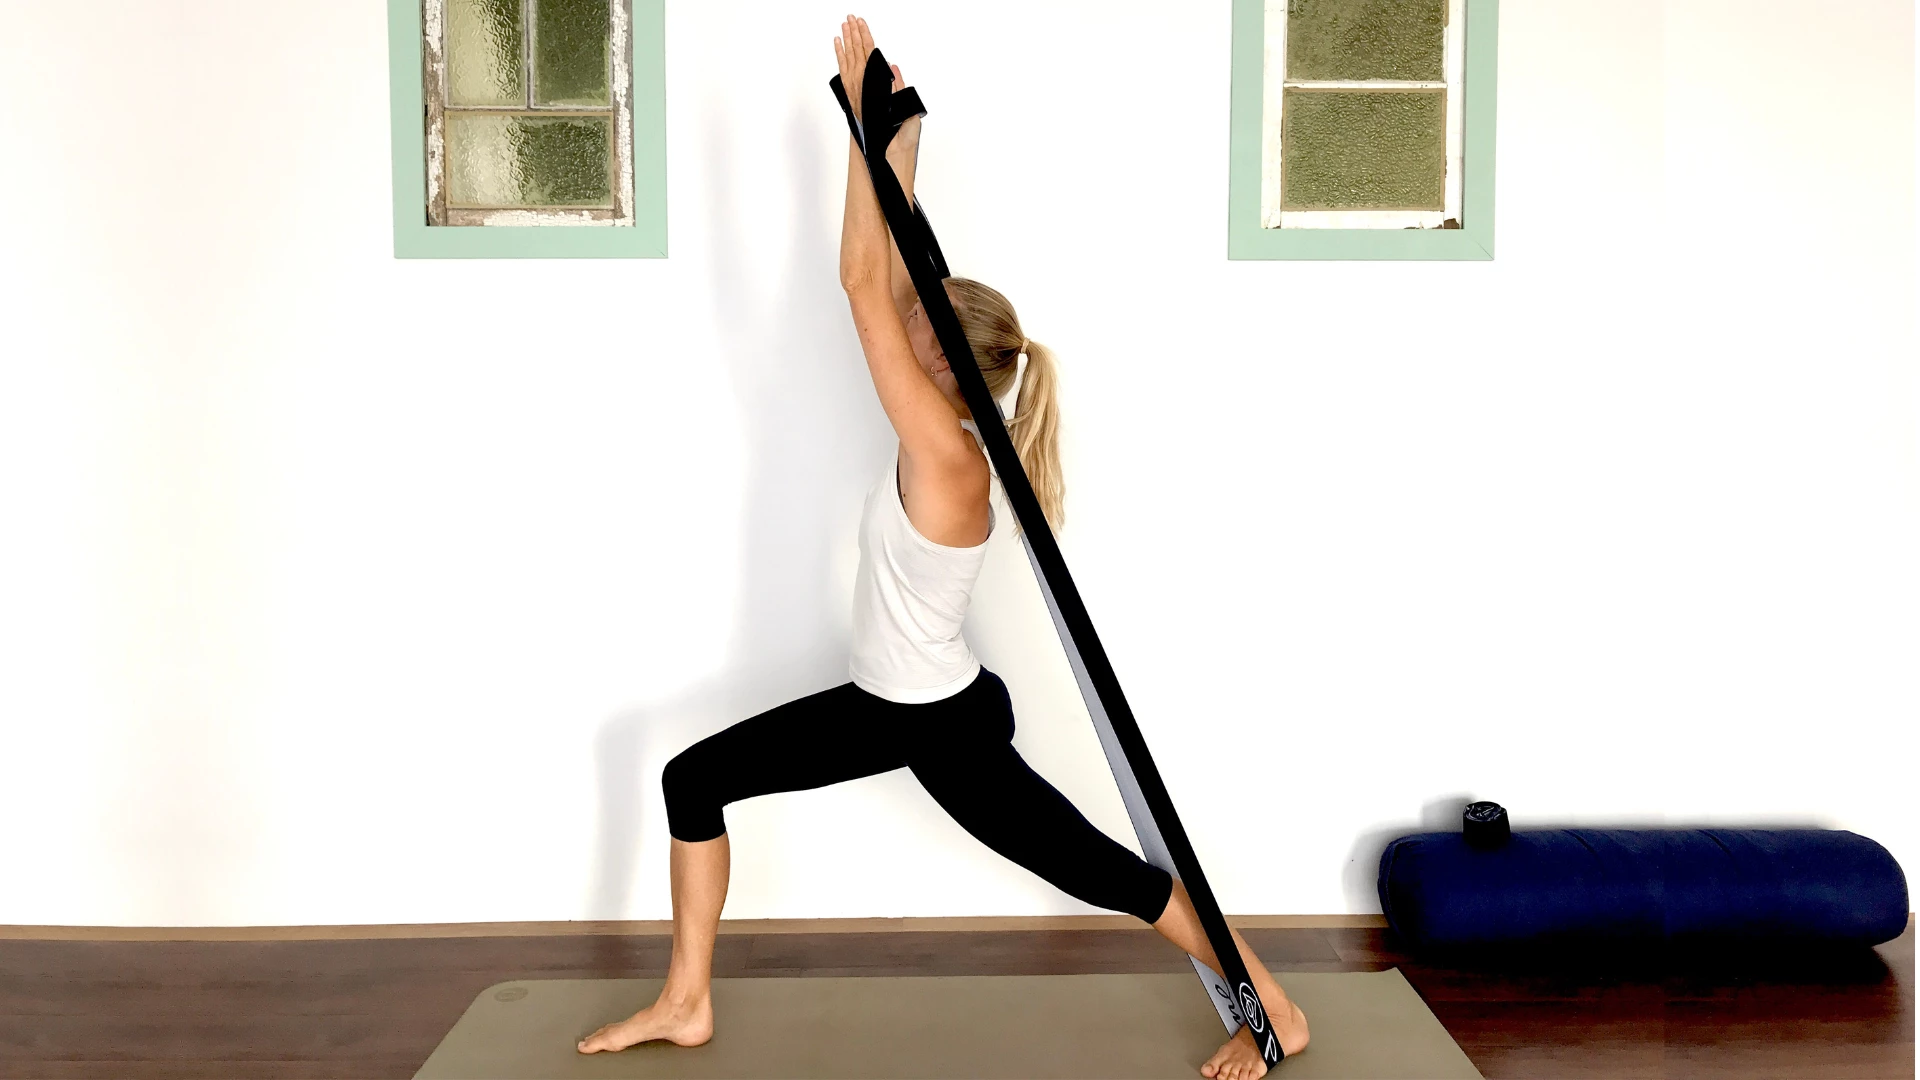
Shoulder and Chest Opening for Backbends
Hold the resistance band with hands wider than shoulder-width apart, keeping arms extended in front of your chest. Rotate your arms externally while simultaneously lowering your hands behind your head, opening your chest. Keep your arms as close to your ears as comfortable while maintaining band tension. Hold the stretched position for thirty to sixty seconds, breathing deeply into the expanded chest. This stretch improves thoracic mobility essential for backbends.
Spinal Twist Assistance for Balanced Mobility
Sit with legs extended and loop the resistance band around one foot, holding both ends in the opposite hand. Inhale to lengthen your spine, then exhale to twist toward the band-gripping side. The band provides constant tension that helps maintain the twist position without requiring hand placement on the leg. Hold each twist for sixty to ninety seconds, working both sides to address asymmetries in spinal mobility.
Avoid Common Mistakes That Undermine Your Progress
Understanding common errors helps you sidestep pitfalls that undermine training effectiveness or lead to injury. Awareness of these mistakes allows you to maintain proper form and maximize the benefits of your resistance band practice.
Band Positioning Errors You’re Probably Making
When the band crosses wrists or ankles at sharp angles, it can cut into skin or create uneven resistance distribution. Always ensure the band lies flat against contact points, and when in doubt, wrap the band around the contact point to create a broader contact surface. Another common error involves anchoring the band incorrectly so it slides during exercise. Verify anchor points are secure before beginning each exercise.
Choosing the Wrong Resistance Level
Using bands that are too heavy forces your body to recruit incorrect muscle groups and sacrifice form for movement completion. Conversely, bands that are too light fail to provide sufficient challenge for strength development. The appropriate resistance allows completion of the target repetition range with the last few repetitions feeling challenging but still maintaining proper form. Keep multiple resistance bands available and select the appropriate band for each specific exercise.
Rushing Through Exercises Instead of Controlling Movement
Allowing the band to snap back quickly rather than controlling the eccentric phase reduces effectiveness while increasing injury risk. Always control the band’s return rather than letting it pull you back. Similarly, rushing through exercises using momentum rather than muscle engagement defeats the purpose of resistance training. Move smoothly and deliberately, feeling the target muscles work throughout the entire range of motion.
Prioritize Safety and Prevent Injury
Safety considerations protect you from injury and ensure your resistance band practice remains beneficial over time. Implementing these precautions creates a secure training environment.
Inspecting Bands Before Each Use
Inspect resistance bands before each use for signs of wear including small tears, thinning areas, or permanent deformation. Damaged bands can snap unexpectedly, causing injury or property damage. Replace bands that show any signs of degradation. When performing exercises near your face or eyes, ensure the band is positioned to minimize risk if it breaks—using fabric bands or doubling latex bands reduces this risk.
Medical Considerations When Using Resistance Bands
Individuals with latex allergies should select non-latex fabric or synthetic bands to avoid allergic reactions. Those with shoulder, elbow, or wrist injuries should consult healthcare providers before beginning resistance band training, as the exercises place specific demands on these joints. People with hypertension should avoid exercises involving breath-holding or excessive straining.
Creating a Safe Practice Environment
Verify anchoring points are secure and capable of withstanding maximum tension the band can generate. Door anchor devices should be positioned in doorways that close properly and are not at risk of opening under tension. When anchoring to furniture, verify the piece is heavy and stable enough to resist pulling force. Practice in a clear space free from objects that could cause injury if you lose balance or the band slips from grip.
Integrate Resistance Bands Seamlessly Into Your Practice
Successfully incorporating resistance bands into your yoga routine requires understanding how these tools complement rather than replace your existing practice. Strategic integration enhances your asana work without disrupting its fundamental principles.
Using Bands to Deepen Existing Yoga Poses
Use resistance bands to deepen existing yoga poses without compromising their fundamental structure. In standing poses, the band can provide feedback for proper alignment or add resistance to muscle groups that are lengthening. In backbends, the band can assist in maintaining shoulder blade engagement while opening the chest. In forward folds, bands looped around the feet can help practitioners with limited hamstring flexibility achieve greater depth while maintaining a neutral spine.
Addressing Muscle Imbalances for Injury Prevention
Resistance bands address the limitation that yoga practice sometimes creates—stronger muscle groups dominate while weaker ones remain underdeveloped. By adding specific band work for the external rotators of the shoulder, the posterior chain of the back, and the hip abductors, practitioners create more balanced development that supports injury-free progress in asana. This balanced development also improves the quality of yoga poses by ensuring all necessary muscles are available to support the body’s weight and movement.
Learning how to use yoga resistance bands effectively transforms your practice by adding progressive resistance, deeper stretching capabilities, and targeted muscle development. These versatile tools address the limitations of bodyweight-only training while remaining accessible, portable, and affordable. By selecting appropriate bands for your fitness level, mastering fundamental techniques, and implementing exercises that target specific muscle groups, you build the strength and flexibility that supports advancement in all aspects of your yoga practice. Consistent, mindful practice with resistance bands—combined with proper warm-up, cool-down, and maintenance routines—creates a sustainable enhancement to your yoga journey that yields benefits for years to come.


