
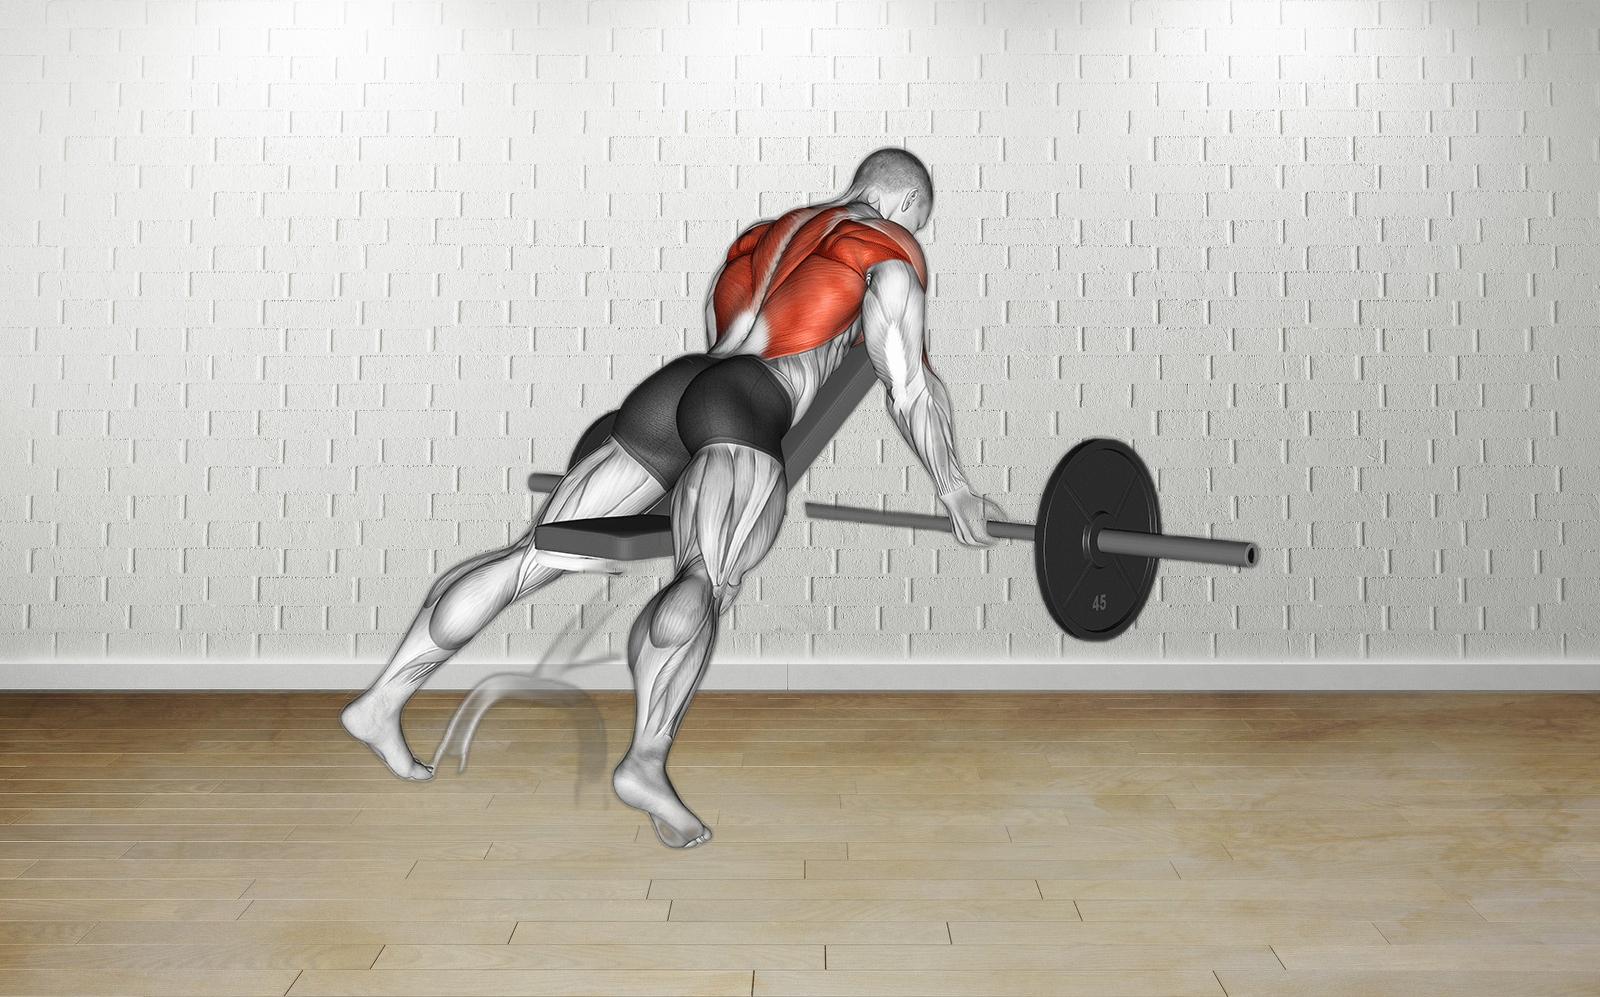
Your lower back shouldn’t scream after every back workout. Yet that’s exactly what happens with traditional bent-over rows when your spine fights to stay neutral under heavy loads. The incline barbell row eliminates this trade-off by locking your torso in position while you hammer your lats, traps, and rhomboids. Unlike precarious bent-over variations, this bench-supported movement delivers brutal upper-back stimulation without risking lumbar strain—making it the secret weapon for lifters chasing a wider V-taper or stronger deadlifts.
Forget wobbly rows that turn into partial reps. When you master the 30-degree incline angle and precise elbow path, you’ll feel muscles activate that bent-over rows never reach. This guide cuts through the noise to deliver exact bench angles, grip widths, and muscle-triggering cues proven to build back thickness. Whether you’re rehabbing lower back pain or breaking through a plateau, these protocols transform your pulling power starting today.
Set Up Your Bench for Maximum Back Activation

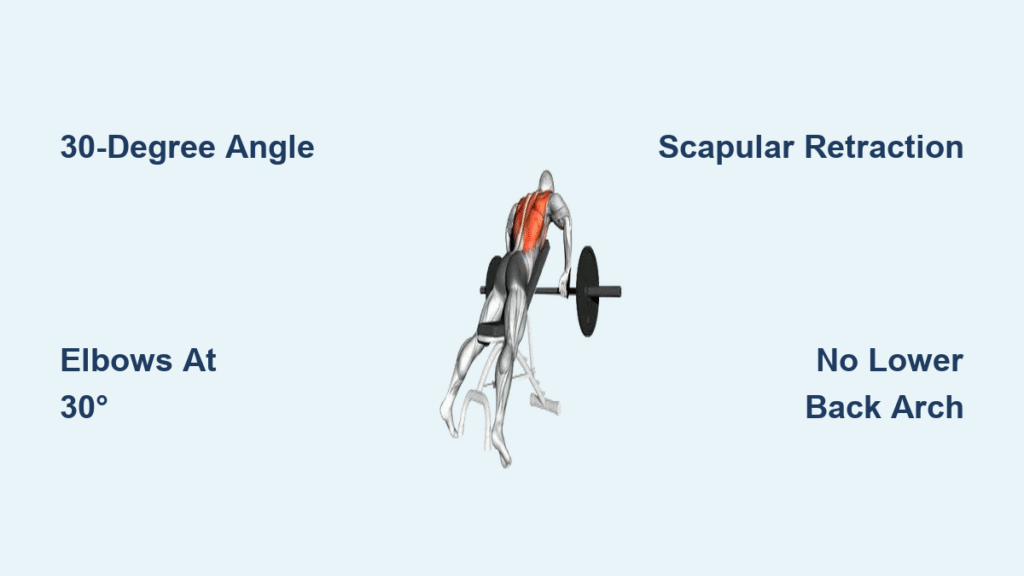
Dial in the Exact 30-Degree Angle
Your bench angle makes or breaks muscle recruitment. Set it precisely to 30 degrees—not the 45-degree setting many default to. At 30 degrees, your upper back works maximally while your lower back stays fully supported. If your bench lacks angle markings, stack two standard 45-pound plates under the foot end. This creates the ideal incline without dangerous instability.
Critical check: Lie face-down with your chest on the pad. Your clavicles must clear the top edge completely. If your collarbones touch the bench, slide higher until only your chest and abdomen contact the pad. This small adjustment unlocks full scapular retraction.
Optimize Barbell and Foot Position
Use a standard Olympic barbell loaded with full-diameter 45 cm plates. Smaller plates drop the bar too low, forcing chicken-wing elbows that kill lat engagement. Position the bar centered perpendicular to the bench’s long edge at the foot end.
Foot placement dictates stability:
– For heavy strength work: Plant feet firmly on the floor straddling the bench legs
– For strict hypertrophy: Rest feet on the lower bench pad to eliminate momentum
– Never let heels lift—this arches your lumbar spine against the pad
Execute Flawless Form in 5 Critical Steps
Positioning and Grip Protocol
Grip the bar 1.5 times shoulder-width apart with a double-overhand hold—thumbs wrapped securely around the bar. Slide your hands so the bar rests low in your palms, not your fingers. As you pull, imagine squeezing a pencil between your shoulder blades before moving the bar. This pre-activates your rhomboids.
The Pull Sequence That Engages Lats, Not Biceps
- Depress first: Pull shoulders down toward hips (like sliding into a tight shirt)
- Retract hard: Squeeze shoulder blades together until they touch
- Drive elbows up: Pull bar toward lower abdomen while keeping elbows at 30 degrees from your torso
- Pause and contract: Hold the bar against your abs for 1 full second
- Control the descent: Lower over 2-3 seconds without relaxing shoulders
Pro cue: “Pull the ceiling toward you, not the bar toward your chest.” This shifts focus from biceps to lats. If your elbows flare past 45 degrees, reset—wide elbows turn this into a rear delt exercise.
Fix These 3 Common Incline Row Mistakes Immediately
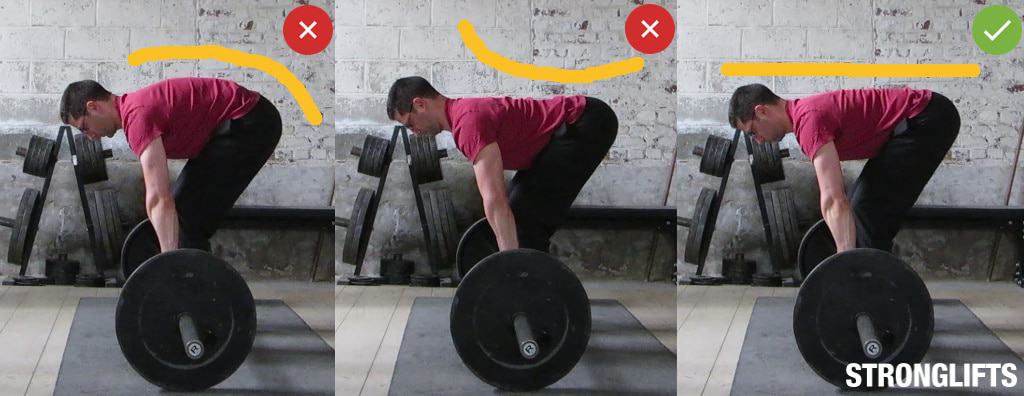
Neck Strain From Looking Up
Why it happens: Craning your neck to see mirrors strains cervical vertebrae.
The fix: Keep your head neutral with your spine. Pick a spot on the floor 2-3 feet ahead of the bench and maintain that gaze. Your chin should stay tucked as if holding an egg under your jaw. Do this now: Record a side-view video of your next set—your ear should align with your shoulder.
Elbow Flare Killing Lat Engagement
Why it happens: Flaring elbows recruits rear delts instead of lats.
The fix: Imagine creating an arrow shape with your arms—elbows pointing forward at 30 degrees. At the top position, your elbows should clear your torso width. Test this: Place a foam roller vertically against your chest. If your elbows hit it during the pull, they’re too wide.
Lumbar Arching From Poor Hip Position
Why it happens: Hips sliding too low off the bench forces lower back into extension.
The fix: Slide your hips higher on the pad until your pelvis presses firmly against the bench. Your entire torso—from chest to hips—must maintain contact. If arching persists, raise the bench angle by 5 degrees.
Program Incline Rows for Strength vs. Hypertrophy
Strength Protocol (4-6 Rep Range)
Do this: 4 sets of 5 reps at 85% of your 1-rep max with 3-minute rest. Use a 3-1-X tempo—3 seconds lowering, 1-second pause at chest, explosive pull up. Add 2.5 kg (5 lbs) only when you hit all reps with perfect form. Critical: Skip straps until your final set—grip strength builds foundational stability.
Hypertrophy Blueprint (8-12 Rep Range)
Do this: 3 sets of 10 reps at 70% 1RM with 75-second rest. Employ a 2-0-2 tempo for brutal tension: 2 seconds up, no pause, 2 seconds down. At the top, crush the bar into your abs while visualizing your shoulder blades touching. Pro tip: Add a 1-second iso-hold at peak contraction on your last set.
Break Plateaus With These 3 Advanced Variations
Close-Grip Incline Row for Mid-Back Thickness
Grip the bar inside shoulder width and pull toward your sternum. The narrower grip increases range of motion, forcing rhomboids to work harder through full scapular retraction. Use 10-15% less weight than standard grip but prioritize the mind-muscle connection.
Band-Resisted Incline Row for Progressive Overload
Loop a resistance band under the bench and around the bar. As the bar rises, band tension increases—matching your strength curve. Start with light bands to maintain control. Key benefit: This method builds lockout strength without grinding heavy weights.
Single-Arm Dumbbell Incline Row for Imbalance Correction
Place one hand on the bench and pull a dumbbell with the other hand. Focus on driving the elbow toward the ceiling while rotating your torso slightly toward the working side. Do this: Match reps on both sides before adding weight—this exposes hidden strength gaps.
Prevent Shoulder and Neck Pain During Rows
Pre-Row Activation Circuit (3 Minutes)
Complete this sequence before loading the bar:
1. Scapular wall slides: 15 reps (slide back up/down wall while keeping contact)
2. Band pull-aparts: 20 reps (elbows slightly bent, squeeze shoulder blades)
3. Dead-hang scapular retractions: 10 reps (hang from pull-up bar, retract without bending arms)
4. Foam roller thoracic extensions: 10 reps (lie perpendicular on roller at mid-back)
Pain-Specific Fixes
- Shoulder impingement: Drop your elbow path and pull toward lower abdomen—never above the nipple line
- Biceps tendon strain: Switch to pronated grip immediately; avoid underhand rows until healed
- Neck stiffness: Place a folded towel under your forehead for slight elevation
Your 12-Week Incline Row Back-Building Plan
| Phase | Sets × Reps | Load | Progression Strategy | Critical Focus |
|---|---|---|---|---|
| Weeks 1-4 | 3 × 8 | 65% 1RM | Add 1 rep/set weekly | Perfect scapular retraction |
| Weeks 5-8 | 4 × 8 | 70% 1RM | Add 2.5 kg when hitting 4×8 | Elbows at 30° from torso |
| Weeks 9-12 | 4 × 10 | 72.5% | Deload week 10 (3×6 @ 60%) | 1-sec peak contraction hold |
Week 10 deload note: Reduce weight to 60% 1RM for 3 sets of 6 reps. This resets your nervous system for the final hypertrophy push. If form breaks, drop back to Week 4 parameters—never sacrifice technique for weight.
The incline barbell row transforms back development by removing the weakest link: your lower back. When you stop fighting to stabilize your spine, your lats finally get the stimulus they deserve. Start with 50% of your bent-over row weight to master the movement pattern. Within 12 weeks, you’ll pull heavier weights with zero back pain while building the dense, wide upper back that powers bigger lifts and creates that coveted V-taper. Your next back workout starts now—adjust that bench to 30 degrees and feel the difference.


