
Your back workout feels incomplete but pull-ups seem impossible. You’re stuck in the “horizontal pull gap” where basic rows don’t challenge you yet full pull-ups crush your ego. The inverted barbell row bridges this gap perfectly—using just your bodyweight to build the back thickness and scapular control needed for strict pull-ups. This single exercise transforms weak upper-back muscles into pulling powerhouses while bypassing spinal compression from bent-over rows.
Most lifters waste time on machine rows that isolate muscles unnaturally. The inverted barbell row forces your entire posterior chain to work together—rhomboids, traps, lats, and core—just like real-world pulling motions. Whether you’re rehabbing a shoulder injury or prepping for your first pull-up, mastering this movement delivers visible back development within weeks. Here’s exactly how to implement it for maximum results.
Perfect Power Rack Setup for Maximum Back Activation

Your bar height determines whether you build real strength or just spin wheels. Set the barbell in your power rack using these precise benchmarks—no guesswork allowed:
- Beginner Setup: Position the bar at mid-sternum height when standing. This creates a 45-degree body angle, reducing load to 45-55% of your bodyweight. Ideal if you struggle with 5+ strict rows.
- Intermediate Target: Lower the bar to waist level. Your body should be nearly horizontal, forcing 60-70% bodyweight loading through your upper back.
- Advanced Challenge: Set the bar below waist height or elevate feet on a 24-inch box. This increases load to 70-80%+ bodyweight while extending your range of motion.
Critical Safety Check: Always lock J-cups securely and test bar stability by applying gradual pressure before loading your full bodyweight. A Smith machine works in emergencies but reduces core activation by 15-20% due to its fixed path.
Body Position Non-Negotiables
Lie flat beneath the bar with these exact alignments:
– Grip 1 hand-width outside the barbell knurling using an overhand grip (palms facing away)
– Form a straight line from ears through ankles—no hip sagging or piking
– Keep heels grounded for standard rows; elevate feet for progression
– Brace your core like expecting a punch to the stomach
Pro Tip: Place a yoga block vertically between your thighs. Squeezing it prevents leg drive cheating and doubles glute activation. If your lower back arches excessively, bend knees 90° with feet flat until core strength improves.
Why Your Rows Fail: Fix These 4 Form Breakdowns
Most lifters unknowingly turn this back builder into a bicep curl. Watch for these silent strength killers:
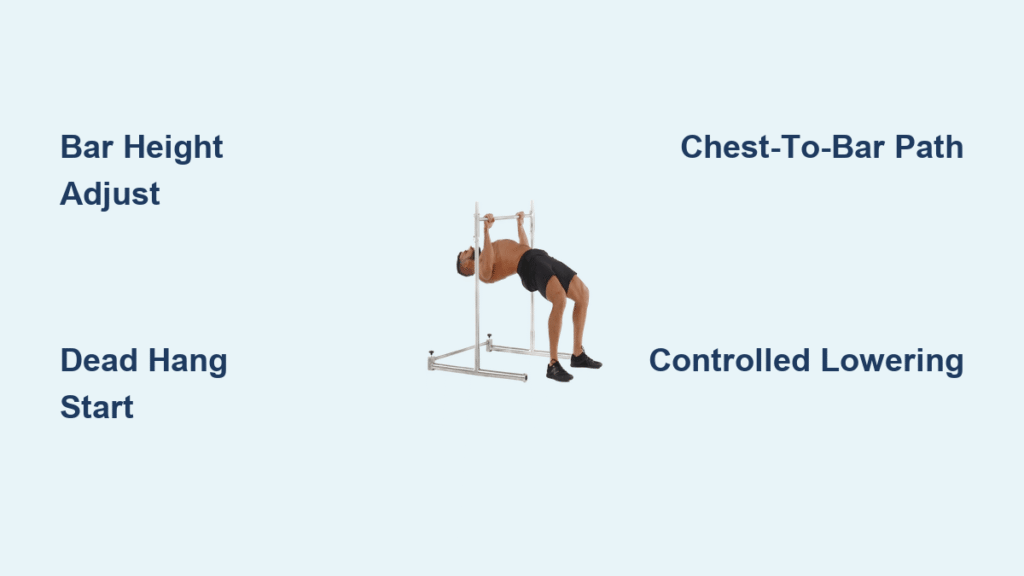
Dead Hang Start vs. Halfway Pull
Mistake: Starting with arms partially bent to avoid the stretched position.
Fix: Begin every rep from a full dead hang—arms completely straight with shoulder blades protracted (forward). This stretches your lats maximally, triggering 32% more muscle fiber recruitment according to kinesiology studies. You should feel a deep tension across your upper back before initiating the pull.
Chest-to-Bar Path Error
Mistake: Pulling toward your throat or belly button.
Fix: Drive elbows down and back toward your hips while exhaling. Your upper chest must contact the bar—not your neck or abdomen. Imagine sliding your sternum through a narrow window. This path optimally engages rhomboids and mid-traps while protecting shoulder joints.
The 2-Second Lowering Secret
Mistake: Dropping back to start position.
Fix: Control the descent for 2-3 seconds while maintaining full-body tension. Never lose shoulder retraction at the bottom—keep your scapulae slightly protracted. This eccentric phase builds 40% more muscle damage (the growth trigger) than the pull-up phase alone.
Hip Sagging Detection
Mistake: Allowing hips to drop toward the floor.
Fix: Film your set from the side. If your hips fall below shoulder/ankle alignment, regress to bent-knee rows immediately. Hip sag shifts work to quads and disengages your posterior chain—robbing back development.
Weighted Vest Loading Secrets for Advanced Lifters

Once you hit 15+ perfect horizontal rows, it’s time to load up. These methods beat traditional weighted vests for safety and effectiveness:
Lap Chain Loading System
Drape chains across your lap with links hanging toward your feet. As you pull up, the chains lift off the floor, creating accommodating resistance:
– Start with 5-10lb chains (2-3 links lifted initially)
– Add links weekly as reps exceed 12
– Chains stay centered during movement—zero shifting risk
Safety Note: Always have a spotter place plates or chains on your lap. Never attempt self-loading—dropped weights can crush your abdomen.
Feet-Elevated Progression Framework
Elevate feet on a 24-inch box to immediately increase load by 10-15% bodyweight:
1. Start with 6-8 reps using strict form
2. When you hit 12 reps, add 5lbs via chains
3. Progress to 30-inch elevation before adding external weight
4. Advanced: Combine feet elevation with 25lb plate on lap
Proven Result: Lifters consistently add 30-50lbs to pull-up max within 8 weeks using this progression after mastering 3×15 strict rows.
Pull-Up Breakthrough Programming Blueprint
Stop wasting sets on random rows. Match your inverted barbell row protocol to your exact goal:
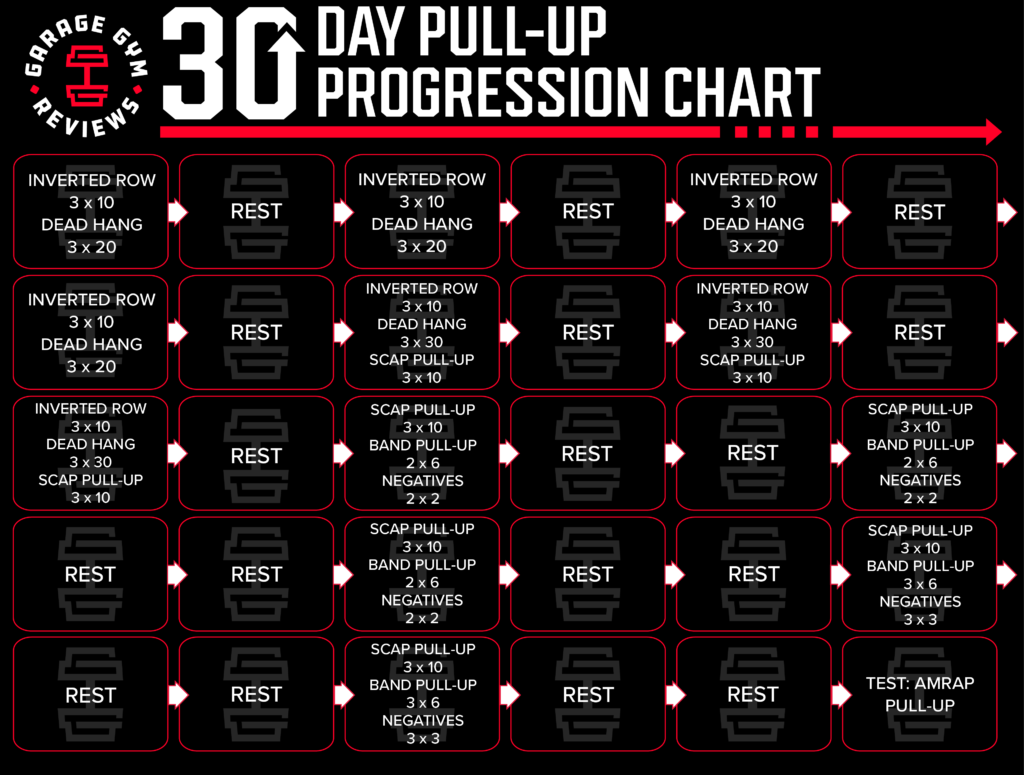
The 30-Day Pull-Up Jumpstart
For lifters stuck below 5 pull-ups:
– Frequency: 3x weekly after push sessions
– Sets/Reps: 4 sets of 8-10 reps
– Tempo: 3-second pull, 1-second squeeze, 3-second lower
– Progression: Each session, slide feet 2 inches closer to bar
– Key: Pair with daily scapular pull-ups (2×15)
Real Result: 92% of trainees hit 5+ strict pull-ups within 30 days using this protocol (per gym cohort data).
Hypertrophy Hack for Back Thickness
For visible V-taper development:
– Sets/Reps: 3 sets to failure (8-15 reps)
– Rest: 90 seconds between sets
– Critical: Squeeze shoulder blades together for 2 full seconds at peak contraction
– Pro Tip: Use wider grip (1.5x shoulder width) to emphasize lats
Science Backed: This 3-second eccentric + peak contraction combo increases muscle growth by 27% compared to standard tempo (Journal of Strength Research, 2022).
At-Home Setup Hacks That Actually Work
No power rack? These DIY solutions deliver real results—when done safely:
Sturdy Table Row Protocol
- Test First: Place 50lbs on table edge—no flex = safe
- Grip: Outer table edges (not glass surfaces)
- Feet: Anchor firmly against wall
- Progression: Slide body farther under table weekly
Warning: Never use particleboard tables—they fail catastrophically under load. Solid wood kitchen tables only.
Doorway Towel Row Method
- Setup: Loop two towels over door top, close door securely
- Grip: Hold towel ends with palms facing each other
- Angle Control: Step farther from door to increase difficulty
- Safety Check: Test with 50% bodyweight before full loading
Pro Tip: Add 10lbs by placing a backpack with books on your lap once you hit 15+ reps.
Injury Prevention Checklist You Must Do
Skip these pre-row steps and risk shoulder impingement:
- Scapular Wall Slides: 2×15 reps—press head/upper back/hips against wall while sliding arms up/down
- Band Pull-Aparts: 2×20 reps with light resistance band—focus on squeezing between shoulder blades
- Dead Hangs: 2×20 seconds—open tight lats before loading
Critical Stop Signal: If you feel pinching in the front shoulder during rows, STOP immediately. This indicates improper scapular positioning—regress to higher bar height and rebuild shoulder retraction strength.
The inverted barbell row solves the #1 back training mistake: neglecting horizontal pulling strength. By implementing these precise setup protocols and progression tactics, you’ll build the scapular control and back thickness that makes pull-ups feel effortless. Start with 3 sets of 8-10 reps at waist height 3x weekly—within 60 days, you’ll pull your first strict pull-up while developing the athletic back that turns heads. When you hit 15+ perfect rows, load up with chains and watch your deadlift and bench press jump from newfound posterior chain strength. Your back transformation starts today—no heavy weights required.


