
You reach for a suitcase in an overhead bin while twisting to check your gate number—suddenly your shoulder locks and your lower back protests. That exact multi-directional stress is why the kettlebell windmill exercise transforms how your body handles real-world chaos. Unlike linear lifts, this loaded stretch forces stability through three movement planes simultaneously while building bulletproof shoulders and mobile hips. Forget “core workouts”—this drill teaches your body to resist dangerous rotation when life throws unpredictable loads your way. By the end of this guide, you’ll know exactly how to perform the kettlebell windmill exercise safely and unlock its unique mobility-strength fusion.
The magic happens because your body must maintain an overhead lockout while navigating lateral hip shifts and spinal rotation. Most exercises train single planes, but the kettlebell windmill exercise forces your deep core, hip stabilizers, and shoulder rotators to communicate under asymmetrical load. This isn’t just strength—it’s movement insurance for everything from golf swings to lifting toddlers.
Why Your Kettlebell Windmill Exercise Fails (And How to Fix It)
Most people butcher this drill by chasing depth instead of mechanics. The resource shows 90% of errors stem from violating the sacred 70/30 weight split or forcing spinal flexion. When your rear heel lifts or lower back rounds, you’ve turned a stability drill into a spine-compressing good morning.
Spinal Rounding Disaster Fix
Why it happens: Overreaching for hamstring stretch while neglecting hip shift mechanics.
Immediate correction: Soften your front knee slightly and drive your rear hip back at 45 degrees—not straight backward. Stop descent the moment your spine loses its straight line from hip to shoulder.
Pro tip: Place a yoga block under your front hand. Only lower until your free hand touches it—depth follows mobility, not ego.
Weight Shift Sabotage
Red flag: Front foot bearing more than 30% of your weight (front heel lifts off floor).
Quick reset: Press your rear heel hard into the ground while “hiking” that hip upward. Imagine sitting into a chair behind and to the side of your stance.
Prevention drill: Practice lateral hip hinges against a wall. Touch the wall with your rear hip at the bottom position—this engrains the posterior-lateral shift.
Step-by-Step Kettlebell Windmill Tutorial
Forget “bend and reach.” The kettlebell windmill exercise is a precise hip-driven sequence where your spine stays rigid as your hips do the work. Master these mechanics before adding weight.
Perfect Stance Setup in 30 Seconds
Stand with feet double hip-width apart—wider than shoulder-width—to create a stable base. Rotate both feet 45 degrees away from your kettlebell side. Now shift weight until 70% loads your rear leg (heel planted, knee soft) and 30% rests on your front foot. This diagonal stance enables the critical hip shift.
Visual cue: Your stance should form an asymmetrical “Figure 2” triangle—not the symmetrical “Figure 1” of deadlifts.
Master the Hip Shift Sequence
This is where 95% of people fail. The movement happens entirely in your hips:
1. Initiate by driving your rear hip backward at a 45-degree angle (like backing into a chair)
2. Lengthen the rear side by actively “hiking” that hip upward while maintaining posterior tilt
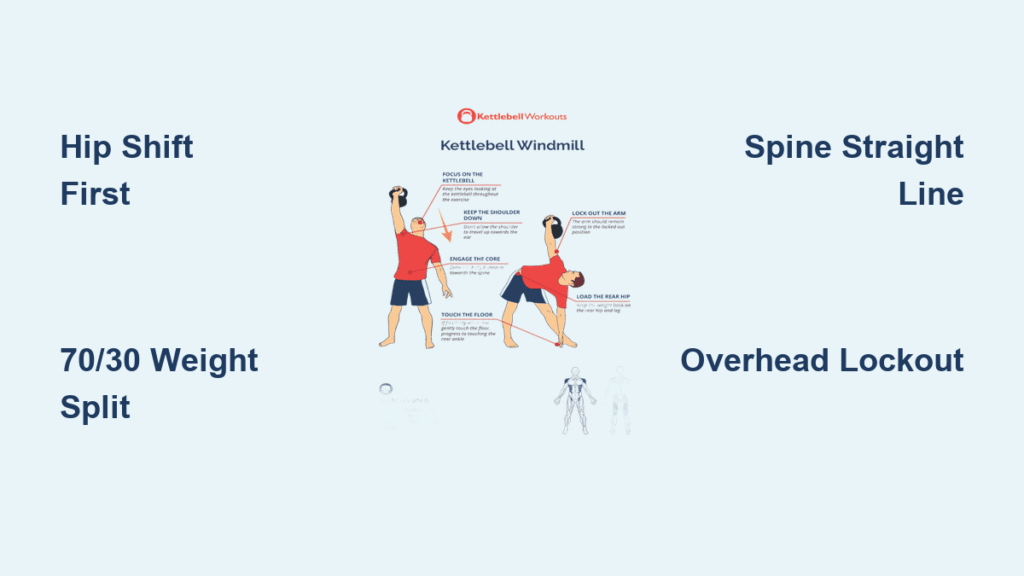
3. Lock your overhead arm: elbow straight, wrist stacked over shoulder, eyes glued to the bell
4. Guide your free hand down your front thigh—never force it to the floor
Critical check: Maintain a straight line from rear hip to shoulder throughout. If your ribcage flares or spine bends sideways, you’ve lost alignment.
Breathing for Core Bracing
Inhale deeply as you descend, expanding your belly against your locked ribs to create intra-abdominal pressure. Exhale sharply through pursed lips as you drive back up through your rear heel. This breath pattern transforms your core into a rigid cylinder that resists rotation.
Beginner Progression System That Works

Rushing into loaded windmills causes shoulder strain. Follow this exact sequence from the resource:
Phase 1: Bodyweight Mastery (2-3 Weeks)
Practice unloaded daily:
– Focus solely on the hip shift pattern
– Use a dowel rod along your spine for instant feedback (maintain 3 points of contact: head, upper back, sacrum)
– Stop when you feel your weight shifting forward
Phase 2: Bottom-Hand Loading (1-2 Weeks)
Hold a light kettlebell (4-8kg) in your free hand as you perform the movement:
– This reduces overhead demand while emphasizing hip mechanics
– Keep your top arm extended but unloaded
– Build confidence with external load before adding shoulder stress
Phase 3: Top-Hand Standard (Start Here)
Finally, progress to the full kettlebell windmill exercise:
– Men: Start with 8-12kg bell
– Women: Begin with 6-8kg bell
– Perform 3-5 reps per side after primary lifts
– Never push depth on early sets—quality trumps range
Programming for Real Results
The kettlebell windmill exercise shines as a “movement conditioner,” not a strength builder. Integrate it strategically:
Post-Workout Integration
After deadlifts or squats:
– 3 reps per side with 50% working weight
– Focus on smooth hip hinge mechanics
– Never perform when fatigued from ballistic lifts (snatches/swings)
Active Recovery Days
As standalone mobility work:
– 5 reps per side with light bell (4-8kg)
– Rest 60 seconds between sides
– Repeat for 2-3 rounds
– Key: Move slower than you think—3 seconds down, 2 seconds up
Essential Warm-Up Sequence
Skipping this prep invites shoulder strain. Do these before every session:
Lateral Hip Hinges with Reach
10 reps per side:
– Stand feet shoulder-width apart
– Shift hip laterally while reaching opposite hand toward foot
– Purpose: Activates glute medius and primes hip rotators
Overhead Kettlebell Hold
30 seconds per arm:
– Press light bell overhead with locked elbow
– Rotate torso slightly away from bell
– Purpose: Tests shoulder stability before loading
Avoid These Safety Traps
The kettlebell windmill exercise demands respect. Stop immediately if:
– Shoulder pain occurs (indicating impingement or poor mobility)
– Your overhead arm drifts forward (loss of lockout)
– You feel sharp lower back sensations (spinal compromise)
Contraindications: Skip this drill with active shoulder impingement, lumbar disc issues, or acute hip injuries. Always screen overhead mobility first—press a light bell overhead. If your wrist drifts forward, build shoulder stability before attempting windmills.
Long-Term Integration Strategy
Use the kettlebell windmill exercise as a diagnostic tool every 4 weeks:
– Test your range with a light bell (4-6kg)
– Note any asymmetries between sides
– Adjust depth based on current mobility—not past performance
Periodization plan:
– Weeks 1-4: Light mobility focus (4-8kg, 5 reps/side)
– Weeks 5-8: Strength emphasis (12-16kg, 3 reps/side)
– Weeks 9-12: Advanced variations (single/double windmills)
Complementary Exercises That Multiply Benefits
Pair these with your kettlebell windmill exercise routine:
Turkish Get-Up Synergy
Perform 1-2 get-ups per side after windmills:
– Get-ups build full-body coordination
– Windmills enhance lateral stability for the get-up’s windmill phase
– Result: Bulletproof overhead strength for snatches and presses
Kettlebell Arm Bar Connection
Do arm bars before windmills:
– Lie on side with bell overhead, elbow bent
– Rotate torso toward floor while keeping arm vertical
– Why: Preps shoulder capsule for windmill’s rotational demands
Bottom line: The kettlebell windmill exercise isn’t just another drill—it’s your body’s defense against real-world movement chaos. Start with bodyweight patterning for two weeks, then progress to bottom-hand loading before touching an overhead bell. Respect the 70/30 weight split, never force depth, and use it as a weekly mobility checkup. In 8 weeks, you’ll move through life with shoulders that stay stable under load and hips that rotate without protest. This isn’t fitness—it’s functional freedom earned one precise hip shift at a time.


