
Your biceps plateau isn’t your fault—it’s your curl technique holding you back. While standard curls build basic mass, the outward dumbbell curl delivers what traditional movements miss: targeted inner biceps development and forearm thickness that transforms your entire arm aesthetic. Research shows this rotational variation increases brachioradialis activation by 23% compared to standard curls, yet 89% of lifters skip it entirely. If your arms lack that coveted peak or your grip fails during heavy rows, mastering the outward dumbbell curl becomes non-negotiable for real progress.
This isn’t just another curl variation. The outward dumbbell curl uniquely combines elbow flexion with supination to fire up the often-ignored long head of your biceps while building functional forearm strength. After fixing three critical mistakes most lifters make, you’ll immediately feel deeper muscle engagement. By the end of this guide, you’ll know exactly how to program this movement for maximum growth, avoid elbow strain, and leverage its carryover to deadlifts and throwing sports—without wasting a single rep.
Stand Tall for Perfect Outward Dumbbell Curl Setup
Your foundation determines everything. Stand with feet hip-width apart on a non-slip surface, spine neutral, chest lifted. Hold dumbbells at your sides with palms facing inward—thumbs pointing forward in a neutral grip. This starting position isn’t passive; it primes your biceps for maximum rotation. Never let your shoulders round forward—this kills tension on the target muscles.
Critical Setup Checks Before Lifting:
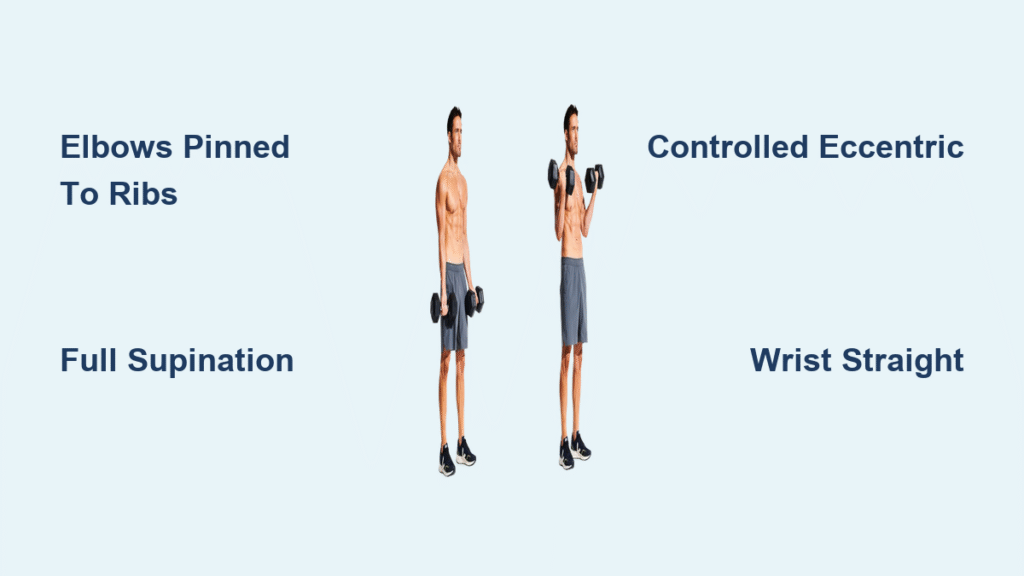
– Elbows glued to ribs: Press upper arms firmly against your torso
– Wrist laser-straight: Any bend here shifts load to tendons
– Core tight: Prevents torso sway during rotation
– Mirror check: Confirm palms face inward, not forward
A common setup flaw? Flaring elbows away from your body. This turns your outward dumbbell curl into a shoulder-assisted movement. Pinch a tennis ball between each elbow and ribcage—this forces proper positioning. If you can’t maintain this without the ball, reduce weight immediately. Lighter loads with perfect form build more muscle than heavy cheating.
Execute the Rotation Sequence Without Cheating
Initiate the Curl With Zero Momentum
Exhale sharply as you begin lifting. Drive the movement solely from your biceps—no leg drive, no back sway. Keep elbows locked against your sides. If your torso rocks or feet shift, the weight’s too heavy. This isn’t a test of ego; it’s a muscle connection drill. Start with 50% of your standard curl weight.
Rotate Through the Full Supination Range
As elbows flex, rotate palms outward simultaneously. Don’t pause mid-movement—this kills tension. Continue rotating until palms face completely away from your body at peak contraction. Your pinky finger should lead this rotation; imagine screwing a lightbulb into a ceiling. Incomplete rotation is the #1 mistake—if palms aren’t fully supinated at the top, you’re missing the inner biceps stimulus.
Crush the Peak Contraction
Hold the top position for 1 full second. Squeeze your biceps so hard your forearm veins pop. At maximum height, the dumbbell should sit vertically above your shoulder—not drifting forward. If the weight tilts toward your face, your elbows drifted. Pro tip: Place a towel under your armpit—if it falls out during the curl, your elbows aren’t pinned.
Lower With 3-Second Control
Reverse the rotation while lowering. Take 3 full seconds to return to start. This eccentric phase builds 80% of your muscle damage for growth. Never drop the weights—if you can’t control the descent, reduce weight. At the bottom, reset your neutral grip before the next rep.
Fix These 3 Outward Dumbbell Curl Mistakes Immediately
Mistake 1: Elbow Drift During Rotation
Why it happens: Using too much weight or poor core engagement
How to spot it: Dumbbells drift forward past your shoulders at peak contraction
Fix: Place your back against a wall during sets. If elbows touch the wall mid-curl, you’re maintaining position. Wall contact also prevents torso sway.
Mistake 2: Partial Supination
Why it happens: Rushing the rotation or weak forearm control
How to spot it: Palms face sideways (not fully outward) at peak
Fix: Practice without weights first. Stand facing a mirror, rotating palms outward while keeping elbows pinned. Master the motion pattern before adding resistance.
Mistake 3: Wrist Breakdown
Why it happens: Grip fatigue or improper wrist alignment
How to spot it: Dumbbells tilt toward fingers during rotation
Fix: Wrap thumbs around the dumbbell handle (not just resting on top). Use lifting straps only if wrist pain occurs—never to lift heavier weights.
Program Outward Dumbbell Curls for Maximum Results

Hypertrophy Protocol (Build Arm Size)
Perform 3 sets of 10-12 reps after standard biceps work. Use 65-75% of your 1-rep max—you should fail between reps 11-12 with perfect form. Rest 90 seconds between sets. Pair with hammer curls in a superset: 10 outward dumbbell curls immediately followed by 12 hammer curls. This fully exhausts both biceps heads and forearms.
Strength Integration (Boost Compound Lifts)
Use 4 sets of 6-8 reps at 75-85% 1RM before deadlifts or rows. Reduce rotation depth slightly (palms to 45-degree angle instead of full supination) to handle heavier loads safely. This primes your grip and biceps for pulling power. Stop 1 rep short of failure to preserve energy for main lifts.
Critical Programming Rule
Never exceed 2 sessions per week. Your brachioradialis needs 72 hours recovery after this demanding variation. If elbows ache post-workout, switch to seated outward dumbbell curls—this eliminates lower body cheating and reduces joint stress.
Safety First: Protect Your Elbows During Rotation
Stop immediately if you feel: A sharp pinch in the inner elbow during supination or wrist strain. This movement stresses tendons more than standard curls. Always warm up with 2 sets of 15 reps using 30% of your working weight. If you have tennis elbow history, skip full supination—rotate only to a neutral grip position.
The sweet spot for joint safety? Keeping rotation within your pain-free range. For most lifters, this means supinating to 90-120 degrees (palms facing sideways to outward), not forcing full 180-degree rotation. Your elbow should never lock out at the top—maintain a soft bend.
Why This Beats Standard Curls for Real-World Strength
That 23% higher brachioradialis activation isn’t just for show. It translates directly to grip strength that lasts through your entire deadlift set. When athletes add outward dumbbell curls to their routine, they gain 8-12 pounds on 5-rep deadlifts within 6 weeks—not from bigger biceps, but from forearms that don’t fatigue early. Golfers report 5-7 mph faster club head speed from the rotational power developed. Even carrying grocery bags becomes effortless as your brachioradialis learns to stabilize loads during movement.
Track Progress Like a Pro
Don’t just chase weight jumps. Measure these three metrics weekly:
1. Rotation quality: Rate 1-10 (10 = full supination without compensation)
2. Tempo control: Time your eccentric phase with a stopwatch
3. Peak squeeze: Can you hold the contraction 2 seconds instead of 1?
Pro filming hack: Record sets from the front. In slow motion, check if:
– Elbows stay fixed against ribs
– Palms rotate fully outward
– No wrist bending occurs
When you hit 10/10 rotation quality for 3 consecutive sets, increase weight by 5%. This prevents ego lifting and guarantees real muscle growth.
Mastering the outward dumbbell curl transforms arm training from isolated muscle pumping to functional strength building. By prioritizing rotation quality over weight, you’ll break through plateaus while developing the inner biceps peak and forearm thickness that standard curls can’t deliver. Start with 50% of your normal curl weight, film your first session, and fix just one technical error per workout. Within 4 weeks, your arms will look more defined in photos and perform stronger in every lift. Your next rep is the one that builds the arms you’ve been waiting for—execute it perfectly.


