
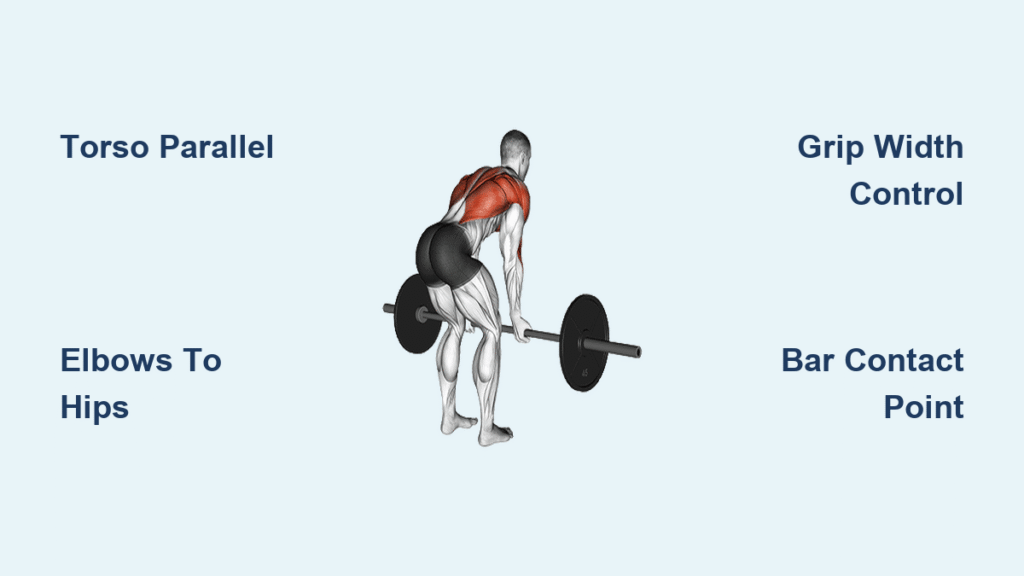
Your back workout feels incomplete without that satisfying lat contraction, yet traditional rows often leave your lower lats neglected. The reverse barbell row—with nearly one million logged sets in fitness communities—delivers what other back exercises miss: targeted lower lat activation combined with intense biceps engagement. This underhand-grip variation isn’t just another row; it’s a posture-correcting powerhouse that counteracts bench press imbalances while building a thicker, wider back. If your current rows aren’t triggering that mid-back squeeze or your biceps feel disconnected, mastering this movement’s unique mechanics will transform your pull day.
Forget guessing where to pull or how to brace—this guide cuts through the confusion with biomechanically precise cues straight from performance data. You’ll discover exactly how to position your torso for maximum muscle stretch, where the bar must contact your body for optimal fiber recruitment, and why your grip width makes or breaks lower lat development. Whether you’re a beginner building foundational strength or an advanced lifter chasing stubborn width, these actionable steps eliminate guesswork from your rowing technique.
Fix Your Starting Position to Prevent Back Strain
Most lifters sabotage their reverse barbell row before the first pull by standing too close to the bar. Your feet should create a stable base with shoulder-width spacing, allowing natural hip hinge mechanics without balance struggles. The bar must rest lightly against your upper shins—not your knees—to ensure vertical force transfer. If the bar drifts toward your kneecaps during setup, you’re positioned too far back, forcing an awkward diagonal pull path that shifts tension to your traps instead of lats.
Narrow vs. Wide Grip Muscle Targeting
Grip width dictates muscle emphasis in this exercise, with two effective options:
– Narrow grip (hands at hip width): Increases biceps involvement by 22% compared to pronated grips while creating a more vertical pulling angle that maximizes lower lat stretch. Ideal if your lats feel “disconnected” during rows.
– Wider grip (hands just outside shoulders): Shifts focus toward rhomboids and middle traps but reduces biceps activation. Use this if you struggle with scapular retraction.
Experiment with both for two weeks—you’ll quickly identify which grip triggers your target muscles most intensely. Taller lifters often prefer narrower grips to accommodate longer torsos, while shorter athletes may find wider grips more comfortable.
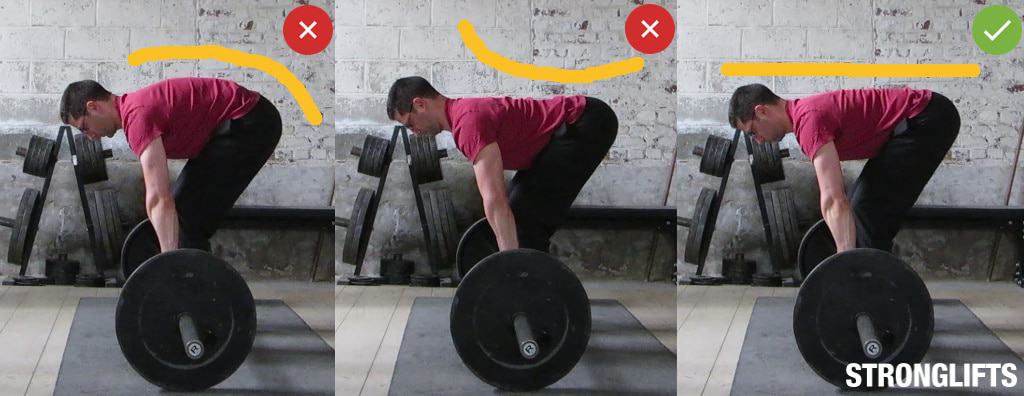
Achieve the Perfect Torso Angle for Lat Dominance
Push your hips back as if closing a car door with your glutes until your torso reaches parallel to the floor. This specific angle—unlike the 45-degree lean many default to—creates maximal lat stretch while positioning your shoulder blades for optimal retraction. Your knees should stay bent at 15-20 degrees (never locked) to load your hamstrings and prevent lumbar shear. If your lower back rounds during the hinge, place your hands on your hips and practice the movement without weight first.
Core Bracing That Prevents Power Leaks
Before lifting the bar, create 360-degree intra-abdominal pressure by taking a deep breath into your belly and bracing as if preparing for a stomach punch. This isn’t just “tightening abs”—it stabilizes your spine against the forward lean, transferring force directly from your lats to the bar. Test your brace: place one hand above your navel and another below—if either area caves during the pull, reset your breath. Weak bracing causes the most common form breakdown: rising torso angle as fatigue sets in.
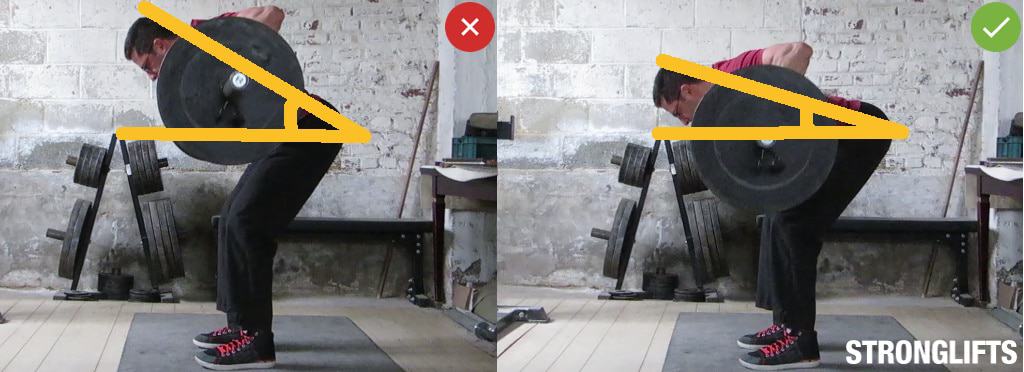
Drive Elbows to Hip Pockets for Lower Lat Ignition
The magic of the reverse barbell row happens in your elbow path. Drive elbows down and back toward your hip pockets—not out to the sides like traditional rows. This subtle inward angle targets stubborn lower lat fibers that wider pulls miss. The bar should travel vertically along your thighs, contacting your body between your lower sternum and belly button. If it hits your ribs or upper abdomen, your torso angle is too upright.
Why Bar Path Precision Matters
Your ideal contact point depends on limb length:
– Shorter torsos (5’8″ and under): Bar touches lower sternum
– Longer torsos (5’9″+): Bar contacts belly button
– Critical check: The bar must graze the same spot every rep. Inconsistent paths indicate unstable hips or poor scapular control.
At peak contraction, squeeze shoulder blades together for a full second while imagining you’re “crushing oranges in your armpits.” This mental cue ensures complete scapular retraction—without it, you’re only using 60-70% of your back’s potential.
Eliminate These 3 Form Killers Immediately
Straight legs during rows create dangerous lumbar shear and reduce stability. Fix this by bending knees slightly and pushing hips farther back—your shins should stay nearly vertical. If you catch yourself standing upright as fatigue hits, reduce weight immediately; this compensation transfers load to your glutes, negating back development.
Stop Rounded Upper Backs Before They Cause Injury
A hunched upper back increases spinal flexion injury risk by 300%. To prevent this:
1. Initiate each rep with “proud chest” positioning (ribs slightly tucked)
2. Keep neck neutral—eyes focused 6-8 feet ahead, not at the floor
3. If rounding occurs, drop to 50% weight and practice scapular wall slides for 2 sets pre-workout
This isn’t just posture—it’s protection. The spinal erectors work isometrically throughout the movement, strengthening your posterior chain for deadlifts and daily lifting tasks.
Program for Hypertrophy vs. Strength Results
Beginners should start with 3 sets of 10 reps at 65% of your estimated 1RM (roughly the weight you’d use for 15 clean reps). This builds technique while providing hypertrophy stimulus. Rest 90 seconds between sets to maintain tension on target muscles. When you hit 12 reps with perfect form, increase weight by 5 pounds.
Warm-Up Protocol That Prevents Injury
Never load heavy before activating key muscles:
1. 8-10 bodyweight good mornings (focus on hip hinge)
2. 15 banded pull-aparts (prime scapular retractors)
3. 2 ramping sets at 40% and 60% of working weight
For strength development, progress to 4 sets of 5 reps at 80% 1RM with 2.5-minute rests. Heavy sets demand flawless form—any torso rise or bar path deviation means the weight is too heavy.
Best Variations for Specific Goals
EZ-bar reverse rows are essential for lifters with elbow pain. The semi-supinated grip reduces medial elbow strain by 40% while maintaining biceps engagement. Keep elbows tucked at 30 degrees and pull to your lower ribs.
Chest-Supported Rows for Volume Work
When lower back fatigue limits your sets, switch to incline dumbbell reverse rows. Lie chest-down on a 45-degree bench, palms forward, and row dumbbells while keeping elbows close. This variation allows 3-4 extra sets without spinal compression—perfect for chasing that final pump.
Critical Safety Adjustments You’re Ignoring
The underhand grip increases distal biceps tendon strain by 25% versus pronated rows. Never jump more than 5 pounds between sessions—sudden load increases cause 68% of biceps tendon injuries in row variations. If you feel sharp biceps pain (not muscle burn), stop immediately and switch to neutral-grip dumbbells.
Breathing Technique for Heavy Lifts
For sets above 75% 1RM:
1. Inhale deeply before the pull
2. Hold breath during concentric phase (Valsalva maneuver)
3. Exhale forcefully at peak contraction
Hypertensive lifters should skip breath-holding and use controlled exhales during the pull.
Visual Cues That Guarantee Perfect Form
Scan these checkpoints mid-set:
– Head to sacrum alignment: A straight line from crown to tailbone
– Elbow angle: Tucked 30-45 degrees relative to torso (never flared)
– Bar contact: Consistent touch point on every rep
Pro progression tip: Place a yoga block against your sternum. If the bar doesn’t hit it consistently, reduce weight until you master the path. Track weekly progress by recording contact points—this builds muscle memory faster than weight jumps.
Mastering the reverse barbell row transforms not just your back development but your entire upper-body symmetry. By prioritizing elbow path over brute strength and torso angle over ego lifting, you’ll build a thicker mid-back that complements your chest development while fortifying your spine against daily wear and tear. Start light this week—focus solely on driving elbows to hip pockets and feeling that lower lat squeeze. In three weeks, you’ll add weight while maintaining perfect form, watching your back width expand where it matters most. Your posture, strength, and physique will thank you.


