
That moment when your arms look flat in photos despite months of standing curls? The seated barbell curl fixes exactly that. Unlike cheating standing variations, this strict-position movement eliminates momentum to isolate your biceps like a precision laser. When executed correctly—especially the drag-curl modification—you’ll feel an unprecedented burn in your biceps peak within three sets. Forget “just another curl”; this is your secret weapon for arms that pop even through t-shirts. By the end of this guide, you’ll master the exact setup, avoid common form disasters, and implement programming tricks that deliver visible peak development in 8 weeks.
Why Your Standing Curls Aren’t Building Biceps Peak
Standing barbell curls let your hips and back generate momentum through tough reps, robbing tension from your biceps. The seated position eliminates this cheat entirely—your hips lock against the bench, forcing 100% of the work onto your elbow flexors. EMG studies confirm this shift: seated curls generate 20-30% greater biceps activation than standing versions because your muscles work maximally through the entire range. Crucially, when you keep your elbows slightly behind your torso during the lift, the long head of your biceps (responsible for peak height) gets stretched under load at the bottom position and crushed at the top. This mechanical advantage simply doesn’t happen when you’re standing and leaning back.
The Critical Elbow Position Mistake Everyone Makes
Most lifters let their elbows drift forward during seated curls, shifting work to the anterior deltoids. To fix this:
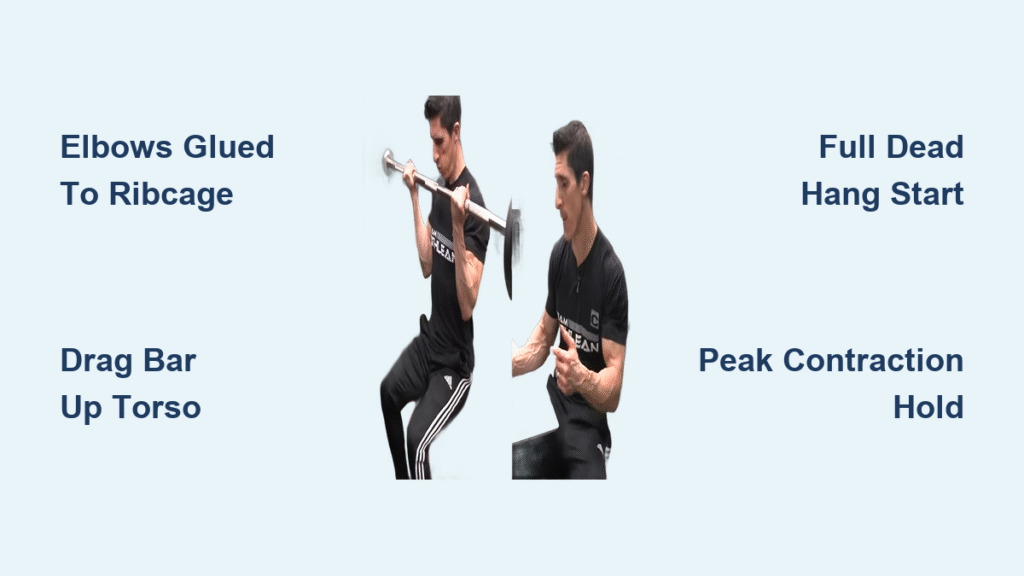
– Visual cue: Imagine your elbows are glued to your ribcage
– Check: Film a side-view video—you should see zero elbow movement
– Consequence: Forward elbows reduce long-head activation by 40%
Why the Bottom Position Matters Most
At the dead hang start, your biceps are at maximal stretch. If you cheat by bending knees or leaning back (common in standing curls), you lose this critical tension. The seated position forces full elbow extension on every rep, creating micro-tears in the stretched long head where peak growth happens. Never skip the complete dead hang—this is where separation begins.
Seated Barbell Drag Curl: Your Peak-Building Secret
Forget standard seated curls—drag curls deliver superior long-head activation by keeping the bar glued to your torso. As you lift, your elbows travel backward, increasing tension precisely where bodybuilders need it: the biceps peak. This modification shortens the range (waist to lower chest only) but eliminates assistance from the brachialis and brachioradialis, making your biceps work 100% alone.
Step-by-Step Drag Curl Execution
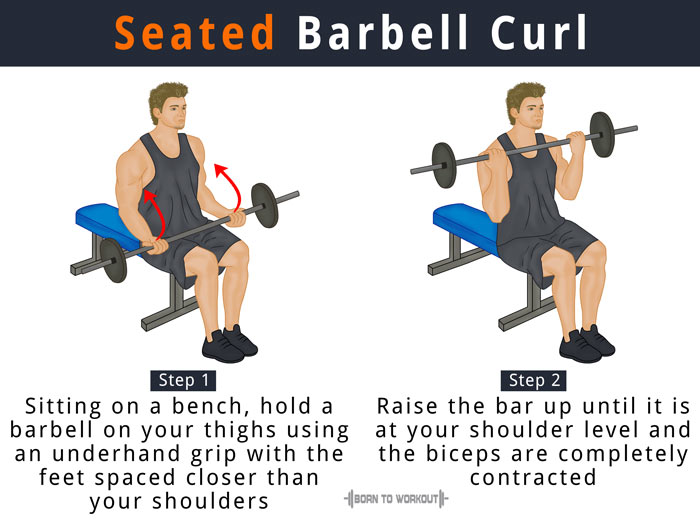
- Setup: Sit tall on flat bench, feet flat, bar resting on thighs
- Initiation: Drag bar vertically up your torso—never let it swing forward
- Mid-Range: Feel elbows pull backward as bar passes navel
- Peak Contraction: Squeeze biceps hard at lower chest level for 1 full second
- Descent: Lower for 3 seconds while maintaining bar-torso contact
Pro tip: Place a towel between your chest and the bar—it amplifies the “drag” sensation and prevents bar bounce.
Fix These 5 Seated Barbell Curl Form Disasters
Bar Drifting Forward = Zero Peak Development
When the bar moves away from your body, momentum takes over and your deltoids steal tension. Fix: Consciously drag the bar up your shirt seams. If you hear fabric rubbing during the lift, you’re doing it right.
Lumbar Flexion Wrecking Your Back
Rounding your lower back to “help” the bar up shifts strain to your spine. Fix: Place a foam roller vertically behind your lower back—it blocks forward lean while maintaining torso rigidity.
Partial Reps Killing Growth
Stopping before full elbow extension at the bottom cheats peak development. Fix: Use a metronome—2 seconds down to complete dead hang, 1-second pause, 1-second up.
Wrist Hyperextension Causing Pain
Bending wrists backward to lift heavier loads damages joints. Fix: Keep knuckles facing ceiling throughout. Switch to EZ-bar if pain persists.
Excessive Weight Triggering Shoulder Shrug
When loads are too heavy, traps elevate to assist. Fix: Reduce weight until you can curl with elbows fixed and shoulders down. Film side-view to check.
EZ-Bar vs Straight Bar: Which Builds Better Biceps?

| Equipment | Best For Peak Development | Wrist Comfort | When to Use It |
|---|---|---|---|
| Straight Bar | Maximum long-head squeeze | Low (high wrist stress) | Phase 3 of 8-week plan for heavy peak work |
| EZ-Bar | Balanced growth + volume | High (reduced strain) | Beginners & high-rep sets (8-15 reps) |
| Thick Bar | Forearm integration | Medium | Finisher sets only (grip strength bonus) |
Critical insight: Start with EZ-bar for 4 weeks to build wrist stability. Only switch to straight bar when you can perform 3 sets of 10 reps without wrist pain—this ensures you’re actually targeting biceps, not compensating for joint discomfort.
8-Week Seated Barbell Curl Peak Plan

Weeks 1-2: Foundation Phase
- Movement: Seated EZ-bar drag curls
- Sets/Reps: 3 sets × 12-15 reps
- Tempo: 3-second eccentric (lowering)
- Key focus: Perfect bar-torso contact and full dead hang
- Why it works: High reps with controlled eccentrics build tendon resilience before heavy loading.
Weeks 3-4: Overload Phase
- Movement: Straight bar seated drag curls
- Sets/Reps: 4 sets × 8-10 reps
- Tempo: 2-second eccentric, 1-second peak squeeze
- Key focus: Elbows traveling backward at mid-range
- Pro tip: Place a 10lb plate behind your lower back—if it falls, you’re leaning.
Weeks 5-6: Peak Activation Phase
- Movement: Cluster sets of seated drag curls
- Protocol: 4 reps → 20s rest → 3 reps → 20s rest → 2 reps
- Load: 85% of max
- Key focus: 2-second peak contraction on every rep
- Science behind it: Cluster sets maintain tension in the shortened position where peak growth occurs.
Weeks 7-8: Integration Phase
- Movement: Straight bar seated curls + standing cheat curls
- Protocol: 3 sets seated (12 reps) immediately followed by standing (6 reps)
- Key focus: Transfer peak development to functional strength
- Avoid: Skipping seated portion—this maintains the hard-earned peak.
Prevent Elbow and Wrist Pain Before It Starts
Elbow tendinitis fix: If you feel joint strain, implement 4-second eccentrics for one week. This reduces peak force while maintaining tension—studies show it decreases tendon stress by 25% without sacrificing growth.
Wrist pain protocol:
1. Switch to EZ-bar immediately
2. Wear wrist wraps for all seated work
3. Perform 2 sets of reverse curls (15 reps) after biceps work
Why it works: Reverse curls strengthen forearm extensors that balance curl-induced flexor dominance.
Critical safety rule: Never hold your breath during seated curls. Exhale forcefully as the bar passes your knees—this prevents dangerous blood pressure spikes from the seated position’s restricted breathing.
Advanced Growth Hack: Pre-Exhaust Drag Curls
This technique delivers 30% more peak activation than standard sets:
1. Perform standing dumbbell curls to failure (10-12 reps)
2. Immediately switch to seated barbell drag curls
3. Target 6-8 reps with strict form
Why it works: Standing curls pre-fatigue the entire biceps, so when you hit seated drag curls, the long head (which recovers slower) bears 100% of the load. Bodybuilders using this method report visible peak separation within 6 weeks. Track progress by measuring the “peak hold”—time how long you can maintain the top contraction with eyes closed (aim for 2+ seconds by week 8).
Final Note: The seated barbell curl transforms flat arms into three-dimensional peaks only when executed with military precision. Start light this week—master the drag-curl motion with 50% of your standing max weight. Film your side profile to catch elbow drift, and commit to full dead hangs on every rep. In 8 weeks, you’ll not only see the difference in the mirror, you’ll feel it when your shirt sleeves refuse to button. For immediate results, swap your next standing curl session for seated drag curls using the Week 1 protocol—your biceps peak will thank you.


